Charm Jelly Roll Friendship Quilt Tutorial & Simply Color Giveaway

My mom, Grandma Jane, is back with another one of her wonderful quilting tutorials and a fabulous giveaway of V & Co’s new line for Moda ‘Simply Color‘. Take it away Mom…..


I don’t like goodbyes and I had a tough one a few weeks ago when I had to say goodbye to a dear friend and co-worker who moved. Lori and I had worked side by side for almost 12 years and she was a part of my day to day work life in a big way! We worked so closely together on projects through the years that we were almost like an old married couple who begins to finish each other’s thoughts and sentences. Crazy, I know but it was a comforting feeling to work with someone who I knew so well!

Besides being incredibly smart and talented in the work setting, Lori is a woman of great personal strength, faith and integrity. She always made me laugh, (many times to the point of tears), with her stories about her family and kids. We shared lots of sad tears too, as we both have lost our precious mothers in recent years. She knew immediately what I was feeling when I said I missed my mother and she could say just what I needed to hear at that moment. I knew I wanted to make her a quilt as a goodbye gift—what better way to surround a good friend with a warm hug even when she is far away!

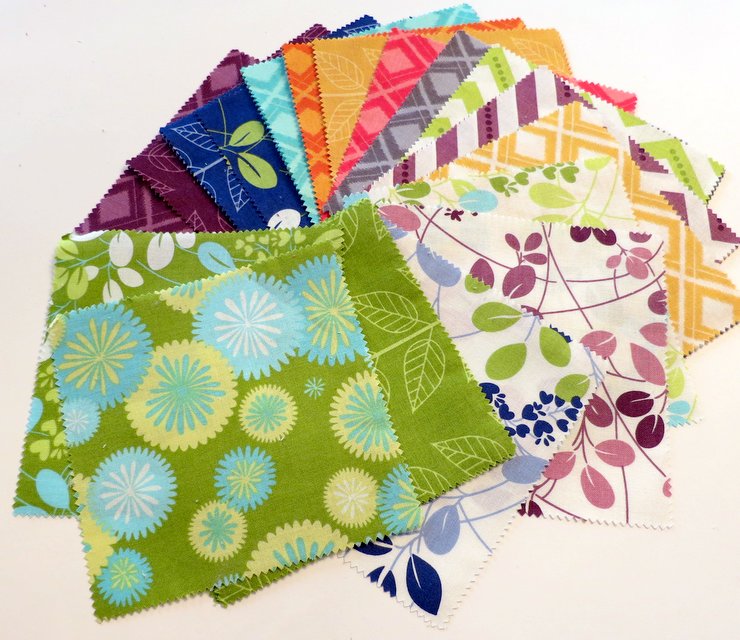
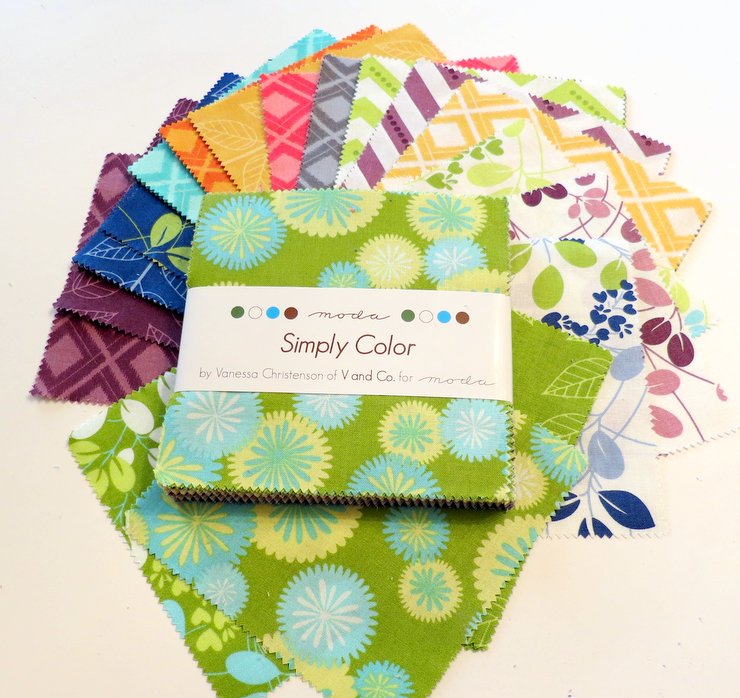
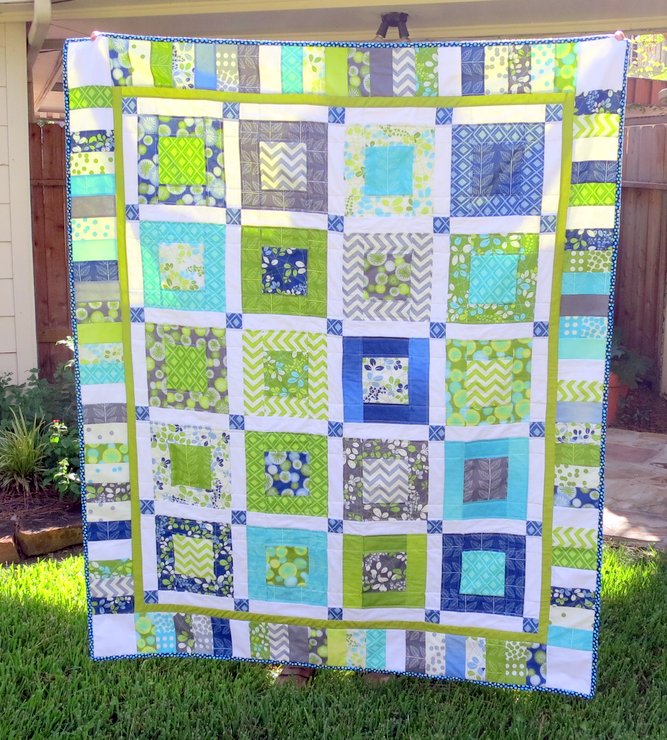
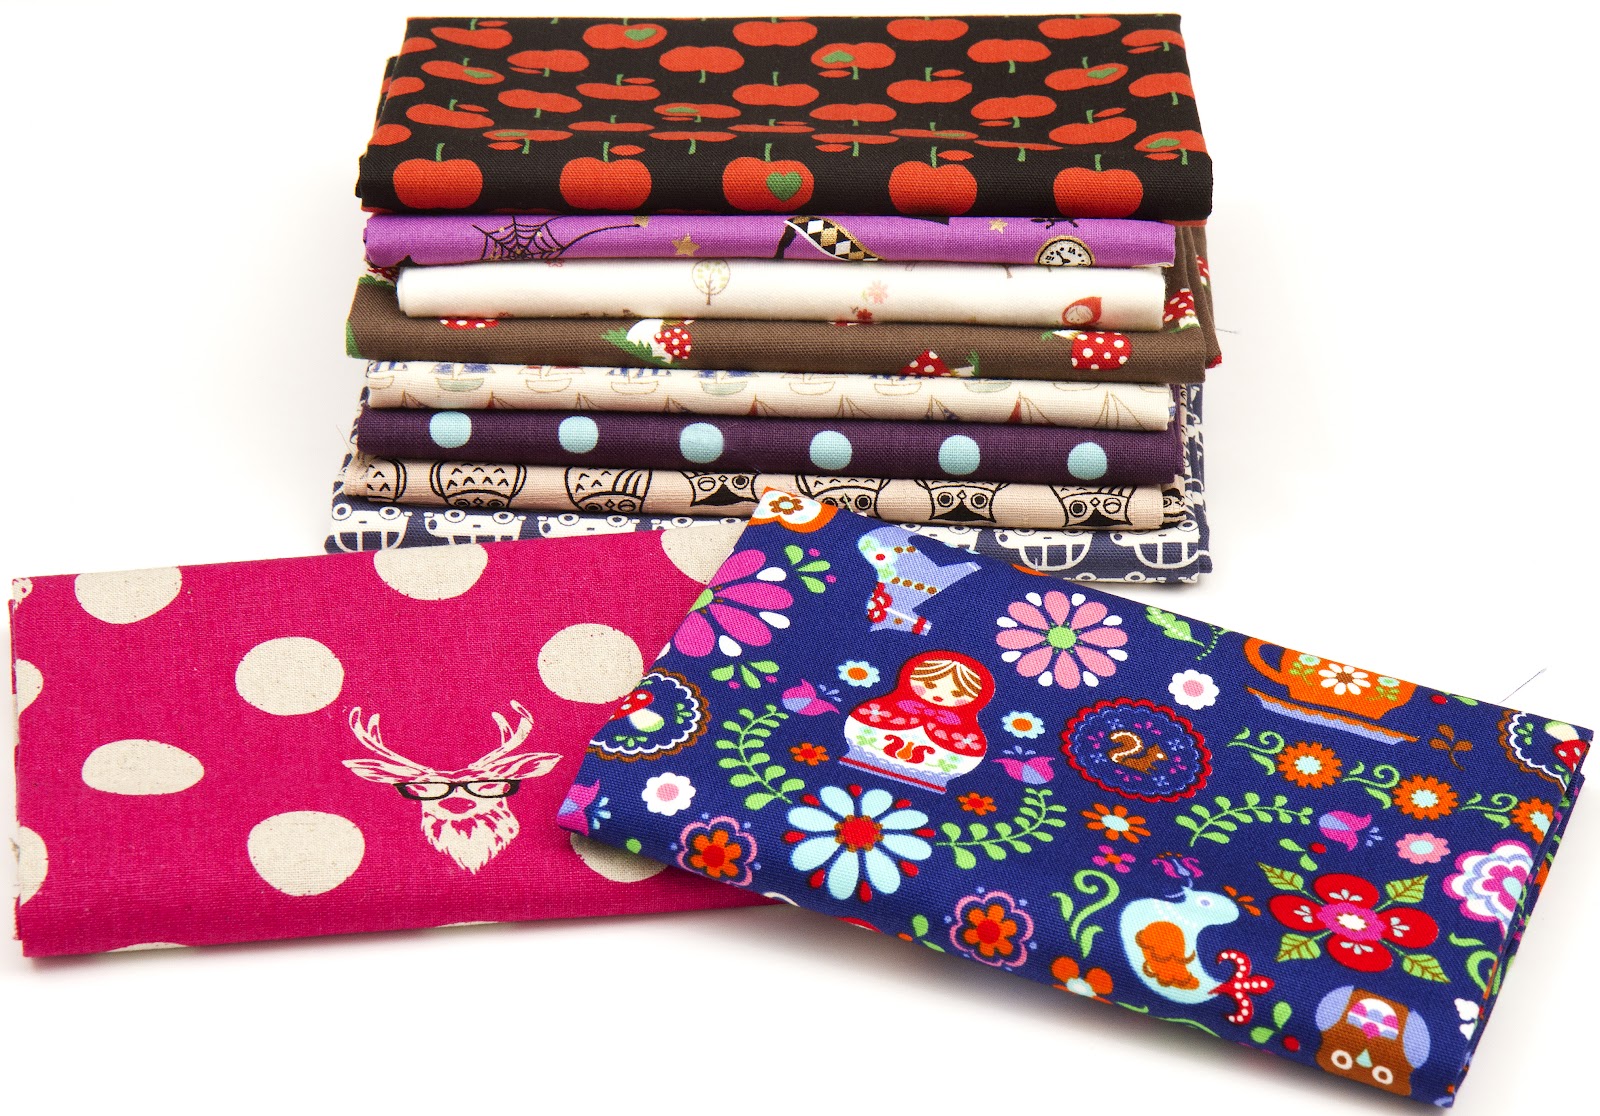
The cheery, happy colors of the new line, Simply Color by V and Co, were perfect! I chose the green, blues and greens for Lori’s quilt. I am going to save the orange, pink, gold and purple for another project.

Precuts of a charm pack and jelly roll come together so easily for this quilt. This finished throw size quilt measures 50 inches by 60 inches.

Choose 20 charms you want to use and pair up with 20 of the jelly roll strips, making sure you have good contrast between the charm and the jelly roll strip.

Cut off selvages for each strip. Stack two strips to speed up cutting.

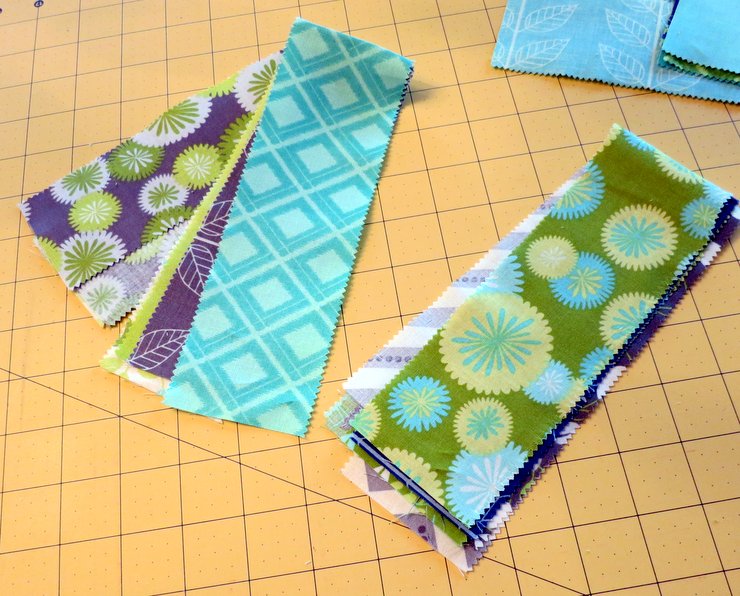
Cut each folded jelly roll strip into a 5 inch strip and a 9 inch strip. Each strip gives you two 5 inch and two 9 inch pieces. Set aside the remainder 15 inch piece to use for a piano key pieced wide border.

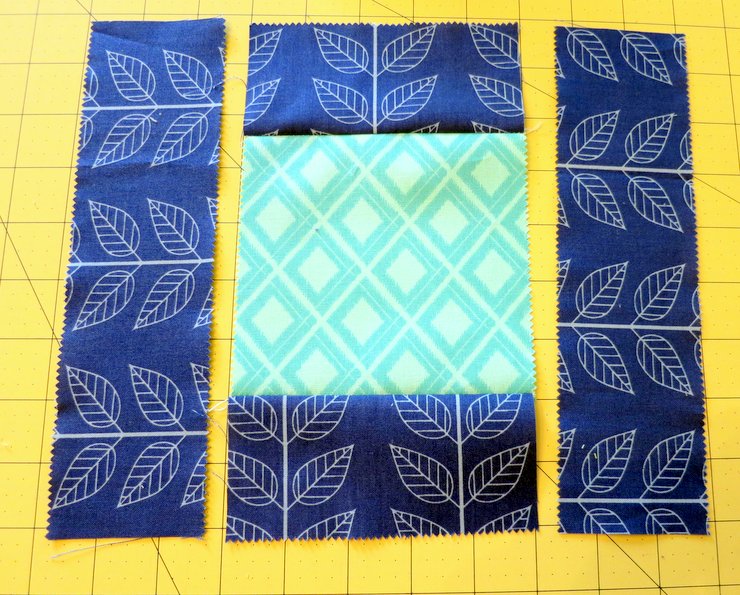
Sew the 5 inch strips to the bottom and top of the charm. Press. Sew the 9 inch pieces to the sides. Press.

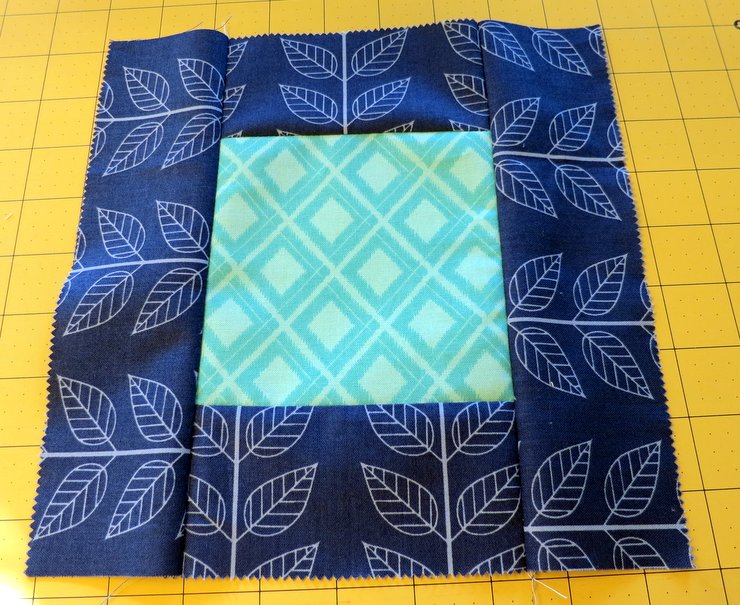
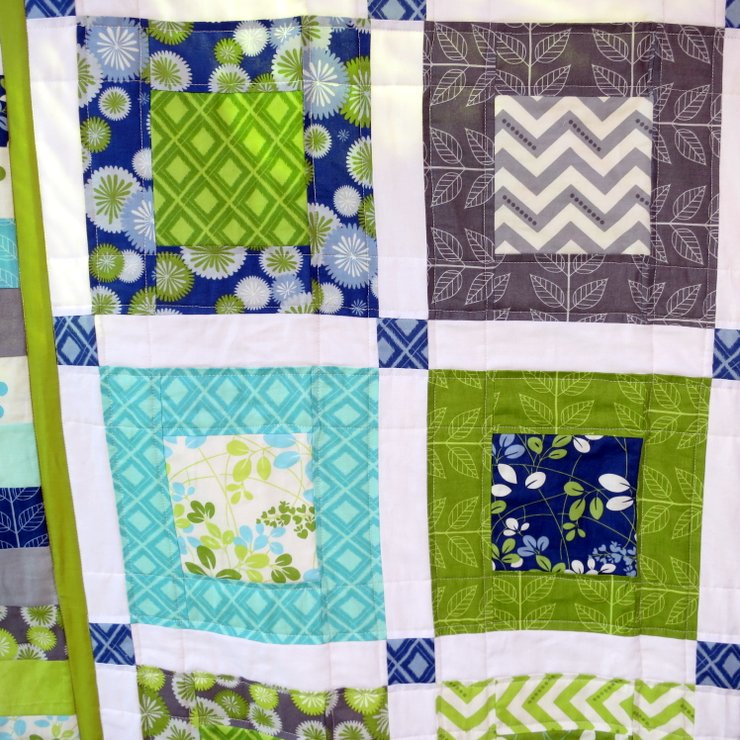
Trim each block to 9 inches. Arrange blocks in rows of 4 blocks x 5 blocks.

I don’t have pictures of the sashing steps but it is easy….First, cut (49) 2” x 9” sashing strips.

Sew vertical sashing strips to the sides of the blocks in each row of 4 blocks. (5 sashing strips in each row).

Cut (30) 2” x 2” cornerstones and sew to horizontal sashing strips. Start and end with the small cornerstones. (4 sashing strips in each row).

Sew the long horizontal cornerstone/sashing strips to the vertically sashed rows, matching seams carefully. Sew rows together.

Sew narrow border strips (1 ½ inch wide) to bottom, top and sides.

Arrange the extra 15”strip pieces together in a pleasing color combo, and sew strips together in sections. I used some extra jelly roll strips and added in some strips of the same white that I used for the sashing to get the length I needed. You will need 21 piano keys on the bottom and top borders and 26 piano key pieces on the sides. You may need to play around with this to get the color arrangement and length you want.

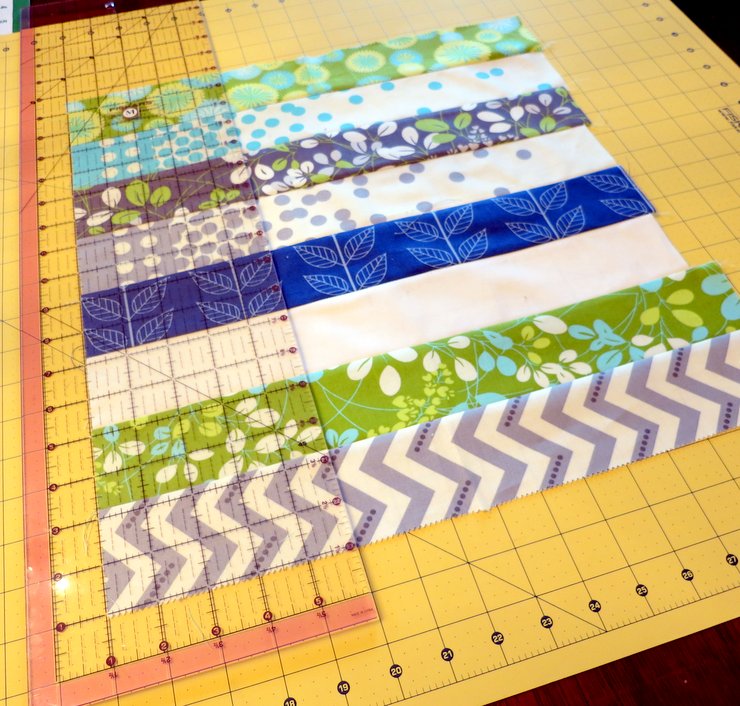
Sub cut the sewn strips into 5 inch wide sections. You can cut the piano key border in more narrow sections if needed.

Use 5 x 5 inch squares as cornerstones for the border. If you cut the piano key border less than 5 inches, adjust the size of the squares. IE… if you are using a 4 ½ inch wide border, cut your border cornerstone squares 4 ½ x 4 ½ inches instead of 5 inches.

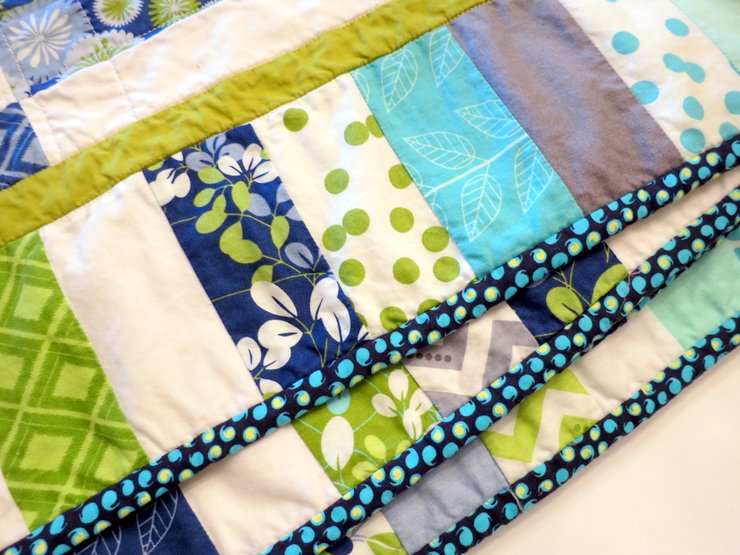
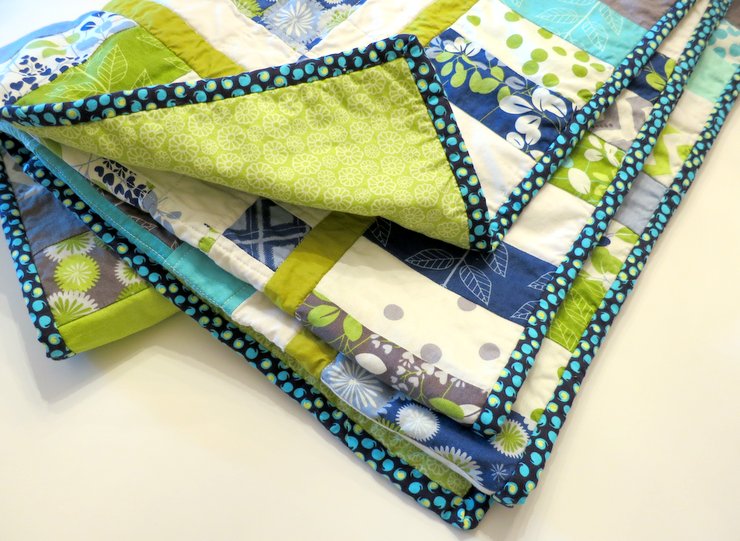
Sandwich, baste, quilt and bind. I quilted using straight lines both vertically and horizontally. (The binding fabric is from Amy Butler’s Lark and the backing is a JoAnn’s fabric). To view more of Grandma Jane’s tutorials, including sandwiching, basting, quilting and binding, click HERE.

 Wash and dry so your quilt is all warm and snuggly and ready to be mailed off! 

How would you like to have some of the “Simply Color” fabric to make a special friend a simply wonderful quilt to show them how much you love and adore them?

Enter to win TWO CHARM PACKS AND A JELLY ROLL of “Simply Color” with a comment (or two, three or four).

To enter the giveaway, do one or all of the following (please leave a separate comment for each entry):

1. Tell us about that special friend or person in your life who helps you get through your day with lots of smiles and laughter.
2. Become an official follower of The Cottage Home Blog (Google Friend Connect, Email or RSS Feed).
3. Become a fan of The Cottage Mama on Facebook (click here).
4. Share this giveaway with your friends on Facebook or on your own blog.

Giveaway open to US Residents only.
Giveaway open until Thursday, September 20, 2012 at Midnight (CST).

*Giveaway is now CLOSED*

So there you have it! There are four chances to enter to win and make your very own Jelly Roll Friendship Quilt.

What a blessing those friends are in our lives. Thank you, Lori, for all the laughter and even the tears we shared! Miss you lots!

Thanks for guest blogging, Mom ~ you are simply the best!

The Lolly Dolly Pillow Tutorial


Hi, I’m Lindsay from The Cottage Mama and I’m thrilled to be back with you again today sharing my most recent design team project.  Deciding which fabric line to use for this tutorial was so darn difficult as I wanted to use just about all of the new lines that were coming out.  So I decided to post the lines I was considering on The Cottage Mama Facebook Fan Page and let the fans vote for their favorite.  It was a pretty close call, but we finally settled on ‘Dress Up Days‘.  I think this line is absolutely adorable in every way and I’m thrilled to be able to share this project with you today…….The Lolly Dolly Pillow.

Dress Up Days‘ has this wonderful panel in three different colorways that is meant to be used to make a doll that you can dress up in several different outfits (so cute).  But I wanted to try to use this panel in a little bit different way and decided to turn it into a pillow.  I hope you like what I came up with today.

The Lolly Dolly Pillow
by The Cottage Mama for Riley Blake Designs
Supplies:
1 Panel from ‘Dress Up Days‘ by Riley Blake Designs
Fat Quarter or 1/2 yard ~ 3 different prints
Fat Quarter ~ Cream colored fabric
Double sided fusible interfacing
1-2 yards rickrack trim
Fiberfill or other stuffing
Basic sewing supplies
Instructions:
Cut your pieces.
For the doll:
From the panel, you will need to cut out the front and back of the doll as well as the front and back of both arms and legs.  Also, cut out the head sash piece if you would like to use that.
 
For the ruffle:  
Cut 4 strips 3″ x Width of the fabric.
For the pillow:
Cream Fabric: Cut 1 piece 12″ x  8″
Purple Fabric: Cut 2 pieces 8″ x  5″
Chevron Front: Cut 2 pieces 20″ x 6″
Chevron Back: Cut 1 piece 20 x 18″
To make the ruffle around the edge of the pillow.  Cut 4 strips of fabric measuring 3″ x width of the fabric.  Sew each of the strips of fabric together at the short ends to make one long round of fabric.
Press the strip in half with the wrong sides facing each other, lining up the raw edges.  Run a gathering stitch around the entire ruffle piece and gather to fit the back of the pillow.

If you are not familiar with a gathering stitch, you need to set your stitch length to the longest setting (mine is 5.0) and increase the tension on your machine.  Run a stitch about 1/4″ from the edge all the way around the fabric and then pull one of the threads to gather.  Make sure you do not back stitch at the beginning or end otherwise your fabric will not gather.  Another note……make sure you are using polyester thread for this project as cotton thread will break when pulled for gathering.

To construct the pillow front.  Place one piece of the purple fabric with the right sides together against the cream fabric, lining up the raw edges.  Sew using a 1/2″ seam allowance.  Sew one piece to the top of the cream and the other to the bottom.
Press open the seams at the top and at the bottom.
For the sides of the pillow front.  Place a piece of the chevron fabric with the right sides together against the center panel (purple and cream).  Line up the raw edges and sew using a 1/2″ seam allowance.  Do this for both sides.
You will end up with a piece of chevron fabric on each side of the center panel.  Press your seams open.
If you would like to add some trim, this would be a good time to do so.  I added some orange rickrack trim over the seam between the chevron fabric and the purple and cream.  You could use ribbon or buttons or whatever embellishment suits your fancy.
Now for the doll, place all the ‘limb’ pieces with their right sides together and sew around the edges using a 1/4″ seam allowance.  Do this for both arms and both legs, leaving the short edge open for turning right side out.  For the body, place the right sides together and stitch all the way around, but leave a small 2″ opening for turning.  Clip around any curves to remove bulk and to make sure the curves are smooth.  Turn all pieces right side out and press.
Use fiberfill or any stuffing material you like and stuff each one of the limbs.  Try to get them pretty full.  This will take a lot more stuffing than you would imagine!  Do not stuff the body piece.
Sew the raw edge of the limbs closed so none of the fiberfill will escape.
Cut a piece of double-sided fusible interfacing the exact size of the doll body and apply it (according to package directions) to the back of the doll.  If you are going to use the head sash piece, fold it in half with the right sides together and stitch down both short sides and the long side, but leave a little opening in the middle of the long end for turning.  Turn right side out and press.  Edge stitch the head sash piece to close the opening
Position the doll on the front of the pillow.  Her smile should be right about where the purple and the cream fabric come together.  Place the raw edges of the limbs under the body and place the head sash under her head.  Make sure you like the angle of the head sash and the way that it ties before this next step.
Using your iron, press the doll body to the pillow front as this will fuse it to the pillow.  This might feel a little trick, but do the best that you can trying to work around the limbs.  Pin the limbs and body to make sure nothing moves for the next step.
Sew using an 1/8″ – 1/4″ edge stitch all the way around the body.  Leave the head sash open until you’ve sewn around the body.  Make sure to catch all the raw edges of the limbs under the body.  Then place a few hand stitches in the very tops of the hands to hold them in place.
Pin your ruffle around the edge of the pillow front or back (either is fine), lining up the raw edges.  Baste stitch to hold the ruffle in place using a 1/4″ seam allowance.
Place the pillow front on top of the pillow back with the right sides together.  Sew all the way around the pillow using a 1/2″ seam allowance, making sure to leave a 4″ – 5″ opening for turning the pillow right side out.  Clip corners, turn right side out and press.
Stuff your pillow with fiberfill or other stuffing material making sure to work the stuffing into all the corners.  Close the bottom of the pillow by hand sewing it shut.
Isn’t she just so sweet?

This is such a fun and different addition to a little girls bed.  This pillow is pretty generously sized, but you could make it even bigger if you want to.

Thanks so much for letting me share The Lolly Dolly pillow with you today.  I hope you will try to make one for a special little lady in your life.
And don’t forget to check out ‘Dress Up Days‘……it is just too cute!

Japanese Fat Quarter Bundle and Washi Tape Giveaway


I’m so excited about today’s giveaway. If I could enter, I most definitely would. Today’s Japanese Fat Quarter Bundle and Washi Tape Giveaway comes to us from Modes4u.com.

Modes4u.com is an online shop for cute fabrics, stationery, DIY items and accessories which are imported from Japan and the USA. The shop carries more than 1,000 colourful fabrics from labels like Kokka, Cosmo, echino, Michael Miller, Robert Kaufman or Riley Blake. Modes4u has a wide variety of materials and prints; just recently they added lots of organic fabrics to their shop. You get free shipping for purchases worth $78 or more to any country in the world.

Today Modes4u.com is giving away 10 Fat Quarters of these amazing Japanese Fabrics as well as two Washi tapes to one very lucky The Cottage Home blog reader. Here is exactly what is included:


Looks good, right? Want to enter to win? Here’s how to enter (do one or all of the following, leaving a separate comment for each entry):

1. Visit Modes4u.com and leave a comment tell us what is your favorite product in their shop (Click Here).
2. Like Modes4u on Facebook (Click Here).
3. Follow Modes4u on Pinterest (Click Here).
4. Blog about this giveaway and link to Modes4u.com (just leave a comment letting us know you did so).

Giveaway open INTERNATIONALLY through September 18, 2012 at Midnight (CST).

Classic Vintage May Dress

My collection of vintage children’s patterns is constantly growing.  I am always on the hunt at flea markets, antique stores and thrift stores for new patterns to add to my collection.  I don’t think you can ever have too many!  I just love holding and touching the patterns imagining the women of the 30’s, 40’s and 50’s sewing these sweet garments for their little ones. I often wonder if I was born during the right era.  I feel like I would have fit in just right during the 1940’s.  But I digress…..

One of the things that really attracts me to vintage children’s fashions is the fact that during the 30’s, 40’s and 50’s women really dressed their little girls like little girls.  I kind of feel the same way with my little ladies, there is plenty of time for them to dress like adults, but I want to preserve their girlhood for as long as I possibly can.  And vintage inspired children’s fashion is a great place to start!

Today I’m sharing a little dress I created that I like to call ‘Classic Vintage May’.  When I think of a classic vintage girls dress, this is what comes to mind………

My interpretation of a classic vintage-inspired girls dress is an a-line dress with puff sleeves, a peter pan collar, an inverted front pleat with fabric covered buttons up the back.

For a little vintage detail I used a fabric yo-yo that was reclaimed from an old vintage yo-yo quilt and placed a vintage button in the center.  I always think it’s really fun to mix a little new with the old, so this was my little piece of ‘old’ that I paired with this more bold fabric choice.

To me, one of the special things about vintage fashion is the attention to details.  Women in generations past took lots of time and care in the details of their children’s clothing.  One of my favorite vintage details is piping and I truly believe it can take an ordinary garment to extraordinary.

I added a classic puff sleeve to the a-line style dress, but inserted some deep plum piping into the seam between the sleeve and the binding.

I echoed the same plum colored piping from the sleeves and inserted into the peter pan collar.  Is there anything sweeter on a little girl than a peter pan collar?  I don’t think so and adding piping is an easy detail that can add a lot of wow factor to your vintage inspired children’s fashion.

And finally, let’s talk a little bit about fabric.  A great way to update a vintage look is to use more modern patterned fabric.  I’ve certainly see some absolutely adorable reproduction vintage fabrics on the market, but my style is a little more bold.  I chose this larger print for the main dress and a slightly smaller scale accent fabric for the sleeve binding and collar.  The only real vintage fabric I included was the fabric yo-yo in the center of dress.

Some people shy away from using large prints in children’s garments, but I think you can make it work if you use these fabrics strategically.  Also the modern fabric that I chose had vintage influences in its design as well, so I think it pairs well with this style dress.  Using modern fabrics helps bring the classic silhouette into modern day.  Fabric is from Tula Pink’s ‘Parisville’ line.

So I leave you with some pictures of this sweet ‘Classic Vintage May’ dress that were taken out by the well in front of our house.  The well no longer works, but back when our cottage home was built in 1934 it was visited and used daily. I can just see a little girl wearing this style dress running around our front yard playing while her mommy and daddy gathered water from the well.  Those were simpler times, but it sure is fun to bring a little of that vintage back!

Embellished Onesie Baby Girl Dress

Our good friends, Lara and Eddie, (Savannah’s Godparents) just had their second baby a little while back.  They have a little boy named Luca who is three and decided to wait to find out the gender of the new baby until the birth.  Since I am such a planner, we found out what we were having with each of our three children, but I give a lot of credit to those who can wait for the surprise at the very end! When I found out they had a baby girl, Francesca Marie, I knew I had to whip up something for the new little lady.

For some reason when my friends have new babies, it makes me want to try to sew something new. Most of them know the kinds of dresses that I like to sew for The Cottage Mama, but it’s always fun to sew something different and more unexpected. For Miss Francesca, I made a little dress out of a pink organic cotton onesie. It is size 3-6 month and I thought it would be really cute layered with tights and a sweet cardigan for the cooler weather.

I’ve been really into using the rolled hem on my new serger (yes, I’ve got new machines and I can’t wait  to tell you about them). I cut a couple strips of fabric and finished the sides with a rolled edge. Then I gathered them and sewed them to the onesie. I added a strip of pre-gathered, cream colored eyelet trim as well. And finished the dress by hand sewing three little pink buttons on top.

The skirt on the onesie is also finished with a rolled hem. I absolutely love the line ‘Woodland Trails’ from Riley Blake Designs. It’s just the perfect shades of pastel for a sweet baby girl.

Happy 1st Birthday Caspian Finn

Dear Caspian,

Today you are 1 year old.  I can’t believe it!  Your first year flew by at warp speed.  It seems like only yesterday you came into our lives, but yet I can’t imagine our life without you.


1 Year Old
Pictures taken by Mama on August 31, 2012

Caspian, on your 1st birthday today there are a few things I would like to remember about you……

1. Your favorite food is bananas.
2. You are so sweet. And I mean SO sweet.
3. You army crawl everywhere.
4. You say ‘Dada’ and ‘Mama’.
5. You have just learned how to shake your head ‘no’.
6. Your sisters love you and tell you that there is ‘No better baby than Caspian’.
7. Your giggle is just about the best sound I have ever heard.
8. You love to smile.  Your Gigi and Grumpy call you ‘Smiley Joe’.
9. You are so happy.
10. You are a dream baby.  So even tempered and delightful.
11. You like feet and shoes.
12. You have the most adorable chubby thighs.
13. You like to eat. A lot.
14. You like when mama sings to you especially ‘Can’t Help Lovin’ Dat Man of Mine’ from Show Boat.
15. You like to dance.
16. You love water and going swimming.
17. You like cars.
18. You love your mama, but as of lately you REALLY love your daddy.
19. You are very ‘go with the flow’. {Thank you for that!}.
20. You bring such a completeness, joy and happiness to our family.

Before you were born, many of my friends told me that there was something different about the relationship between and mother and a son.  I never really thought there was much to that, until I had you.  I absolutely love my girls, but our relationship is just different.  I can’t put my finger on it, but all I know is that you are my sweet little boy and I can’t imagine you any other way.  What a light you have brought into our lives.  Thank you for being such a joyful, wonderful, lovable child.

Happy 1st Birthday!

I love you from here to the moon and back again my sweet, sweet Caspian Finn

Love,
Mama

Another ‘Out to Sea’ Dress and a Little Sailor

We spent this past weekend up in Lake Geneva, WI celebrating Caspian’s 1st birthday and my father-in-law’s 60th birthday.  Knowing that we were going to be up to the lake, I couldn’t resist making another dress from Sarah Jane Studio’s new ‘Out to Sea‘ fabric line.  It just had to be done!

Here are the girls wearing the two dresses that I made for them.  I shared Matilda’s dress in a previous post (which is made from my Charlotte Apron Dress Pattern), but I made a different style dress for Miss Savannah.

This dress is a basic peasant style dress with a flutter sleeve and a double layer ruffle down the front.  If you’ve never sewn a peasant dress, you should definitely give it a try.  It’s probably one of the easiest garments to sew because the fit is very forgiving and it will take you no time at all to whip up.  Definitely great for a beginner!

I decided I wanted to add in some seersucker with the ‘Out to Sea‘ line because nothing says nautical summer more than seersucker.  I had this pink and white stripe in my stash and used it as an accent for the ruffle and sleeve.

I did a double layer flutter sleeve with the pink anchor fabric on top and the pink and white seersucker underneath.  I did a rolled edge on my serger to keep the sleeves as light and ‘fluttery’ as possible.

I’m really happy with the way this dress turned out and Savannah seems to like it too!  I adore the rich navy blue and pretty pink. Such a classic, timeless combination.

How grown up is she looking?  Four going on sixteen……..gosh, I sure love that sweetheart.
So with all these nautical dresses, I couldn’t help but let Caspian join in the fun with a cute little sailor suit.
Here is my husband, Brett, and Caspian Finn.  I think Caspian looks so much like his daddy!

Caspian’s sisters sure love him…..poor guy.  You can just see the look on his face, ‘please stop smothering me!’

Here is Daddy and his boy.
I did sell some kits to make the dress that Matilda is wearing that I listed in my Etsy shop. It included all the fabric, trims, buttons as well as the printed sewing pattern to create the exact same dress in up to size 8.  I shared the kits over on the Facebook page first and they sold out very quickly.  I don’t plan to offer anymore of this exact same kit, but if you are interested in future dress kits, please join us over on The Cottage Mama Fan Page on Facebook.

Have a great day!

A Week of Many Firsts…….1st Day of Preschool

So this is a busy week around here.  The girls had their first day of preschool on Monday and their first day of tap and ballet class on Tuesday and we have our little man’s first birthday coming up on Friday.  Whew…….that’s a lot of firsts all in one week!

It’s hard to believe that both my little ladies are in preschool this year.  This is Matilda’s first year and she is in the three year old class and this is Savannah’s second year and she is in the four year old class. It works out really nicely because both girls go on the same days which allows me a little alone time with my little guy.

Miss Matilda was so excited for her first day……..

Savannah was excited to see her friends again and show Matilda the ropes…….

Savannah is really into purple lately.  Can you tell?  She picked out her own outfit.

These silly sisters truly love each other.  As much as they know how to push each others buttons, they really adore one another……

The first day of school was just an hour and the parents attended with their student.

Savannah loved showing her sister exactly what to do and where to go.  The girls are in different classes, so my husband took the day off and went with Savannah and I went with Matilda.

Here are some pictures of Matilda’s first day in her class…….

The girls had a great time on their first day!  Today was actually the second day and they both went for a shorter day without the parents.  Both girls were absolutely fine……..they barely even looked back at mama (which was quite different than Savannah’s first day last year…….oh, the tears).  My girls are growing up. I am so excited for them and all the fun they are going to have this year!

And this goofy guy…….he and I will be doing a lot more hanging out this year (which I’m really looking forward to).  I seriously cannot believe he will be one year old in a couple days.  
Where did the time go? {Sigh}. I guess they all eventually grow up……….

Eat Your Fruits and Veggies Half-Square Triangle Quilt Top

I just wanted to write a quick post to share my mom’s Eat Your Fruits and Veggies Half-Square Triangle Quilt Top that she completed using half square triangles.  

If you missed her half-square triangle tutorial, you can check it out HERE.

Isn’t it gorgeous?  I absolutely adore this quilt top.  I think it is so fresh and modern, yet with a fun 1950’s retro feel.  ‘Eat Your Fruits and Veggies‘ is by Pat Sloan for Moda Fabrics.  We picked up some of this line at sample spree during Spring Quilt Market.  The yardage has not been released yet, it will be out in October 2012. So once Mom can get her hands on more of this fabric she can finish up this beauty.

Isn’t it amazing the beautiful designs you can create with half-square triangles?
I think I’m hooked!

Out to Sea ~ Nautical Girls Dress

I am a big fan of Sarah from Sarah Jane Studios and I knew her second fabric line ‘Out to Sea‘ was going to be a must-have.  I think you all know how I felt about her first line, ‘Children at Play‘ ~ L.O.V.E.  I ordered ‘Out to Sea‘ back in May at Quilt Market in Kansas City.  Let me tell you, it was really hard to decide which prints to order, but I’m so happy with the ones we picked!

These are the prints that arrived this past Tuesday.  There is a boy, pirate one too, but we’ll save that for another time.  I have some ideas for what I want to do with the map, but I am in love with these colors. First of all, the navy blue and pink is a timeless combination and secondly, it was so lovely to see nautical prints in more girly colors.

I have a million and one other things that need to be sewn, but I could not control myself.  I had to cut into this fabric right away.  You know that feeling, right?  So, here’s what I created…….

This is my Charlotte Apron Dress Pattern made with a few additional pieces.  My husband didn’t even know this was the same pattern, but really, the adjustments were very simple.

I added two scallop pieces to the top of the bodice.  I simply traced a curve that I thought looked good and placed them in from each side 1.5″ (before the bodice was sewn together).  I basted them in place and then constructed the bodice according to my pattern instructions.  I also topstitched all the way around the top of the bodice which helped the scallops stay down.

Where are the buttons, you might ask?  They are underneath the scallop pieces.  You just flip them up, make your buttonholes and flip the scallops back down.  I used smaller, flat buttons so they don’t even show.

For the sash, I cut two pieces on the fold (5″ x 20″) and sewed them together at the short seam to make one long strip.  I folded the long strip in half with the right sides together, cut both ends at a diagonal and sewed the raw edge together using a 1/2″ seam allowance.  I left a 4″ opening in the sash for turning right side out.  Once I turned it right side out, I pressed the sash and slip-stitched the opening closed.  You could also topstitch the entire sash to close the opening.  I sewed the sash to the dress at the side seams and made it off-set so it would tie off to one side.  You could definitely have the sash tie in the back as well.

As far as the skirt goes, I shortened it by two inches to account for the gathered eyelet trim at the bottom.  I decided to use a rolled hem on the bottom edge of the fabric for the skirt (just because I’m really enjoying this stitch on my new serger and I knew it wouldn’t show) and then layered the trim on top.

I purchased this nautical trim wholesale at the same time we ordered this fabric line.  I knew it was going to be perfect and I think it really works well.  The rickrack is layered underneath the woven ribbon and brings the pink down into the bottom of the dress.

I am so happy with how this dress turned out.  I was going to have Matilda model this one, but the mosquitos have been out in full-force, so the mannequin will have to do for now.  If I get some pictures of the little miss wearing this dress, I will definitely share the pictures.

A big thank you to Sarah Jane for creating such wonderfully inspiring fabric.  Without her beautiful illustrations and her ability to capture such whimsy and charm through her art, this dress never would have been created.  Thanks, Sarah!

You can purchase ‘Out to Sea‘ by Sarah Jane Studios for Michael Miller Fabrics at many of the sponsors listed in the right sidebar of the blog.  I believe the first shipment has arrived in most shops.

You can also purchase the Charlotte Apron Dress Pattern HERE.

Lastly, I am considering offering these fabrics and trims as a kit in my Etsy shop.  Is that something of interest to you all?  I’ve gone back and forth with whether or not people would like me selecting the fabrics and trims for you or not.  It’s just an idea…..but I’d love to know what you think!