Zealous Good: A Meaningful Way to Donate

I don’t promote a whole lot of different organizations on this blog, but when I was contact by Zealous Good in Chicago (about guest posting on the blog), I knew I wanted to share them with you all.  They are a wonderful organization, doing wonderful things for the community.  Please take a moment and read the following post from Zealous Good………

Zealous Good: A Meaningful Way to Donate 

Giving your old stuff away to a charity is a great thing. However, when you donate, do you really know whom it’s going to? How it’s helping? If it’s actually helping that much?

You donate a bag of old clothes to a charity. Great— but what if the charity could use your old children’s toys and games more? Would you know?

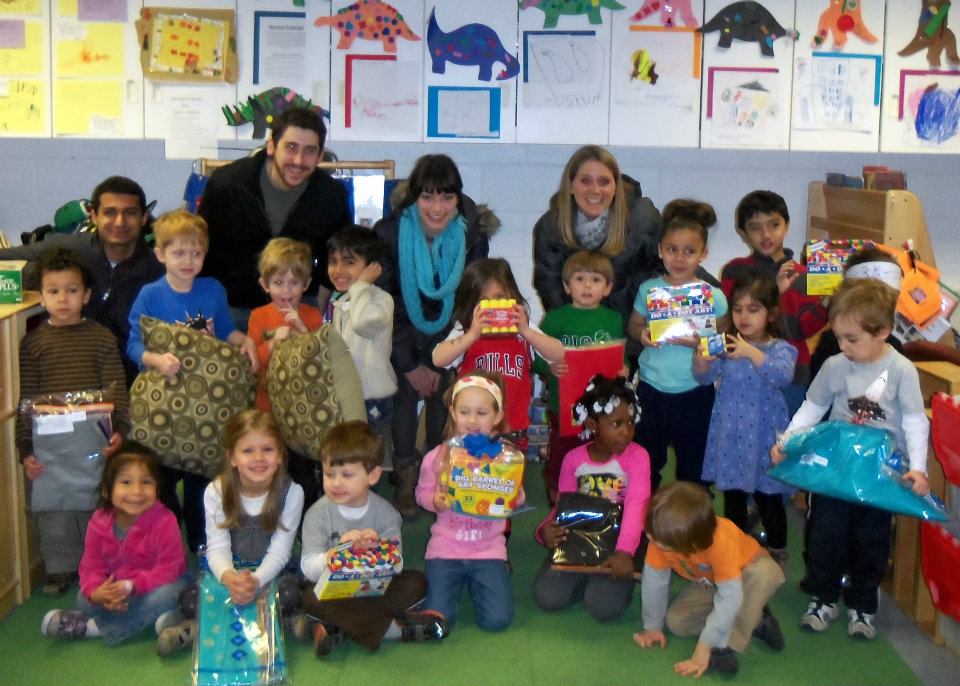
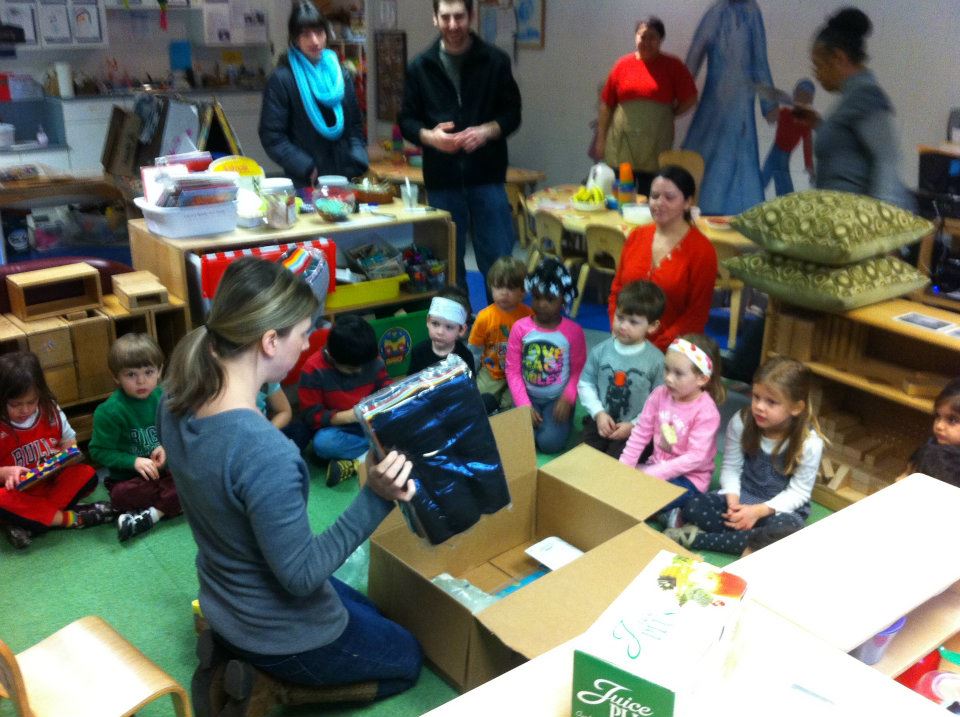
Now, all these questions are silenced by the Chicago-based organization Zealous Good. Zealous Good matches people with excess goods to donate to the needs of local charities, providing an efficient and effective way to donate your old, no longer needed items.

The average American household has $7,000 in unused items. $7,000! So give all those old children’s games, old sports equipment, or arts & crafts supplies you know you’re never going to use again new life, by placing them in the hands of a child who really needs them.

A local charity is waiting on the other side of your computer for help. And the best part– the donation process is easy.

To donate, go to zealousgood.com and submit what you want to donate. Then let Zealous Good start the matchmaking. You’ll be notified which local charities are interested, and you can pick which charity suits you best and schedule a time to pick up or drop off your item. Once your donation is in the hands of your selected charity, you get to see the difference you made and the lives you affected.

Or, if you’re a charity and need donations, it’s just as easy. Simply make a Zealous Good page and request what kind of donations you want to receive. After Zealous Good matches the donations with your needs, you receive the donation and your charity is fulfilled.

Simple. Powerful. Good.

So take a look around your house. See what extra stuff you don’t need. Maybe even ask your kids if they have old toys they would be willing to give to a child in need. If they do, you and your child can pick together which charity think would be best and which one you want your items going to, so you can both feel good about whom you are helping.

There’s never a bad time to do good. Why not make it today?

Click HERE to read more about Zealous Good.

Yes, Zealous Good is a Chicago-based organization, but even if you aren’t in the Chicagoland area, maybe you will think twice about where you take your donations.  I love the idea of knowing that what I no longer need will go to an organization can put it to great use!

Happy 3rd Birthday Miss Matilda Jane

Happy 3rd Birthday our sweet girl!
Today is your 3rd Birthday Miss Matilda Jane.  You are such a special part of our lives and there are a few things I would like to remember about you today……
1. Your favorite color is blue.
2. You are sweet and cuddly.
3. You sleep with your little stuffed puppy dog and you love him.
4. You can be found most days wearing a tutu.
5. Your favorite tv shows are Team Umizoomi and Dora the Explorer.
6. You love to take baths.
7. You love to play dress up.
8. Pretend play is a favorite and you like to pretend to be a puppy dog, a knight or a cowboy.
9. You like to help mommy cook in the kitchen.
10. You love to color and paint.
11. ‘You said it sister’ was a funny phrase you said recently.
12. You still take a good 2-3 hour afternoon nap (thank you!).
13. You love taking your gymnastics class.
14. You are usually up between 5:45am – 6:00am in the morning.
15. You always wear your sunglasses upside down.
16. You like to ask mommy for buttons when I am working in the studio.
17. Your most favorite foods are hot dogs, go-gurts, french fries, ketchup and pancakes.
18. You chose a Team Umizoomi theme for your 3rd birthday party.
19. You are very smart and really like patterns and counting.
20. As I’m closing your door after bedtime, you always say, ‘Wait, Mama, come back……..I love you’.
Matilda Jane, we love you from here to the moon and back again.  You bring a sweetness and spunk to our lives that is one of a kind.  I cannot believe you are three years old today…..such a big girl!  Your free spirit, loving nature, and sensitive soul are some of the many, many things that we love about you.
Happy Birthday, baby girl!
Love,
Mommy, Daddy, Savannah and Caspian

Recipe: Baked Apple Pancake

Looking for a delicious family breakfast or a new go-to brunch idea…..how about a Baked Apple Pancake? Easy and inexpensive, but packed with flavor. Not to mention the fact that it will make your house smell heavenly. Give it a try……you’re going to like it!

Baked Apple Pancake
SERVES 6
Ingredients:
2 apples, thinly sliced
1/2 stick of butter
1/2 cup brown sugar
1.5 teaspoons cinnamon
5 eggs
1/2 cup flour
1/2 cup milk
Directions:
Preheat oven to 450 degrees. 
Melt butter, brown sugar and cinnamon together in a bowl.  Toss the apples into the butter mixture and stir to combine.  Place coated apples into a large pie dish.  
In a blender, combine eggs, flour and milk.  Blend well.  Pour mixture over apples in pie dish.  Place pie dish on top of a baking sheet (to catch any drips).  Bake for 45 minutes or until top is golden brown and a knife inserted in the center comes out clean.  Dust with powdered sugar and serve with a drizzle of maple syrup.

YUM!

DIY Craft: No-Sew Fabric Covered Box Tutorial

This past weekend I was out and about running errands on my own.  And I’m sure most of you mom’s know…….I sort of felt like I was on a mini-vacation. Anyway, I stopped off at one of my favorite local thrift stores and, come to find out, the entire store was 50% off.  50% off at a thrift store?  Yes, I couldn’t believe it either.  I picked up a bunch of things that I just couldn’t go home without and this little metal box for 50 cents was one of them.

Here is what the box looked like when I brought it home:


Not very exciting, but it was just begging to be given new life.  So I decided to get out my craft supplies and turn it into something a little more eye-catching.  This is an easy, inexpensive craft project that can be done with mostly items you have around the house.  Granted, if you don’t craft a lot you may have to buy some essentials (like spray adhesive), but you’ll be able to use this things for projects in the future.


Fabric Covered Box Tutorial
by Lindsay Wilkes from The Cottage Mama
Supplies:
Box ~ any size (mine was able to fit large notecards inside)
Spray Paint
Spray Adhesive
Glue Gun
Fabric (a fat quarter should be more than enough)
Trim
Scissors
Instructions:


I grabbed a can of spray paint that I happened to have around for this project.  You want to make sure you spray the inside of the box really well since that will not be covered.  Let the inside dry and then flip the box over and spray the bottom.  The rest of the box will be covered by fabric and trim so no need to worry about it’s appearance.

Cut the piece of fabric for the top of the box about 1/2″ larger than the box top.  Then cut small slits on the diagonal in each of the corners which will enable you to wrap the fabric around the box (like you are wrapping a gift) after you use your spray adhesive.  You are just wrapping the fabric down over about a 1/2″ over the edge so that you don’t see any raw edges.  The raw edge will eventually be concealed by your ribbon trim.


Measure and cut out the strip of fabric to go around the box.  You want the fabric to go all the way around the box and overlap by about an inch.  Cut the fabric wider than necessary so you can press under the top and bottom with your iron.  Press the fabric so that it is just the right size to fit your box.  Also press under the one side that will overlap in the back of the box so it looks neat and tidy.
The next part is easy.  Take your box and fabric outside and spray liberally with spray adhesive.  Place fabric on the box and smooth out any bumps.  For the top, press the over-hang pieces down a tiny bit over the sides, but remember this will be covered by trim so it doesn’t have to be perfect. Spray adhesive around the main part of the box and wrap your fabric strip around the box, overlapping the strip in the back.
Next, get out your glue gun and glue any trims that you have onto your box.  You can use anything you would like to embellish this box.  I simply used trims that were already in my stash to make this an even more budget friendly project.  I used one piece of ribbon around the top and then I layered some rickrack and ribbon around the bottom.  This is your chance to get creative!


You can use this box for just about anything.  I think it would be fun to make some of these for different holidays too.  How about one for Christmas?  It could also be an adorable recipe card box, a place to store crafting or sewing supplies, or even a pretty container for flowers……..


I simply placed two of my really small ball jars (minus the lids) inside the box and filled them with water to hold the flowers.  These flowers were already growing in our yard and I love being able to use things that we already have.
So that’s it!  A super-simple craft project taking an ordinary thrift-store metal box and making it into something beautiful, special and one-of-a-kind!

Spring Sewing Swap Stuff

I recently participated in a ‘Spring Sewing Swap‘ over at Sewing In No Mans Land.  Did you hear about this?  Basically you just signed up and used three words to describe yourself / your style.  Then we were each paired up with someone and given only their name, shipping address and their three descriptive words.   We weren’t give a dollar value to send.  You were just supposed to send a package that you would like to receive in the mail yourself.  I thought this just sounded like such a neat idea.


I quickly sent my package out prior to heading to quilt market.  I should have taken a picture, but I didn’t have time.  I sent a bunch of different trims, a fat quarter bundle of fabrics, and several The Cottage Mama Sewing Patterns.

Then a week or so later, I received my package in the mail in return from the person I was paired up with for the swap.  I can’t tell you how excited I was ~ I was like a kid on Christmas!

My swap buddy sent me the most beautiful bag of trims, packaged up so beautifully.  To be honest, I can’t remember what three words I used to describe my style, but she hit the nail on the head.  And then she sent these beautiful summery fabrics.  I actually had no eyelet in my stash, so this was such a pleasant surprise.  She included two hand-knit hats for the girls that she made herself.  We absolutely love these hats to pieces.  I don’t have pictures of the hats because the girls love playing with them for dress up so they were off in one area of the house or another when I was taking these pictures.

I’m thinking I might challenge myself to make an outfit for one (or both of the girls) out of this grouping of sewing loveliness.  What do you think?  Do you think I can do it?  I don’t think it should be very hard since everything she sent is beautiful.  But it might be kind of fun to see what I come up with.

Anyway, I just wanted to share this beautiful package with you all.  And say a BIG GIANT thank you to my swap buddy!
Have you every participated in a swap before? 
If so, did you love the package that was sent your way?  
This really was so much fun.  I would definitely sign up for another one in a heartbeat!

The Cottage Mama Custom Fat Quarter Bundle ~ Blogger’s Choice

I just wanted to share something kind of cool with you.  I was recently selected by Fat Quarter Shop to put together a ‘Blogger’s Choice‘ Fat Quarter Bundle for them for the month of September.  I was supposed to choose 12 prints and 3 solids from any fabric lines to create a custom bundle that will be sold in their shop.  Talk about a tough decision narrowing it down from all the gorgeous prints that are available. There were tons of different directions I could have gone.

Want to see my bundle?
Custom Fat Quarter Bundle by Lindsay Wilkes from The Cottage Mama
for Fat Quarter Shop

Do you like it?  I hope so!  I went with some deeper tones since this bundle will be available in September.  There are several different lines included, most of which have yet to be released. Some Amy Butler, Tula Pink, Denyse Schmidt, Art Gallery Fabrics, Riley Blake….lots of my favorites.  Pairing fabrics is one of my absolute favorite things about the design process so be able to put this bundle together was a complete joy.

I will let you know when all the fabrics are in-stock and the bundle is available for sale or you can sign up on the Fat Quarter Shop website to be notified when it is ready. They will be sending me my own bundle that I picked out.  I’m thinking I need to do a quilt out of this selection.  

What do you think?  What would you make with this bundle?

Click HERE to check out the exact fabrics included in the bundle and click HERE to see all the ‘Blogger’s Choice‘ Bundles.  I’m in some very good company.

The Cottage Mama Sewing Pattern Blog Tour ~ Wrap Up!

Our Sewing Patterns Blog Tour has finally come to an end.  I have had so much fun seeing the amazing looks these these creative, talented women have come up with using my pattern designs.  I think it is so inspring to see how the same pattern can be made into different looks depending on the fabric selection, use of trims and slight alteration of the design.  These women all did an amazing job and I can’t thank them enough for joining us on this tour!

I know it can be a little scary coming up with your own pattern design, but I believe a great gateway into pattern design can be taking pre-existing patterns and making them your own.  Once you’ve mastered that skill, you will feel more comfortable starting to draft your very own patterns.  So, I encourage you to take your favorite sewing pattern and make it your own…….I think you will be pleasantly surprised by the creativity that is within all of us.  It’s in there, trust me, you just need to start thinking outside the box.

Here is a little recap of some of the looks we’ve seen over the last several weeks……..

Charlotte Apron Dress
SIZE 6 MONTHS – 8 YEARS
Run Around Romper
SIZE 6 MONTHS – 6 YEARS
Ruby Ruffle Dress
SIZE 6 MONTHS – 10 YEARS
All of The Cottage Mama Sewing Patterns can be purchased through our website: www.thecottagemama.com.  
All Sewing Pattern Blog Tour posts can be found HERE.
Again, I have thoroughly enjoyed being able to share these beautiful creations with you all and I hope you have enjoyed this tour as well.  I’ve got some really fun things to share with you coming up and I’m looking forward to getting back on the blog myself with some new FREE patterns, tutorials and handmade business posts.  Thanks so much for reading!

Sewing Patterns Blog Tour: Susan from Living with Punks

Today is the final stop on the Sewing Patterns Blog Tour!  We’ve rounded out this group of incredibly talented women with Susan from Living with Punks.  If you’ve never been over to Susan’s blog before, you really should.  She has some of my most favorite tutorials in all of sewing and crafting blog-land.  We both share a love of bright patterned fabrics and I’m so excited for you to see the Ruby Ruffle Dress that she created……..

Head over to Living with Punks to see more pictures of Susan’s Ruby Ruffle Dress and enter to win your own copy of this pattern.

Click HERE to enter to win!
This concludes our Sewing Patterns blog tour.  I’ll be back tomorrow with a recap of all these amazing looks and then we will return to our regularly scheduled program (whatever that may be).
Have a great day!!

Sewing Patterns Blog Tour ~ Shannon from Luvinthemommyhood

Today’s stop on the tour is one that is very special to me.  I credit Shannon from Luvinthemommyhood for putting The Cottage Home on the map in the blogging world.  Shannon featured me on her blog in the very beginning of this journey and I will never forget what she has done for me.  And what’s even better is that she has truly become a friend.  Though she lives in Canada and I live in Chicago, we actually have phone chats and its such a blessing have someone who can totally relate to my world to talk, email and support each other through this time in our lives.

Ok, enough of the sappy stuff.  Shannon selected the Ruby Ruffle Dress pattern to sew for her darling little lady.  Here is what Shannon created……..

Head over to Luvinthemommyhood to check out more pictures of Shannon’s creation and enter to win your very own copy of of this pattern.

Click HERE to enter to win!

Sewing Patterns Blog Tour ~ Amy {and Mama Reita} from Positively Splendid

It’s the final week of the Sewing Patterns Blog Tour and we’ve got three more guests to round out the tour.  Today’s guest is someone very special……..it’s actually a blogger’s mama! Amy (from Positively Splendid) and I started blogging around the same time and have become blogging buddies through our emails. I absolutely adore her blog, crafts, DIY home decor and writing style.  But I equally adore Amy’s mom, Mama Reita’s, sewing style.

Mama Reita follows The Cottage Home blog and she purchased one of my first sewing patterns (thanks Mama Reita!). I had seen several of her amazing creations over on Amy’s blog and was blown away by her talent and attention to detail.  So I decided to invite Mama Reita to share her version of the Charlotte Apron Dress with you all today.

Here is what Mama Reita created for her beautiful granddaughter………

Thank you so much for joining the tour, Mama Reita, your work is total perfection!  I feel like you and Amy have a very similar relationship to the one I have with my mom.  And let me tell you, I certainly wouldn’t be where I am today without everything I’ve learned from my amazing mama (aka Grandma Jane) and I bet Amy feels the same way about you.  Yay for amazing, creative, supportive and inspiring moms!

To view more pictures of Mama Reita’s creation and to enter to win your very own copy of this pattern, please visit Positively Splendid.

Click HERE to enter to win!