Sewing Patterns Blog Tour: Jess from Craftiness Is Not Optional

And to round up this first week of The Cottage Mama Sewing Patterns blog tour, we have the lovely Jess from Craftiness Is Not Optional.  Jess and I definitely share a love of creating little girls clothing and she comes up with some of the most darling silhouettes for her little ladies.  She’s pregnant with baby number three, so who knows…….maybe she’ll be entering the world of sewing for boys, but for now she’ll be sticking to girls clothing……

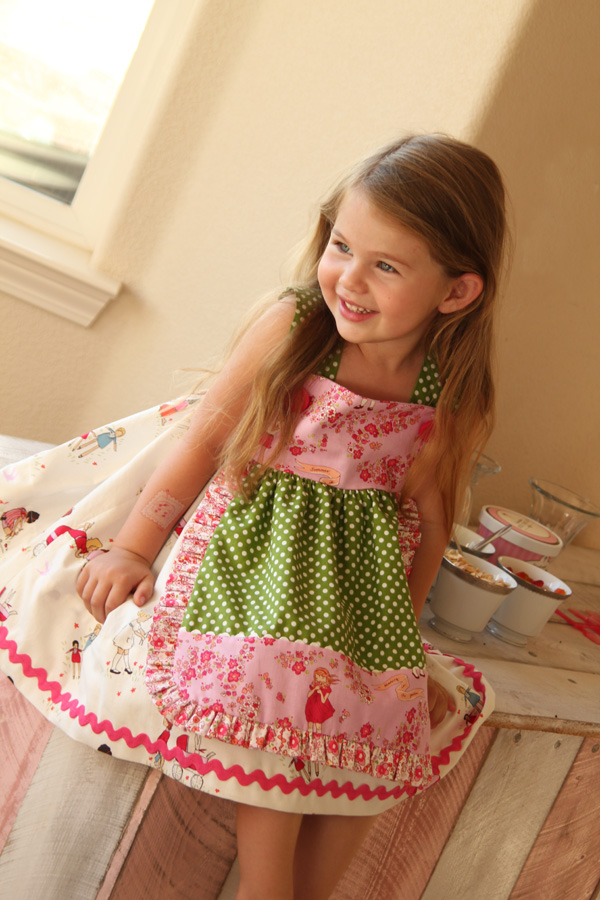
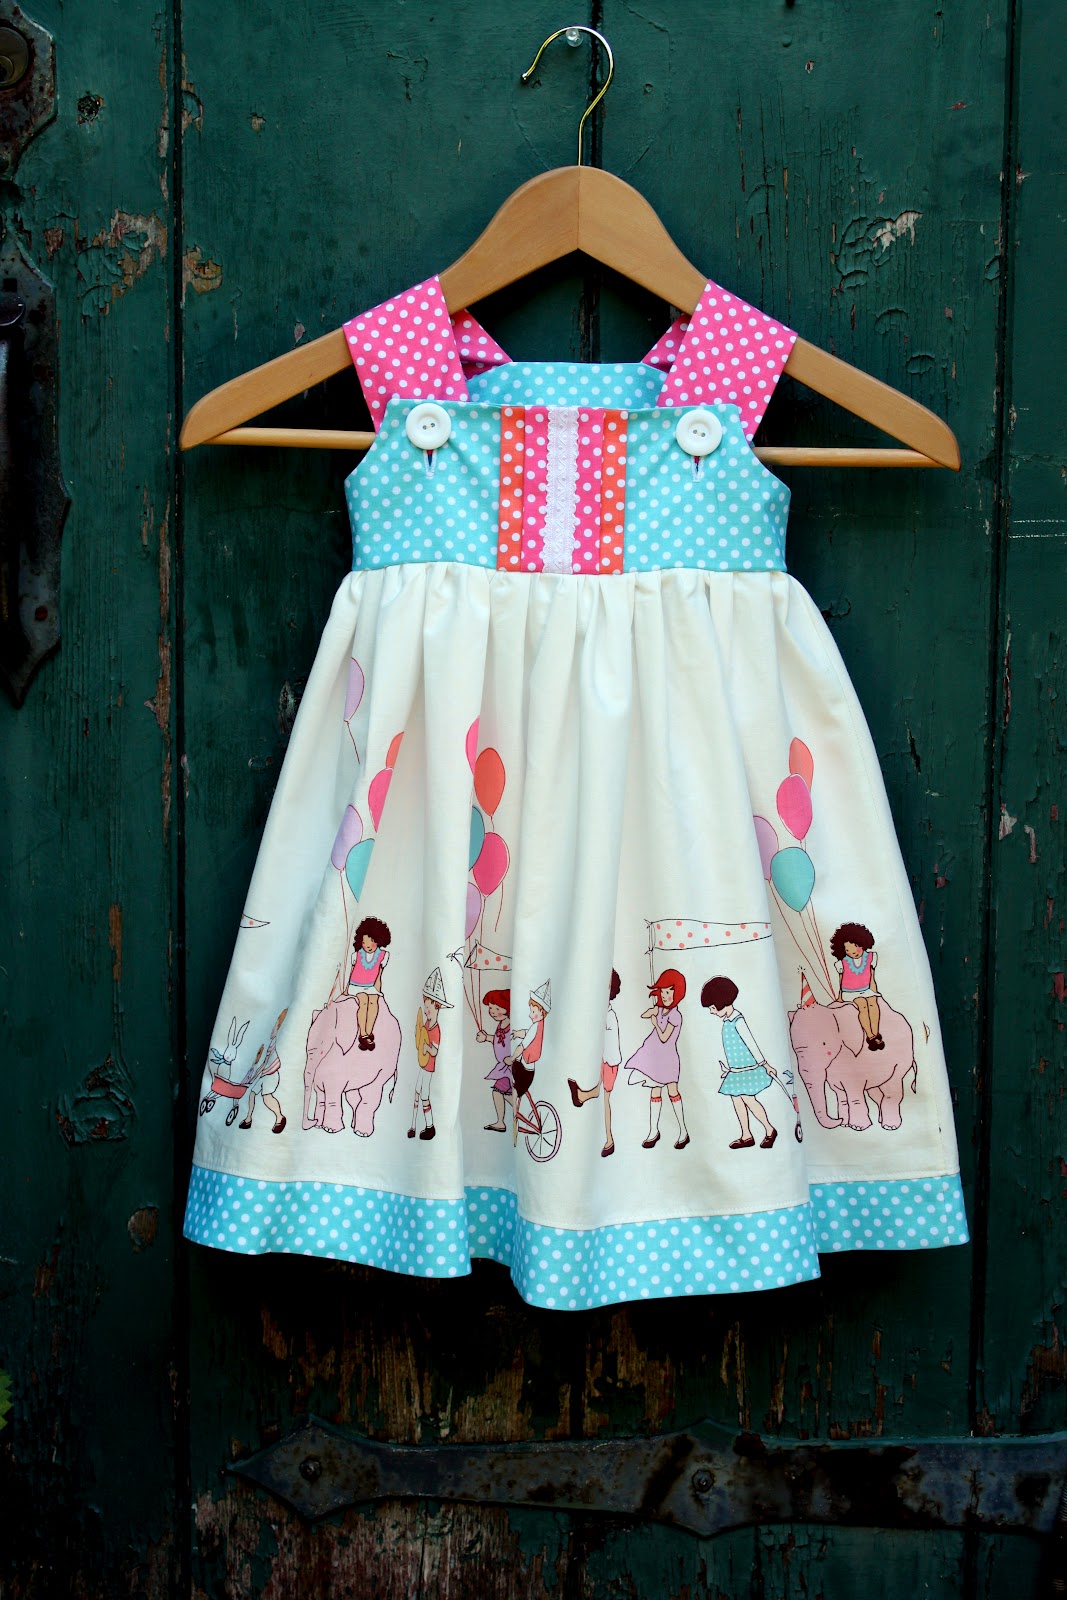
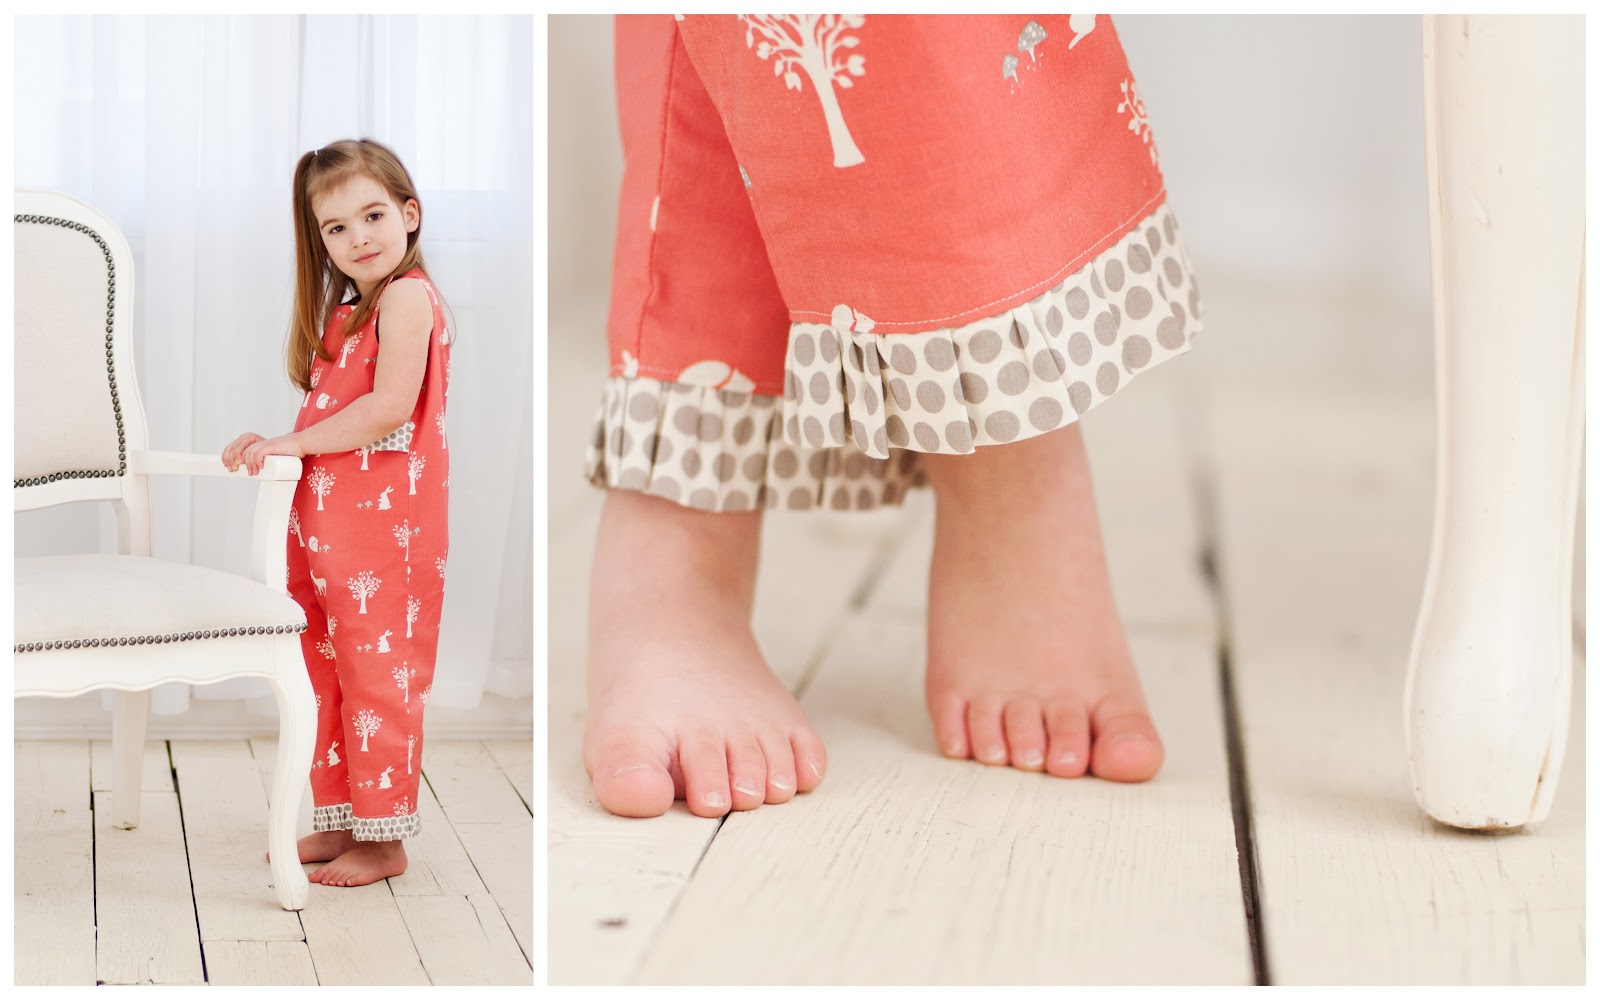
Jess chose to sew up the Ruby Ruffle Dress for Miss Sadie.  I can’t believe how grown up she looks here.  These kids are growing up way too fast!  Head over to Craftiness Is Not Optional and check out more pictures of Jess’s creation and enter to win your very own copy of this pattern.

Click HERE to enter to win!

Sewing Patterns Blog Tour: Christina from 2 Little Hooligans

The third stop on our new sewing patterns blog tour is over at Christina’s blog, 2 Little Hooligans.  I was incredibly impressed by some of the creations Christina came up with when I was judging the Project Run and Play Flickr group this past season and I knew I had to have her as part of this tour.  She chose to sew up the Run Around Romper and made of three of them!  Two girl versions and one for her little guy…….
Head over to 2 Little Hooligans to check out more pictures of Christina’s darling creations and enter to win your very own copy of the Run Around Romper.
Click HERE to enter to win!!

Sewing Patterns Blog Tour: Jessica from Me Sew Crazy

Today we have someone I’m sure you are familiar with ~ Jessica from Me Sew Crazy!  She’s always coming up with fabulous creations for her two little ladies and baby boy.  Our kids are very close in age so it is really fun to know another mama going through the same stage in life and running a creative business.  I would definitely call her one of my good friends (though we’ve never actually met).  Jessica chose to sew up the ‘Ruby Ruffle Dress‘ pattern…….
Head over to Me Sew Crazy to check out more pictures of this darling dress and enter to win your very own copy of the ‘Ruby Ruffle Dress‘ pattern.
Click HERE to enter to win!!

Sewing Patterns Blog Tour: Stef from Girl.Inspired

I decided we needed to start this tour off with a bang and I knew just the lady for the job.  Stef over at Girl. Inspired wowed us with her Christmas variation of the Janey Jumper pattern during our first tour (click here to check it out), so I couldn’t wait to see what she would do with this new pattern.  As always, she does not disappoint…..

Charlotte Apron Dress
Check out Stef’s version of the Charlotte Apron Dress Pattern.  Isn’t it adorable!?!  Head over to her blog to check out more eye candy photos of this adorable dress and enter to win your very own copy of this pattern!
Click HERE to visit Girl. Inspired.

New Sewing Patterns Blog Tour

The Cottage Mama Sewing Patterns
~Blog Tour~
It’s that time again!  Time to start the The Cottage Mama Sewing Patterns Blog Tour!
My new patterns are all officially in-stock and available for sale in my Etsy Shop!
What is the Blog Tour all about?  I have a group of incredibly talented bloggers and sewers that are going to be sewing up each of the new patterns (Ruby Ruffle Dress, Charlotte Apron Dress and the Run Around Romper) and will each be giving away one of the new patterns on their blogs.  The tour will happen every day over the next three weeks and we will be giving away 12 patterns total throughout the tour.  Each pattern contains three variations, but there are certainly many more ways to get creative and change it up.  I can’t wait to see what kind of looks these ladies will inspire throughout the tour.
We did this last time with the release of my first two sewing patterns and I thought it would be really fun to do it again (click HERE to view the previous tour).  We’ve got some great new participants this time as well as a few returning sewing super-stars, so here are the lovely ladies that will be participating in the tour……..

Week 1: 
Stef from Girl. Inspired (Charlotte Pattern)
Jessica from Me Sew Crazy (Ruby Pattern)
Christina from 2LittleHooligans (Run Around Pattern)
Jess from Craftiness is not Optional (Ruby Pattern)

Week 2:
Maureen from Maureen Cracknell Handmade (Charlotte Pattern)
Liz and Elizabeth from Simple Simon (Run Around Pattern)
Andrea from The Train to Crazy (Ruby Pattern)
Destri from The Mother Huddle (Ruby Pattern)
Beverly from Flamingo Toes (Charlotte Pattern)

Week 3:
Shannon from Luvinthemommyhood (Ruby Pattern)
Mama Reita / Amy from Positively Splendid (Charlotte Pattern)
Susan from Living with Punks (Ruby Pattern)

Each day during the tour I will post one picture from each of these lovely posts to remind you to go visit their blogs and see all the details about the look they’ve created.  Also, at that time, you can enter to win a specific pattern on their blogs.  All patterns will ship out to the winners upon completion of the tour.

Sound like fun?  I think so.  I’ve already got a picture from our first guest tomorrow and I just about fell over from the cuteness that she has created!

Here are a few more pictures from the new sewing patterns…….

Size 6 Month – 10 Years
  View A
View B
View C
Size 6 Month – 8 Years
  Embellished Bodice variation with the skirt shortened and a contrasting band of fabric at the bottom.
(for Boys and Girls)
Size 6 Month – 6 Years
  
Current The Cottage Mama Sewing Patterns

   
All patterns can be purchased in the shop: www.thecottagemama.com
Check back tomorrow for the first stop on our tour.  I promise it’s going to be a good one!

Beach Family Vacation 2012 ~ Seaside, Florida

We just got back from a weeks vacation down in the Seaside area of Florida.  If you don’t know where that is, it is kind of near Destin, FL in the panhandle.  My in-laws have a beach front condo there that they use from time to time and invited us to join them for a week.  This was the kids very first time at the beach and they LOVED it! The picture above is the view from the balcony of the condo.

My in-laws drove down from Chicago to arrive several days before us.  Since our family flew down,  we didn’t have to check any luggage (they brought it all in the car for us) or worry about hitting the grocery store when we got down there (they had already done that).  Pretty nice in-laws, huh?  Yep, we are very lucky.

We spent the week hanging out on the beach, eating lots of seafood, doing a little shopping, taking some naps and basically doing a whole lot of nothing.  Let me tell you…..it is very hard for this mama to chill out for an entire week.  I am a go-go kind of gal and I always love to have a plan, but I did my best to relax and not think about getting back to the sewing machine. But I’m not going to lie, I did miss it…….just a little bit.

Here are a few pictures from our trip:

 Caspian Finn ~ 9 Months
 My husband, Brett, had as much fun at the beach as the girls.  They loved playing in the water.
The girls had a great time digging in the sand.
Savannah loved the water more than anyone!  She is such a little fish and wanted to be in there every chance she got.  She and her Daddy had a great time bonding in the sea together.
Matilda did more playing on land.
Sometimes when you get tired, you just need to stick your head in a hole in the sand and take a nap.  Miss Matilda usually takes a really good afternoon nap, but she was running on fumes at this point…..such a tired little lady.
After all that playing, Matilda finally fell asleep with Daddy.
We went out to eat at a restaurant in the area called Bayou Bills where the girls held a real baby alligator.  It’s mouth had a rubber band around it, but I thought they were so brave.  I really couldn’t believe they went through with it ~ I couldn’t do it, that’s for sure!
And this guy, well he has me wrapped around his little finger.  I love every single inch of him.

While we were at the beach I got a very exciting phone call with some news that I am dying, I mean dying to share with you all, but I’m not sure if I have the go ahead yet…….I will know more this week.  Don’t you just hate that? “I’ve got news, but I’m not going to tell you what it is”…..I know, I don’t like it either, but I promise that when I have the go ahead I will spill the beans.  And no…….it is definitely not another baby, it’s something Cottage Mama related!

So that’s what we have been up to this last week.  While we had such a fabulous vacation, I am truly glad to be home and get back into our routine.  I don’t have a whole lot of sewing-related things to share with you right now, but eventually I will.  I’ve got a fun book review and some other things to share coming up.  

We are having a great start to our summer and I hope you are too!!

Woodland Cottage Pincushion ~ Free Pattern and Tutorial

Today, I’ve got a really fun, whimsical pincushion that I hope you all love as much as I do.

I was inspired to create the Woodland Cottage pincushion by our home.  We live in a 1930’s cottage style home and it has been a great source of inspiration for me in a lot of my design and sewing projects. Here is our home……

So today we will be making an adorable Woodland Cottage pincushion from Riley Blake Designs ‘Woodland Trails’ fabric line.  Even if you don’t want to use it as a pincushion, you could hang it somewhere in your home or even on your Christmas tree, but for me, mine will be sitting right next to my sewing machine!

Let’s get started……….

Woodland Cottage Pincushion
by The Cottage Mama
Free Printer-Friendly Woodland Cottage Pattern Pieces
(Click HERE to print)
Materials:
Fat 1/8th of 4-5 different coordinating fabrics
1/2 yard Riley Blake Designs rickrack trim
1/4 yard Riley Blake Designs crochet trim
Embroidery floss and needle
Fiberfill or stuffing
Basic Sewing Supplies
Instructions:
Print your pattern pieces and cut all pieces.
Main House: Cut 2
Door: Cut 2
Window: Cut 2
Shingles: Cut 38
Using a 1/4″ seam allowance, place the shingle pieces with the right sides facing and sew around the curve.  Turn the shingles right side out and press.  You may need to trim the curves a bit to get them to lay flat.  You will end up with 19 completed shingles.  This is the most time-consuming part of this pincushion, but it’s what gives it some charm.  So turn on some music and take your time.
Add some embroidery to the window and door.  This does not need to be perfect as imperfections add character.  Even if you don’t know how to embroidery, just go for it.  I did a basic backstitch on the window and a large french knot for the door knob.
Place the window and door pieces with their right sides together.  For the window, you will sew all the way around the square, but leave a little opening for turning your window right side out.  For the door, sew around the curve and turn right side out through the bottom opening.  Press the seams out for both the window and door.
Pin the window and door in place.  You can eye-ball this step.  Just place them where you think they look nice.  Make sure to line up the raw edge of the door with the raw edge of the main house piece.  Edgestitch these to the main house piece (this will catch the little opening left in the window).
Now for the fun part, the shingles.  I like to use Wondertape for this step because pinning in straight lines can be a little tricky with such small pieces.  Wondertape is a double sided tape used in sewing and quilting and will disappear when washed.  I use it a TON when working with trims.  If you don’t have this, you can try pinning or using a quilting basting glue.
Lay your first line of tape 1/4″ up from where the roof and the house join.  Pull off the paper backing and lay your shingles with the straight edge in line with the tape.  Stitch 1/8″ from the edge to secure the first row of shingles in place.
Measure up 1/4″ from the first row of shingles and put down another row of tape.  Pull off the paper backing and lay another row of shingles.  Stitch in place.  Continue to do this same technique until you reach the top of the roof and it is totally covered with shingles.
You should end up with two shingles at the top of the roof of the house.
Now if you would like to add some rickrack, just line it up with the edge.  Again, I used my Wondertape (yes, I am obsessed), but you could certainly pin it.  At this point baste the rickrack in place 1/4″ from the edge.  If you use a smaller rickrack or larger you will need to adjust your seam allowances to make sure only a little part pokes through.
At this point, if you have a label for yourself or your business, sew it onto the back of the main house.
Also, I used a piece of Riley Blake Designs crochet lace to kind of look like a chimney coming off to the side of the house.  You could omit this piece or make it larger for a nice hook to hang your cottage over a door handle or even on a Christmas tree.  Sew the crochet lace in place by lining up the raw edge of the lace with the top of the house.
Place the cottage front and cottage back with the right sides together.  Stitch all the way around using a 1/4″ – 1/2″ seam allowance (depends on the size trim you are using).  Leave a 1″-2″ opening at the bottom.  Clip the corners to remove bulk and turn the cottage right side out by pulling it through the opening in the bottom.
Next, grab some fiberfill and stuff your pincushion.  Make sure you fluff the fiberfill as you go and really get it tucked in nicely to the corners.  Close the bottom by hand sewing with coordinating thread.
And, you’re finished!
Now step back and admire your adorable Woodland Cottage Pincushion!
Fabric Line: Woodland Trails by Sheri McCulley for Riley Blake Designs
Happy Sewing!

Embellished Ruffle Hoodie Tutorial

I’m excited to be sharing my Embellished Ruffle Hoodie Tutorial with you today! My style of designing is a little different.  I usually let the fabrics I work with inspire my children’s clothing designs and blog projects, so I’m never quite sure what I’m going to come up with.  When I got this package in the mail from Riley Blake Designs, my mind started swirling with about 10 different ideas.  This line is ‘Woodland Trails‘ and it is about one of the cutest lines around.  It’s sweet, whimsical, youthful and feminine (well, the colors I selected).

After thinking about these fabrics and trims for several days, I finally settled on the project that I’m sharing with you today – The Embellished Hoodie Tutorial.  This is a practical project for any girl……from a baby up to a tween.  You can get as creative as you would like with the amount of embellishing you would like to include and can customize this look and theme to your liking.

So, let’s get started………

The Embellished Hoodie Tutorial
by The Cottage Mama for Riley Blake Designs
 
Supplies:
1 blank zip-up hoodie (any size)
1/2 yard of two different prints (for ruffles)
1/4-1/2 yard (depending on size) for hood lining
Trims – 1 yard of several trims – rickrack, crochet lace, pom poms or any trims you love
Optional: Woodland Trails Panel (back applique)
Steam-A-Seam 2 Lite (for applique)
Optional: Embroidery Floss
Wash Away Wonder Tape (optional)
Basic Sewing Supplies
Iron
Instructions:
 
1/2″ SEAM ALLOWANCE
(unless otherwise noted)
 
 
For the back embellishment I used one circle from the Woodland Trails panel.  I also wanted to make it a little more special so I hand-embroidered over some of the lines with embroidery floss using a back-stitch and a satin stitch (on the ears).  I also added french knots on top of the brown dots around the edge of the circle.  This part is totally optional, but I would suggest embroidering before you cut out the circle from the panel.
Cut out a circle from the panel.  You can choose any one of the adorable animals.  Just leave a 1″ border around the edge of the actual design.
Next we are going to add the rickrack trim edging around the panel circle.  I love to use Wonder Tape to hold trim in place, but you can also use straight pins.  If you are not familiar with Wonder Tape, it is a double sided tape that washes away after going through the wash.  It also doesn’t gum up your needle when you sew through it.  Line up the rickrack with the edge of the circle and overlap the two ends.  Stitch down the center of the rickrack all the way around the circle.
After sewing the rickrack in place, turn the rickrack to the backside of the circle.  This will allow for just the edge to poke out.  Work your way around the circle, using your iron to press the seam open and press the rickrack into place.
To applique your circle piece to the back of the hoodie, grab your double sided fusible web (I use Steam-A-Seam 2 Lite) and follow the instructions to ahere it to the back of the hoodie.  Once you’ve pressed it in place, stitch around the edge of the circle using a 1/8″-1/4″ seam allowance.  Make sure your bobbin thread matches the hoodie so that your stitching won’t show on the inside of the hoodie.


Cut the lining for the hood.  Lay your hoodie down, folded in half, and use this as your pattern (I use basic hardware store washers for pattern weights).  Fold fabric in half and cut around the hood leaving a 1/2″ for your seam allowance.  You should now have two pieces for your hood.
Place your hood pieces with the right side of the fabric facing one another.  Stitch around the entire side that is curved.  Then clip your curve or use pinking shears to clip to reduce bulk and to help your curve lay flat.  Press your seam open.
Press the front of the hood lining back towards the wrong side of the fabric a 1/2″ (seen in the picture above).  We are doing this to make one of our future steps a little easier.

Pin your hood lining to the inside of the hoodie at the bottom of the hood.  Stitch across the bottom of the hood.

After you have sewn the bottom of the hood, press the seam open and line up the rest of the hood and hood lining.  Top stitch around the hood lining to secure the rest of the lining to the main hood.  That is why we pressed part of the hood under 1/2″, so it would make this step easier and we would have no exposed edges.
If you want, you can add some trim detail on the inside over the seam between the hood and the main part of the hoodie.  Again, this is totally optional, but it adds a cute little detail.  I used the Riley Blake Designs crochet trim.  Pin and sew in place.  Make sure to turn the ends under so you have no raw edges exposed.

Now it’s time to cut the ruffle pieces.  This step will vary depending on the size of your hoodie.  You want your ruffle pieces to be 2-2.5 times the length of the zipper all the way around the hood and back down the other side of the zipper.  For the size 5, I just cut two strips on the fold of each fabric using the full width of the fabric.  This should work for sizes 2-8, just shorten them a little for smaller sizes.  Your width is going to be 5″ for the bottom ruffle and 3.5″ for the top ruffle.

So, you should have two strips of each fabric, for a total of four strips.

To make one big long strip of each fabric, place the fabric with the right sides together and sew one of the short ends together.  Press seam open.  Now you will have one long strip each of two different fabrics.  Fold the long strips in half (length-wise) with the wrong sides facing (right side facing outward). Press.

Now we want to finish both ends of each strip, so that it will look nice when we add the ruffle to the hoodie.  So, unfold the fabric and turn it the opposite way with the right sides together and sew both short ends.  You will do this on two ends for both pieces of ruffle fabric.

I decided to use my serger to finish the raw edge of the ruffles.  I know most people do not have a serger, so you can finish the edge with a zig-zag stitch or leave it raw.  It’s not going to show, but I just wanted a clean edge to work with.

Use a gathering stitch to gather your fabric.  To do this, set your sewing machine to the longest stitch length, mine is 5.0, and run a stitch all the way down the long, edge of the fabric.  Make sure you do not backstitch at the beginning or end otherwise your fabric will not gather.  Now pull one of the threads on either end of the fabric to begin gathering.  Because this is two layers of fabric, it may take a little bit of work to gather the fabric.  Gather both fabric strips until they are the same length as the zipper, around the hood and back down the other side of the zipper.

Line up your bottom ruffle first, then place your smaller ruffle on top, making sure to line up the raw edges.  Pin all the way around the hoodie and stitch in place, sewing as close to the edge as possible.  To conceal the unfinished edge sew trim on top.  I used the Riley Blake crochet lace trim, but you could use ribbon or even bias tape.  Do not get your ruffles and trim too close to the zipper or you run the risk of the fabric catching in the zipper.  I would also recommend switching out your needle to a denim needle for this part as it is pretty thick sewing through the trim, four layers of fabric and the hoodie.

And once you’ve finished that step, you’ve got a gorgeous embellished hoodie!

You can find blank hoodies at most of your local retailers such as Target or Walmart.  I ordered some of these from Etsy.com for $6.00 a piece.  They are a really nice, light-weight knit.

I am totally in love with this fabric, Woodland Trails.  I have so many other ideas…….dresses, pillows, little aprons, ruffle pants, baby quilts and the list goes on and on.

Embellished Ruffle Hoodie Tutorial by The Cottage Mama. www.thecottagemama.com

So, what do you think?  Think you’ll make one of these for a darling little lady in your life?  I’m sure she’d love it.  Shoot, I think I’d even like one for myself!
Until next time……….have a great one!
To check out more sewing products and recommendations, click HERE!

June Giveaway Day

Can you believe it’s June already?
This year is going by way too fast, but guess what that means?
It’s time for our June Giveaway Day!
The June Giveaway Day
on The Cottage Home Blog
Here’s how this works………you can enter to win each one of these prizes from our lovely blog sponsors.  Leave a separate comment for each prize you would like to win.  For example, if you want to win the Birdsong Bows prize, leave a comment saying something like “I’d sure love to win the Birdsong Bows prize – they are a great shop!”  And leave a separate comment for EACH entry. Got it? Great!

Here are the wonderful prizes and sponsors for our June Giveaway Day…….

FAT QUARTER SHOP: The Fat Quarter Shop is an online quilt shop with a wide selection of top- quality cotton yardage, specialty cuts, quilt kits and quilt patterns. They also offer access to many wonderful quilt clubs, block of the month programs and exclusive projects. Most of all, Fat Quarter Shop prides themselves in their top-notch customer service, with friendly, knowledgeable representatives and speedy same day shipping.

GIVEAWAY:
Bukhara Fat Quarter Bundle by Dear Stella  

Website: www.fatquartershop.com 
Blog: http://fatquartershop.blogspot.com/ 
Facebook: http://www.facebook.com/FatQuarterShop
Flickr Group: http://www.flickr.com/photos/fatquartershop/
Twitter: http://twitter.com/#!/fatquartershop
Pinterest: http://pinterest.com/fatquartershop/ 

FAIRYTALE FROCKS & LOLLIPOPS: Sewing has been a life-long passion of Terri Allred, owner of the on-line based sewing boutique, Fairytale Frocks and Lollipops. In 2009, Terri began living her dream… Fairytale Frocks & Lollipops was created with every seamstress in mind! From children’s clothing, aprons, bags, designer fabric and patterns, to home décor and much more! You will find whimsical, traditional, contemporary, or heirloom-style patterns offered at all sewing skill levels. Terri has an impeccable eye for detail and design and hand-selects what she loves. Fairytale Frocks & Lollipops steadily features and promotes small boutique owners and always has an “open-door” for any new ideas or designs. New designers are teaming up with Fairytale Frocks & Lollipops everyday! Terri is proud to present a “one-stop” sewing boutique with such vast inventory variety. Stop by, browse around, fall in love.

**Currently they have instant digital pattern downloads which is a huge perk for anyone ready to get sewing on a new pattern right away!  Also, they have a lot of their stock on sale, so stop by and take a look around.

GIVEAWAY: 
$25.00 gift certificate towards anything in their shop.
MODERN FABRIC STUDIO: I started sewing a few years back…I taught myself how to sew and the first fabrics I started sewing with were from the Designers I sell in my shop! I have always wanted to own my own business so this was a perfect combination – to own a business doing something I love!  Modern Fabric Studio offers high quality fabric in rich and vibrant colors perfect for quilting, sewing and creating anything your imagination desires! 🙂

Additionally, Modern Fabric Studio is offering an exclusive discount of 10% off their entire purchase through the duration of this giveaway with the promo code: 
COTTAGEHOME


GIVEAWAY:
$25.00 gift certificate towards anything in their shop.

HeartSong Quilts is one of the most unique quilt shops in America. It offers visually stunning fabrics including Australian Aboriginals, primitive moderns,urban and edgy fabrics, and fabrics evoking African mudcloth and homespun. They also sell traditional fabrics, panels, quilt kits, books, patterns and notions. They have an extensive clearance fabric department with savings up to 50%. They provide long arm quilting service, too. When you don’t want the “same old, same old”, head for HeartSong in Hot Springs, SD. It’s definitely not Your Grandma’s Quilt Shop!


GIVEAWAY:
Book ~ Australian Spirit
The Definitive Book for Using Australian Aboriginal Fabrics 
Today,  Ann and Brian are giving away a copy of Australian Spirit, the definitive book for using Australian Aboriginal fabrics.  This 115 page book contains 10 projects, explanations of Aboriginal motifs, biographies of artists designing for M & S textiles, and pictures of additional idea generating projects.  The Caddywampus Down Under quilt pictured here is from this book.  This book retails for $34.99.
GIVEAWAY:
5 e-Book Pattern Bundle
From Birdsong Bows:
Birdsong Bows offers comprehensive patterns and tutorials for a variety of hair accessories, bows, and fabric flowers. But this year, I’m expanding into sewing patterns such as whimsical totes and bags that you and your little ones will love! I have a new Envelope Pillow pattern available this month that includes cutting templates so the pillow won’t develop those little ears on the corners. My first bag pattern is a pretty ruffled tote that’s perfect as a Barbie accessory case or a pretty organizer for your sewing room or nursery: http://www.etsy.com/listing/93376704/easter-basket-instructions-pdf-fabric.

Buy more and save with my Accessories Pattern Bundle package!
From Shabby Fabrics……
The Shabby Fabrics story begins here. All along while growing up, I loved arts and crafts with every ounce of my being. When it came time to choose a career and go to college, I figured I couldn’t make a living crafting so I pursued an aeronautical degree and became an airline pilot. I would take my hand sewing with me on trips and stitch to my heart’s content while laying over at various hotels.  The love of crafting never left me. 

The events of September 11, 2001 changed the entire world and definitely my own personal world in a very big way.  Soon thereafter the airlines began furloughing pilots. Both my husband (also a United pilot) and I found ourselves out of work with no health care, two children and a mortgage. These were indeed uncertain and scary times. All of the flying experience  I had accumulated over the last 20+ years suddenly meant nothing. No one was hiring pilots. I knew I would have to reinvent myself and awaken a skill set that I never even  knew I had.  After much prayer and contemplation, I felt God urging me to do something I loved and knew a great deal about already. After all, we needed to find work right away! I applied for a business license and  began selling a few fabrics on ebay. 
Ten years later, we are selling fabrics from our own website worldwide and loving every moment. There is no question that God is behind the success of Shabby Fabrics. I have a wonderful staff that I enjoy working with each day. Besides buying products and deciding which projects will becomes kits, block of the month, etc, I also design a line of quilt patterns called Shabby Exclusives. Some of our designs have been featured recently in McCalls magazine. When I think to the future of our company, I remind myself to remain flexible and attentive to God’s word and plan. After all, He’s the author of this great book.

GIVEAWAY:
$25.00 Gift Certificate

A BIG giant thank you to our sponsors who decided to participate in our June Giveaway Day!
Again, leave a separate comment for each prize you would like to win. 
It would be great if you could visit the different shops and tell us something you like about their shop, but I understand if that’s not possible.  So just a nice comment will work too!
Giveaway open until June 4, 2012 at Midnight (CST).
Happy June!

*If you are interested in sponsoring The Cottage Home blog, please email Lindsay at thecottagemama[at]gmail[dot]com for rates and information.

Sample Spree and Lots of Fun Goodies

I know I said that you couldn’t really purchase individual yards of fabric, trim, ect. at International Quilt Market, but there is one event that is held before market opens where you can and it’s called Sample Spree.  Again, this event isn’t open to the public, but it’s about the only chance that one has to purchase lines of fabric that have yet to be released and may not be released for up to five more months.  It happens around 8:00PM the night before market and goes until 10:00PM.  Not every fabric manufacturer participates, but a lot of them do.  There is a lot of fabric as well as trims, patterns, notions, ect. that can all be purchased at wholesale cost (without the huge minimums that generally come with ordering wholesale). 

Sample spree is nuts!!  Seriously.  Imagine all the chaos that goes along with the running of the bulls, but instead you have hundreds of ladies obsessed with fabric all running to grab the new lines.  And once it’s gone, it’s gone, so I’m sure you can imagine the madness.  Mom and I signed up for Sample Spree last spring which was our first time, but we skipped it this past fall, so we thought it would be fun to do it again.  Luckily for us, there are no fabric lines we just MUST have, so we are much more relaxed about the whole event.  Some people would not find sample spree fun at all.  Certainly if you don’t like crowds, you would not like this event.  But we like the excitement and hub-bub of it all, yes, we are the type that actually like shopping the day after Thanksgiving.

People start lining up for Sample Spree up to four-five hours before they even open the doors.  Mom and I arrived about 45 minutes before it started and this (picture above) was what the line looked like and we ended up pretty much in the middle.  It seems kind of nutty to wait in line that early since once the doors opened we were all in there in about 5 minutes, but to each his own.

So here are some of the things we brought home from sample spree and some freebies from different people at market……….

I firmly believe that you can never have too much rickrack, especially in pretty colors such as these!

I picked up pretty much the whole collection of ‘Rhapsodia‘ by Art Gallery Fabrics (which has already been released).  These are all 1 yard cuts and I am in love with this line.  Feminine and girly, yet still modern.  And if you’ve never felt Art Gallery Fabrics, you are definitely missing out.  They are dreamy and wash better than any of my other quilting cotton.  Perfect for garments!

And while we were at the Art Gallery Fabrics table, I picked up one more bundle of fabric that I might love even more than ‘Rhapsodia‘……this one is called ‘LillyBelle’ by Bari J. for Art Gallery Fabrics.  This line will be released in June which is just around the corner.  This is only half of the collection as the other half was already sold out by the time we made our way to this stop at sample spree.

I have been waiting for this line from Riley Blake Designs to come out for about 6 months now.  It’s called ‘Seaside‘ and it is just perfect.  Yes, Riley Blake Designs sends me fabric for all my design team projects but I wanted to have all of these fat quarters of each print so I picked up this fat quarter bundle at sample spree.  I’m seeing a quilt here with this set.  Although, I may have to get some yardage as well because a few of these prints are begging to be made into children’s clothing.

I don’t have very much seasonal fabric in my stash, so I picked up this fun Christmas collection from Anna Griffin.  I like that it incorporates some pink and blue into the traditional red and green color scheme.

Here is a little freebie from the folks at Windham Fabrics.  This is Lotta Jansdotter’s new line ‘Bella‘.

Some free, super-cute 2.5 inch pre-cut squares.

I picked up a Kona Cotton Color Card that they were giving out for free.  It’s a great thing to have because it gives you an actual swatch of each solid fabric that is much easier to coordinate than just looking on your computer.  This card is also great when you are trying to pair a solid with a patterned fabric.

This was a cute bundle of embroidery patterns that I picked up.  I have been embroidering a lot lately and I am really enjoying it.  I may have a little embroidery up my sleeve coming out soon, so these sweet little designs really caught my eye.
Here are some pictures I took in our hotel room with some of mom’s fabric too…….

And that’s a wrap.  We had so much fun picking up these goodies at quilt market.  It’s so nice that Mom and I both love sewing and fabric and can bond over fun experiences like quilt market

I think we both have A LOT of sewing ahead of us with all this gorgeous fabric!