Archives for July 2011

Fat Quarter Shop Fabric Giveaway Winners

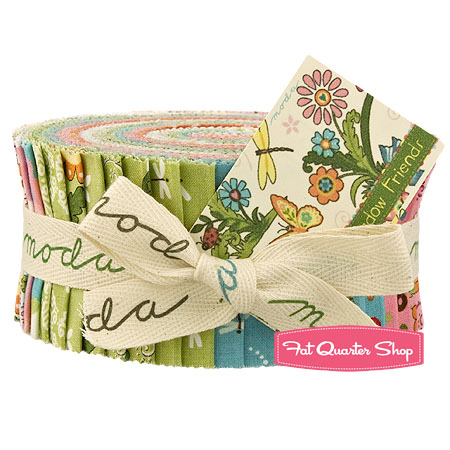
I’m so excited to announce the winner(s) of the Fat Quarter Shop “Meadow Friends” jelly roll giveaway.  Did you notice how I said winner(s) plural?  Well, Fat Quarter Shop contacted me this week and said because you guys did such an awesome job at visiting their shop and ordering fabric, that instead of just giving away one jelly roll, they are giving away FOUR!!!

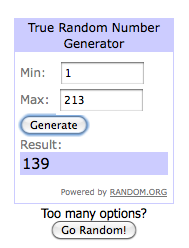
Here are the FOUR lucky winners………

Congratulations to all four of you!  Each winner will receive a jelly roll of “Meadow Friends” by Deb Strain from Fat Quarter Shop and can choose whether they would like the boy or girl version.  If you were one of the lucky winners, please email me at thecottagemama[at]gmail[dot]com with your contact information, your boy or girl selection and we will get you your prize as soon as possible!

Thank you so much to everyone who entered and if you didn’t get a chance to visit Fat Quarter Shop, make sure to pay them a visit – their shop is like a slice of fabric heaven!
If you are interested in becoming a sponsor of The Cottage Home blog, please email Lindsay at thecottagemama[at]gmail[dot]com for rates and more information.

Decorating ~ Girls Shared Toddler Bedroom

About a month ago we moved the girls into the same bedroom.  I’m not going to lie, I was extremely nervous to make this move, but we knew it needed to happen well in advance of the other big adjustment in our future (baby brother).  It was a big transition for them and for us into their Girls Shared Toddler Bedroom.  It was Matilda’s first time in a “big girl bed” and the first time either girl has ever had a roommate.  We had a rough first couple days, but since then it’s been working out pretty well.

The girls bedroom is not a huge room, I think it’s 11′ x 13′ and we weren’t really sure if both beds were going to fit.  Sure enough, they did!  I just love these beds.  They were given to us after my husband’s Grandma passed away last year – they use to be in her guest bedroom.  I love the ornate lines and the creamy white color.  It’s exactly what I would have picked out for the girls had I gone shopping for these myself.  And I’m sure Brett’s Grand-Molly loves looking down seeing her great-granddaughters snug as little bugs in the beds she picked out.

I’ve been collecting embroidery hoops from local thrift shops for the past year or so.  Just picking them up here and there, not quite sure what I was going to do with them.  These were so inexpensive, maybe .25 – .49 cents a piece.  I used my designer fabric scraps and just stretched them into each canvas and then trimmed around the edges.  They are each hung on a nail and are very light-weight.

The embroidery hoops on the wall is not my original idea, I’ve seen this done in designer magazines as well as on lots of online websites and I have always loved the look.  We used to have Savannah’s name on the wall, but when we moved Matilda in, we had to come up with something new.  I have so many fabric scraps that I just love, I knew this inexpensive art work would be just perfect to fill the large wall in the girls room.

The pink polka dot duvet covers and pillow shams are from Potterybarn Kids.  The twin-sized quilt on the foot of Savannah’s bed is one that I made for her from Heather Bailey’s “Freshcut” fabric line before Matilda’s arrival.  I haven’t had time to make Matilda a big quilt yet, so her quilt is store-bought.  It’s really cute with owls, flowers and birds.

The cream colored drapes were in the nursery, but didn’t really go with our new “Nautical” theme for baby brother.  So I moved them into the girls room, but they needed something against the yellow wall.  I found these two valences at Home Goods store in the clearance section – $3.00 a piece.  I stitched them to the top of each curtain panel to add a little interest around the window.  They are trimmed with ric-rac and were just the right colors.

I covered this lampshade for Savannah’s original room and I still love it.  I covered it with fabric and then made fabric yo-yo’s that I hot glued all around the bottom.  It is finished at the top with a pink, ruffle trim ribbon.

Above are a couple pillows I made for their room.  I haven’t gotten around to making an “M” pillow, but hopefully that is on my short list of to-dos.  The other pillow is made from scraps from Savannah’s quilt and several handmade fabric yo-yo’s.

The elephant wall art was made by me from different fabric scraps that I cut up to create the piece.  There are two other similar pieces in the room (though I didn’t get a photograph of them) – one has two little birds and the other has a lion and a whale on it.  All three photo mats are covered in the same pink polka dot fabric.

Matilda’s bed is still a little high up for her to climb in, so she uses this painted trunk to climb into bed.  It’s great because it also doubles as storage and looks pretty too.

The girls are having a great time being roommates.  Since they are only 16-months apart, I think it works out really well for them to share a room.  I’m currently having them nap in separately (Savannah naps in Mama and Daddy’s bed), but other than that it’s worked out really great!
Shared Toddler Girls Bedroom from The Cottage Mama. www.thecottagemama.com

Fat Quarter Shop Giveaway: Meadow Friends Jelly Roll Fabric Giveaway

Have you heard of Fat Quarter Shop?  Of course you have! They are only one of the most awesome fabric shops online with the most amazing collection of precut fabrics around.  Did you know that they are a sponsor of The Cottage Home blog?  Well, they most certainly are and I just wanted to take a moment to share a few things from their shop before we move on to their generous giveaway.

Delilah Fat Quarter Set

Fat Quarter shop sells an amazing array of designer quilting cotton yardage, but they also specialize in “precut” fabrics.  If you aren’t familiar with “precuts”, here is what they are – they are fabrics that have been cut to a certain size and are generally bundled together in coordinating sets.  For example, charm square packs are 5″ x 5″ cuts of fabric sold in coordinating packs of 42 (or other number depending on the seller).  These “precut” fabrics make it super-easy to do fun patchwork projects like quilts, table runners, wall hangings, clothing, ect.  There are also several other different types of “precut” fabrics that come in other sizes – jelly rolls, layer cakes, fat quarter bundles, and fat eighth bundles.

 Joel Dewberry Heirloom Fat Quarter Set

The neat thing about Fat Quarter Shop is that they bundle a lot of their own fabrics into “precuts” that are exclusive to their shop.  Some manufacturers will sell fabrics already “precut”, but at Fat Quarter Shop you can get these plus a variety of cuts not available elsewhere.

Tula Pink’s Parisville Fat Quarter Bundle (on sale)

I am so excited about today’s giveaway and I know you guys will be too!  Our lovely blog sponsor, Fat Quarter Shop, is giving away a girl or boy (your choice) jelly roll of Deb Strain’s “Meadow Friends” to one lucky The Cottage Home Blog Reader.

I have seen so many fun projects online using jelly rolls lately.  Here are a few projects on my “to do” list (tutorial links underneath)………..


Remember the quilt I showed you a few weeks back that I made for my daughter, Savannah’s room (blog post here)?  
Well, back in the day (3 years ago) I purchased a jelly roll and fat quarter bundle from Fat Quarter Shop to complete this quilt.  I still have a few scraps left over – fat quarter bundles go along way!
So here’s how to enter the “Meadow Friends” jelly roll giveaway.  Two entries allowed per person.  Please leave a separate comment for each entry.  Open to US residents only.
1) Go check out Fat Quarter Shop and tell us what you like (click HERE to do so).
2) Become a fan of Fat Quarter Shop on Facebook (click HERE to do so).
Giveaway will be open until July 29, 2011 at midnight (CST).
If you love designer cotton fabrics, you need to go check out Fat Quarter Shop.  They have an amazing selection to choose from and you can be 100% assured that this is quality, top-of-the-line fabric!
*If you are interested in becoming a sponsor of The Cottage Home blog, please email Lindsay at thecottagemama[at]gmail[dot]com for rates and more information.

Governor’s Mansion Summer Peach Tea Punch

Several months prior to Matilda’s “Tea for 2” party, I received an issue of Southern Living magazine that was totally dedicated to different types of sweet teas.  I thought, “Perfect!”, it was just what I needed for my little lady’s party.  I decided on “Governor’s Mansion Summer Peach Tea Punch” and I was not disappointed!

This tea punch is a combination of peach nectar, iced tea, simple syrup, ginger ale, club soda and more!  It’s a great way to add some festiveness to your basic iced tea and really take things to another level!

Makes 1 gallon
Recipe from Southern Living Magazine
Ingredients: 
3 family-size tea bags 
2 cups loosely packed fresh mint leaves 
1 (33.8-oz.) bottle peach nectar 
1/2 (12-oz.) can frozen lemonade concentrate, thawed 
1/2 cup Simple Sugar Syrup 
1 (1-liter) bottle ginger ale, chilled 
1 (1-liter) bottle club soda, chilled 
Garnish: fresh peach wedges

Directions: 
Bring 4 cups water to a boil in a medium saucepan; add tea bags and mint leaves. Boil 1 minute; remove from heat. Cover and steep 10 minutes.

Discard tea bags and mint. Pour into a 1-gal. container; add peach nectar, lemonade concentrate, and Simple Sugar Syrup. Cover and chill 8 to 24 hours.

Pour chilled tea mixture into a punch bowl or pitcher. Stir in ginger ale and club soda just before serving.  Garnish with fresh, sliced peaches.


We served our Summer Peach Tea Punch in mason jars with straws, but it would also be beautiful in a wine glass or champagne flute.  This iced tea is perfect for a warm summer day or a “Tea for 2” party!

Mamarazzi Book Giveaway Winner

The winner of the book, “Mamarazzi – Every Mom’s Guide to Photographing Kids” by Stacy Wasmuth, is………….

Congratulations, Clover!!  You are going to love this book!  Please email me at thecottagemama[at]gmail[dot]com with your contact information and we will get you your book as soon as possible.  Thank you to everyone who entered the giveaway and if you weren’t the winner, I highly recommend checking this one out.  It’s a really easy read and a great reference book.  
Another great giveaway coming tomorrow (Monday)!!

Lemon Lavender Tea Cookies

My mom and her husband, Allen (aka Pepo), recently attended the Lavender Festival in Blanco, Texas and they sent me this wonderful lavender cookbook and culinary grade lavender.  I had no idea there were so many ways to cook with lavender.  I thought these Lemon Lavender Tea Cookies would be just perfect for Matilda’s “Tea for 2” party and they definitely were just right!

These cookies are light and contain absolutely no eggs, so they are definitely more of a shortbread.  Be careful though, because the dough tasted so yummy that I’m surprised I even got some cookies out for the party!

Makes 24 cookies
From the “Local Flavor of Lavender” cookbook
Ingredients:
1 tablespoon dried culinary lavender
2 cups all purpose flour
1/8 teaspoon salt
1 cup unsalted butter (room temperature)
2/3 cup sugar
Zest of one lemon
1 teaspoon vanilla
1 tablespoon milk

Directions:
Preheat oven to 325 degrees.

You will need to use dried culinary grade lavender for this recipe since that is what is suitable for human consumption.  Above is the lavender that was sent to me by my mom from the festival.

Finely chop 1 tablespoon of lavender.  If you have a coffee grinder used for grinding herbs, that would be a great thing to use or you could also use a food processor.  I opted for a basic knife.

Zest one lemon.  I like to use my microplane for zesting, but a box grater would work just as well.  Make sure you only zest the yellow part of the lemon.  The white can be pretty bitter.
Cream wet ingredients, lemon zest and sugar with a hand-mixer.  Then add in dry ingredients.  Stir until dough comes together.  It should not be dry, but not too sticky either.  If you think it is too dry, keep stirring, it will come together.

Place dough in refrigerator for 1-2 hours, until firm, or overnight.  Remove from refrigerator one hour before rolling out dough.  The next part is up to you.  You can make these like regular cookie cutter cookies and roll your dough 1/4″ thickness and cut with a round or heart shaped cookie cutter.  Or you can do what we did, which was to roll the dough into two logs and slice the cookies, then coat them in sugar.  Either way, they will turn out great.

Bake for 15-20 minutes or until cookies are slightly brown on the edges.  Transfer cookies to a cooling rack and let cool completely.


The dough can be made up to two days in advance and cookies can be baked one day in advance.  Freeze any leftover cookies for a sweet treat on another day!  These cookies will have your guests talking because they are delicious and a unique flavor.

The next time you have the ladies for tea or coffee, give these a try, they will love them, that is, if you don’t eat all the dough first!

The Little Man Gown Tutorial

I was recently invited by Laura from ON{the laundry}LINE to guest post during her “Summertime and the Living is Thrifty” series.  So here I am sharing my most recent thrifty creation for my soon to arrive little man, The Little Man Gown.
I’ve been meaning to make a little something for this new bundle of joy that is due to arrive in a month in half, but just haven’t had the time to sit down and actually get it done.  I’m sure you can imagine that with two girls, we have a lot of pink in this house.  I love baby gowns, but we really didn’t have any that would be appropriate for this little guy.

My husband recently left a stack of old t-shirts in my studio that he was done wearing.  He said before he put them in the “donate” pile, he thought I might want to make something out of them (he knows me pretty well).  The shirt above is kind of a joke.  We used to have a really awesome six-toed, boy cat named George.  Brett would always call him a mushroom and one day I asked him, “why?”.  He said it was because he was such a “Fun Guy”……..get it? Funghi?

Well, anyway, George passed away at the young age of 3, but when I saw this shirt I knew I had to buy it in honor of our late “Fun Guy”.  Brett wore it as an undershirt a few times to humor me, but it isn’t quite his style.  I thought this would be really cute for the new little man coming into our lives.

I decided to turn this t-shirt into a baby gown.  You could certainly use this tutorial to make a recycled baby girl gown too, but since I have boys on the brain, I’m calling it “The Little Man Gown”.  Oh, and the best part about this gown is that if you use a shirt/supplies you already have – it’s almost free!!  That’s being pretty thrifty, right?

Supplies:
1 large t-shirt (the larger the better)
1/4 yard contrasting knit (I used rib-knit)
18″ thin elastic
Scissors
Sewing Machine (make sure you use a needle designed for knits)
Old baby gown to use as pattern
Spray starch (optional)

Directions:

 Grab a large shirt.  It needs to be pretty big because you need the length for the gown.

For this tutorial I used one of my girls old baby gowns as the pattern.  I know there are tons of commercial patterns by McCalls and Simplicity if you would prefer to use a gown pattern.  But if you have a baby gown lying around, just go ahead and use that.

Cut around the baby gown leaving at least a 1/2″ seam allowance all the way around.  Cut the neck out of the t-shirt, but make sure to leave some length towards the top (see picture below) because we will be overlapping this part of the gown.

Here is what the top of your gown should look like after you have cut it out using your pattern.  Again, notice how I left some length towards the top of the gown, near the neck-line.

Now you need to cut out both of your arm pieces.  Lay the arm flat along an extra piece of t-shirt material (I used the sides of the t-shirt).  For this piece you will need to cut it TWICE as large as the arm pattern piece (see picture below).  Cut a curve towards the top.  You don’t have to be super exact with this part.  Trust me, don’t be scared.

Here are your two arm pieces after they have been cut out.  See what I mean?  They are double the size of the arm piece that we used for our pattern.
It’s time to cut our contrasting binding.  I used rib-knit because I like the way it stretches, but you could certainly use pieces from another recycled t-shirt.  I cut 2 strips, both 2″ x 36″ and that was just the right amount for the gown and hat.  You can do shorter pieces if you are working with less yardage, you’ll just have to cut more than 2.
Here is your contrasting binding once it has been cut into strips.

You are going to fold the binding like you would bias tape.  Fold in each side in 1/2″ and press.  This is when your spray starch will come in very handy.  The starch really helps give the knit more body and structure, so use it liberally during this step.

Once you have folded the sides in by 1/2″, you now want to press your binding in half length-wise.  Again, use your spray starch.

Now that your binding is complete, it’s time to add it to our main gown pattern pieces.  Pin binding around both neck-lines.  Sandwich the main gown piece in between your folded binding.  Stitch the binding to the front and back of the gown as well as on the ends of both sleeve pieces.

Once you have the binding sewn on, overlap the front and back of the gown to form the neck-hole.  Baste stitch around the armholes to hold in place.  Basting means to use a slightly longer stitch (I use 3.0).  You want to overlap the neck enough so that your armholes are the same length as the curve on your arm pieces.

Pin your arm pieces along the armhole opening.  Place the main gown piece and the armhole piece right-sides together.  The pinning may seem a little strange for this part because of the curve of the armhole, but just keep working it around.  Stitch in place using a 1/2″ seam allowance.  Do this for both arm pieces on each side of the gown.

Stitch down both sides of the gown.  Place gown front and back, right-sides together.  Start sewing at the wrist and go all the way down the arm and down the side of the gown.  Do this on both sides.  Turn right-side out and press.

Stitch binding around the bottom of the gown.  Leave a 2″ – 3″ opening for threading your elastic.

Cut an 18″ piece of thin elastic and thread through the bottom binding.  Use a safety pin or a bodkin (shown here) for threading.  Stitch the ends of the elastic together, overlapping about 1″.  If you are using really skinny elastic you can simply knot it several times.  Sew the opening closed.

If you have some extra t-shirt fabric leftover you may want to make a matching little hat.  Again, I used a 0-3 month baby hat as my pattern piece and cut the hat out of the sleeve.  Cut around the hat leaving a 1/2″ seam allowance.   Place right-sides together to sew the hat.  Turn and press.   Then sew the coordinating binding around the bottom.

And there you have it, a super-cool gown for your super-cool dude!
If you’re looking for some other thrifty tutorials, check out some of these previously seen on The Cottage Home………..

And for even more fun and thrifty ideas, head over to Laura’s blog and check out some of the other awesome ideas from some other very talented bloggers!  Thanks for the invite, Laura – it’s been fun!!

Goat Cheese and Ham Wrapped Asparagus

These Goat Cheese and Ham Wrapped Asparagus were a huge hit at Matilda’s “Tea for 2” party.  And surprisingly it was the men who really gobbled these up!  They are a great finger food because they don’t require a fork and are easy to pick up and eat while you socialize.

Serves 15-20
Ingredients:
2 lbs. fresh asparagus
1/2 lb. honey ham
8 oz. herb goat cheese
1/3 brick cream cheese, softened
30+ fresh chives 

Cut off the tough ends of the asparagus (approximately 1″- 2″). Cook asparagus.  Only cook for a few minutes in boiling water and then shock them in a large bowl of ice water.  You do not want to over-cook the asparagus because they will lose their beautiful green color.  You also still want them to have a good bite and not be flimsy.  I’d say, in this case, better to under-cook than over-cook.

Clean your fresh chives.  We picked these from our herb garden so they are super long.  You will need one chive per asparagus spear.

Combine your herb goat cheese and the 1/3 block cream cheese.  The cream cheese will help the goat cheese be easier to work with when spreading it on the pieces of ham.

Cut ham in half or thirds (we did thirds because our ham slices were very large).  Spread a very thin layer of goat cheese on each piece of ham.  Roll up asparagus in ham/goat cheese.  Tie with a chive to secure.  Place in a container to keep cool in the refrigerator.  Can be made a day in advance.

Remove from refrigerator just prior to serving.  Place on a serving tray.  I love using white because I think it makes the colors pop, but you can use whatever you’d like.

I would suggest discarding any un-eaten asparagus after the party if it has been sitting out for several hours.  These asparagus were eaten up SO quickly. I would recommend making more than you need and maybe bringing them out in two rounds so they don’t spoil.

Give this recipe a try – you’re going to love it!

Summer Pasta Salad

I love a good pasta salad, don’t you?  I’ve tried tons of different recipes and I don’t know if I’ve ever met a pasta salad that I didn’t really like.  For Matilda’s “Tea for 2” party I wanted to do an updated version of a traditional classic.  This is my version of Summer Pasta Salad with fresh herbs, sun dried tomatoes, peas, black olives and asparagus.

Serves 15-20
Ingredients:
2 lbs. tri-color rotini pasta
1 cup zesty Italian dressing
1 cup Caesar dressing
1/2 jar of sun dried tomatoes packed in olive oil
10 fresh chives
Handful of fresh parsley
1/2 cup fresh basil
2 small cans sliced black olives
Half bag of frozen peas, thawed (run under hot water)
10 cooked asparagus spears, cut into 1″ pieces

Directions:

Cook pasta according to package directions.  Once cooking is complete, rinse thoroughly under cold water to remove starch and set aside.

While pasta is cooking, make your dressing for the pasta salad.  Combine both dressings, sun dried tomatoes (with some of the olive oil), and all the fresh herbs.  Place in a blender and puree until dressing comes together.  Feel free to add any additional fresh herbs that your family loves.

Pour dressing into a large mixing bowl.  Combine pasta, olives, peas, asparagus, and dressing until pasta is fully coated.  Place in refrigerator to cool.  Remove from refrigerator 1 hour prior to serving and stir.  Can be made up to two days ahead of time.

 Garnish with fresh parsley or any other herbs.  We just happen to have a lot of parsley in our garden this year so that’s what I chose to use.  My Grandma Marge always taught us to never serve a dish without a garnish.  I think she would be proud.

This is a wonderful dish for entertaining because it can be made up to two days in advance and only continues to get better the longer it sits.  You can add any vegetables that are in season or that your family enjoys.  I think this would be amazing with some grilled zucchini or roasted bell peppers.  Just make the dressing and see what you happen to have on hand – you can’t really go wrong!

{ Tea for 2 Birthday Party }

About a week ago we celebrated Miss Matilda’s 2nd birthday with a “Tea for 2” party.  I got the idea for this party about six months ago.  Matilda loves playing with her tea set and I thought this would make for a lovely party theme outdoors.  We really lucked out with the most gorgeous day!  It was sunny, low 80’s, very little humidity – perfect for an outdoor tea!

Matilda’s Squinty Little Smile

Matilda had a great time at her party!  She ate lots, played with her balloons and bouncy balls, and had a lot of fun opening presents and eating cake.  She kept saying “Happy Day”, “Happy Day”!!  She really understood this year that the party was all about her and she enjoyed every minute of it.

The party was inspired by the gorgeous Anna Griffin fabric that I recently purchased.  I just loved the yellows and pinks which made me instantly think of little Matilda.  I created her birthday dress from one of my own patterns that will be coming out later this year – the “I’m a little teapot dress”.  You can read more about her birthday dress here.

We had about 35 close family and friends attend the party.  At age 2, the party is as much for the adults as it is the children so I made sure to have a mix of food and beverages for all ages.

I set up a little area for the kids.  I brought out the girls small table and covered the chairs with vintage pillowcases.  Then I draped some vintage linens over the top of the table (which I taped underneath so they wouldn’t move around).  I also put out two large quilts and the girls upholstered sitting chair for an area to open presents and for the little babies to hang out.  We brought out lots of the girls stuffed animals and baby dolls to play with as well.

For the adults we brought out the furniture that is in our sunroom, but for some reason I didn’t snap a picture of that area.  It was a settee and three sitting chairs.  We brought out some side tables to have areas to set down drinks as well as a few white Adirondack chairs.

The main tent is where we kept all the food and most of the beverages.  Luckily our yard is pretty shady with all the trees, but this just kept any extra sun from making the food too warm.  Thank goodness there were no bugs out this day either!

I served lots of tasty treats at Matilda’s “Tea for 2” party.  I just love menu planning and cooking food for parties – so much fun!

Asparagus wrapped with herb goat cheese, ham, and tied with a fresh chive.
Summer Pasta Salad with homemade sun dried tomato dressing, olives, peas and asparagus.
Summer Berry Salad served in waffle cones.
Lemon Lavender Shortbread Tea Cookies
Tea Sandwiches – Chicken Walnut Salad, Cucumber with Chive Cream Cheese, and PB&J.
 Brownie Bites, Coconut Macaroons, Apricot and Raspberry Shortbread Cookies
 Lemon Cranberry Scones
 Palmiers (aka Elephant Ear Cookies)
Old Fashioned Store-bought Wafer Cookies

Beverages are a big part of our events, so we made sure to have plenty on hand.  We had iced tea (can’t have a tea party without tea, right?), a variety of wine, sparkling lemonades, sodas, water, and my husband’s home-brewed beer.

Governor’s Mansion Summer Peach Tea Punch

The tea and beverages were served in canning jars.  Mason jars are my favorite drinking glass of choice – we had two different sizes and the small ones were just right for little hands.  I also tied the little ones with some pink tulle for added color.

Like I said above, when your kiddos are little, the parties are just as much for the parents as the little ones.  For each of the girls birthday bashes my husband has made a variety of beers for the adult guests.  This year was no exception.  The main theme beer was the “Peach Mango Tea” beer, but we also had several other varieties on tap.  He always makes these cute little labels for each beer……my favorite label was the “Pigtail Pale”.  I didn’t get to taste any of the beer this year, but maybe next year!


The long folding table was decorated with a basic tablecloth and then I layered some vintage linens on the top which included a small tablecloth and napkins.

I wrapped the silverware in napkins with some twine.  I used light pink, bright pink and yellow napkins.  The plates coordinated with the napkins and I put out additional forks in a canning jar.

I made a banner from doilies that I cut in half and stitched onto a pale pink ribbon (tutorial to come).  I also took some basic paper streamers and ruffled them with a gathering stitch on my sewing machine and I turned several of them into flowers as well.

In the picture above you can see the paper flowers.  I placed these in several different places as well as in two white bird cages that we used for decoration.


I made some fun, pretty headbands for the little girls to play with at the party.  Here are a couple of the cuties wearing them………


And for the boys, I made these funny little man mustaches……….

Matilda waited very patiently to open her presents.  Actually she was a very patient little lady all day long.  I was very impressed, especially because it was a “no nap” day for her (which could be disastrous).


Big sister, Savannah, got in on the present action too, but did a very good job just “helping” rather than taking over.


We gave out simple party favors of side-walk chalk for the children that attended the party.
I printed this nice saying on our computer and then taped them to each little box of chalk.  Each box was tied with pink tulle.
In life you need these things………
 Tea,
Chocolate,
And friends to share them with. 
Thanks for coming to my Tea for 2 party.
Love, Matilda Jane
And finally, the cake.  I bet you’ve never seen one like this before…….it’s kind of a funny story.
At first Savannah told me that Matilda wanted a cake for her birthday, then she decided that she wanted cupcakes (mind you, this was NOT Savannah’s party).  And finally she settled on the fact that Matilda wanted a cake with cupcakes on top.  It’s all she could talk about.  I told her that it was Matilda’s birthday so we would let her decide what she wanted.  Savannah said, “Matilda, do you want a cake with cupcakes on top?” and Matilda said “yeah!!!”.  Savannah said, “See Mommy, that’s what she wants!”.
So, though I would have loved to do a little tea pot cake or something a little more elegant, sometimes you just have to make your children’s dreams come true.  We purchased a large sheet cake with no writing on top.  Then I took the wrappers off of 18 cupcakes and placed them on top.  We sprinkled the top of the cake with thick, white sugar and fine, pink sugar.  Savannah loved helping me with this and was tickled pink to finally have a cake with cupcakes on top.
To be honest, it made for very easy serving.  We gave each of the kids a cupcake straight off the top of the cake and cut the rest of the cake for the adults.  I think Savannah may be on to something with this idea!
All and all we had a great time at Matilda’s birthday party and couldn’t have asked for a more beautiful day!  Good food, good drinks and great family and friends.  The girls were wiped out by the end of the day and tucked into bed by 6:00!!
And again, Happy Birthday to my little baby girl!
I’ll be sharing recipes and a few decorating ideas from the party over the next couple weeks, so stay tuned for some yummy recipes to come!