Summer Garden Party Birthday Outfit

So I have been busy, busy lately with custom orders.  And while I love the fact that I have had so much business lately, I needed to take a little break and work on something for one of my own little ladies.

My sweet Matilda Jane’s 1st birthday is in a month – she was born 7/8/09 (cool birthday, right?).  As it goes with the second child, Matilda doesn’t get very many things that are just for her, so I had to make sure I really turned it up a notch for her special birthday outfit.  And I really think this might be one of my most favorite little creations ever!

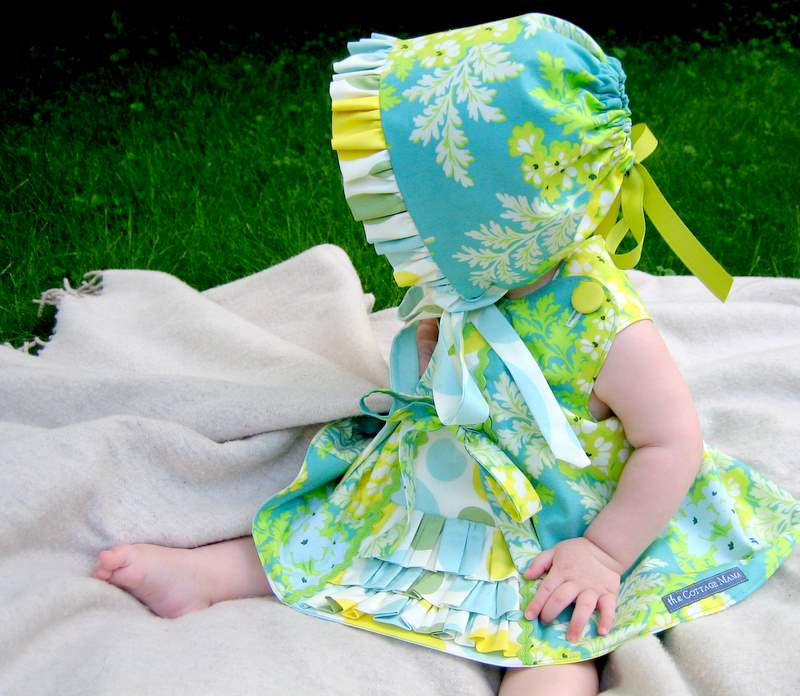
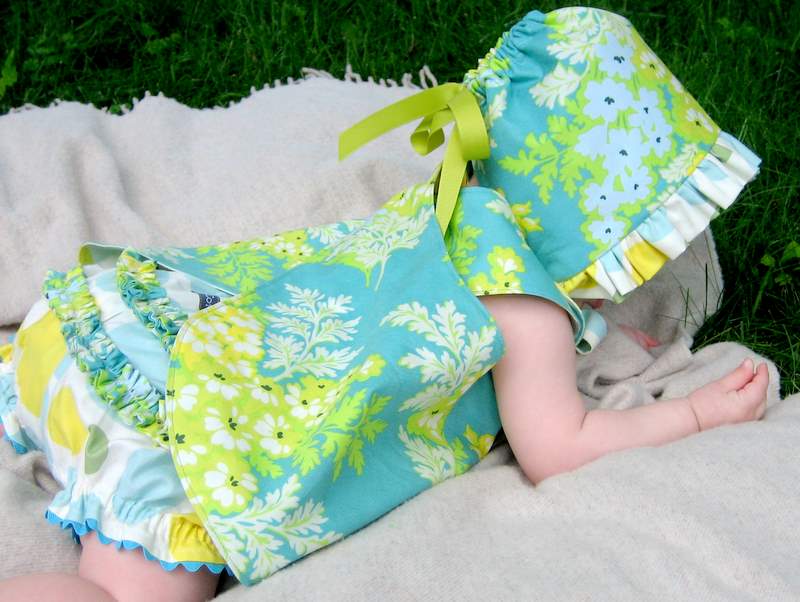
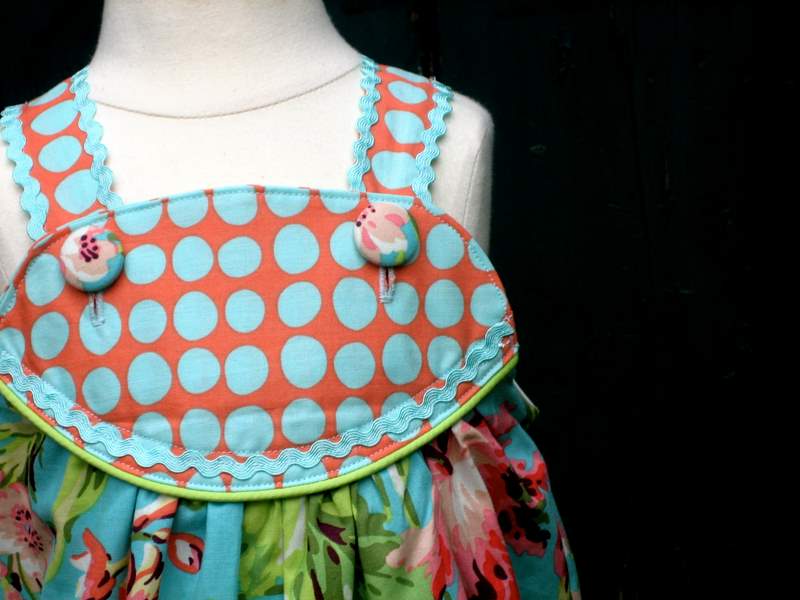
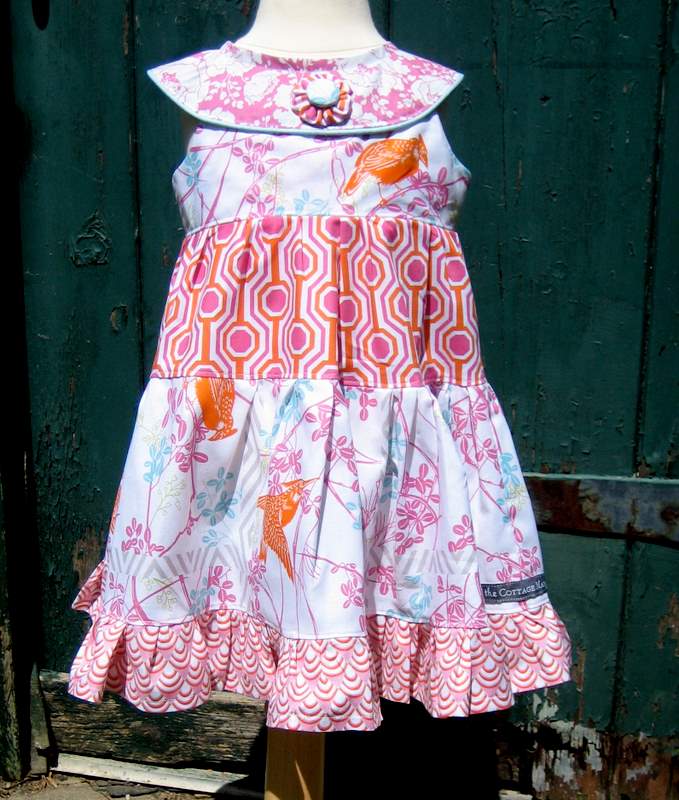
So here is her little birthday outfit.  It is a cross back dress with bloomers and a little bonnet.  This dress is made from Heather Bailey’s “Nicey Jane”.  Can I just tell you for the 100th time how much I love this fabric line?  I L.O.V.E. it – fits my style to a tee!

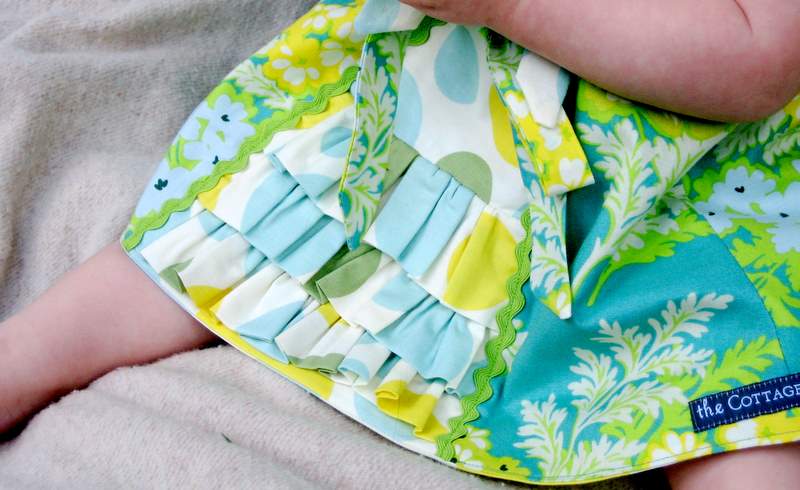
I added an inset panel to my original design and added three lined ruffles toward the bottom.  I lined the inset with some light-weight interfacing to give it a little more body.  I trimmed the edge with green rick-rack and finished it with a little bow towards the top in coordinating fabric.

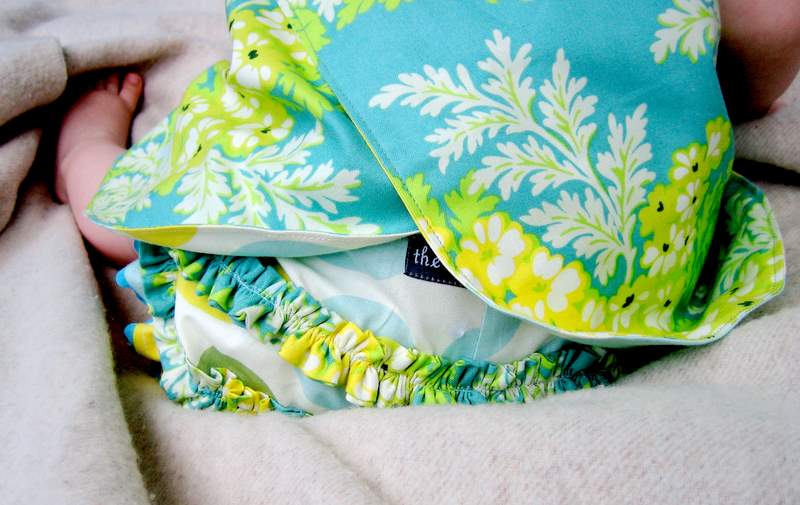
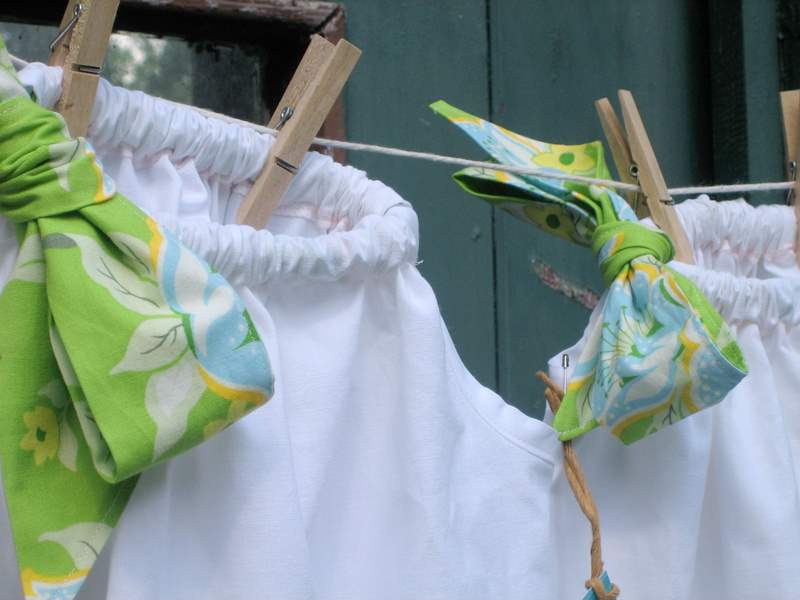
The bloomers have encased elastic in the legs and at the waist.  Both legs are trimmed with blue rick-rack.

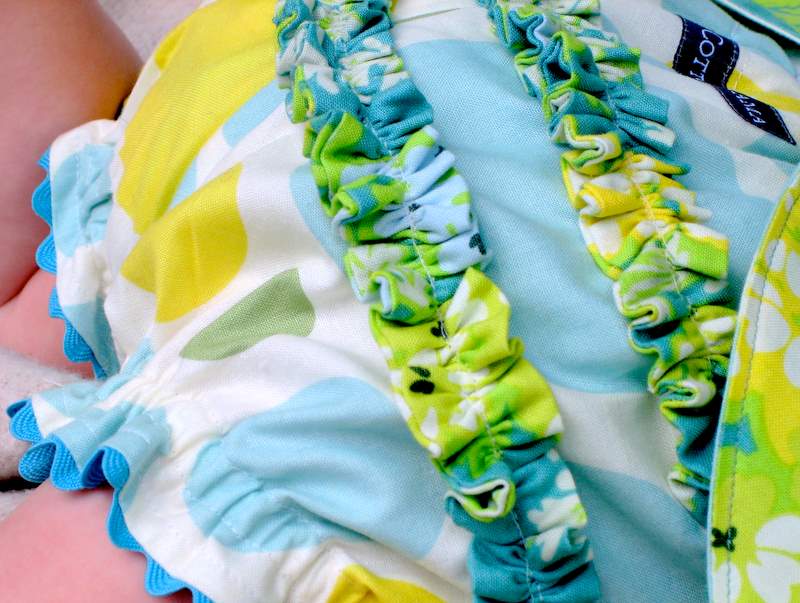
The rear has two lined ruffles that run the entire length of her little back-side.  I just love that little tushy!

I made a bonnet to go with the birthday set.  I will be posting a tutorial for making the bonnet later today or tomorrow.  

I’m just so happy with how this little outfit turned out and I think my Matilda Jane likes it too!  I can’t believe my baby girl is turning one next month, where did the time go?

Visit thecsiproject.com

Babyhood Bonanza – Guest Blogging at Luvinthemommyhood

Guess where I am today?  I’m over at Luvinthemommyhood guest blogging!  Shannon, just had her second baby girl, Harper (who is the cutest little thing EVER).  So while she’s on maternity leave she has lined up some crafty ladies to come over and blog about projects for Mama and baby.  You’ve got to check out what some of these ladies have come up with – there are some really great ideas!

Today I am sharing my tutorial for a Dress Shirt Baby Sleep Sack.  Come on over to luvinthemommyhood and check it out – it’s a super fun, inexpensive and easy beginning sewing project!

Asian Slaw

Several weeks ago, I shared my recipe for Jambalaya Egg Casserole that I served at my most recent playgroup.  With the casserole I served an Asian slaw and a pineapple salad – I shared the pictures, but not the recipes (I know, how rude of me!).  A couple people emailed asking for the recipe for the Asian slaw, so I thought I would share it with you all.

I love almost all Asian food (unless I can see the eyeballs) and I especially love things with peanuts.  This is a great dish to take to a potluck or for entertaining because you can make it ahead of time and it tastes great at room temperature.

Asian Slaw
Ingredients:
1 package Ramen noodles – Oriental Flavor
2 tablespoons peanut butter
6 tablespoons vegetable oil
1 teaspoon sesame oil
3 tablespoons rice wine vinegar or apple cider vinegar
4-6 cups shredded cabbage (regular green or napa) or 1 bag coleslaw mix
1/2 cup grated carrots
1 handful of roasted peanuts
2 green onions, sliced
Optional:  
Chopped cilantro
Sesame Seeds
Directions:
Crush Ramen noodles.  Use this time to take any aggression you may have in life out on your noodles. 
Mix oriental seasoning packet (from Ramen), peanut butter, vegetable oil, sesame oil and vinegar in a large mixing bowl – use a whisk or a fork.  I find everyone likes a little different consistency.  I like it to look like a salad dressing, so a little bit on the thin side.  If you need to thin it, add some hot tap water.  If you would like it thicker, add some more peanut butter.  
Add crushed Ramen noodles, shredded cabbage, carrots, green onions, peanuts, cilantro (optional) and a sprinkle sesame seeds (optional) to the dressing mixture.  Toss to combine.  Garnish with cilantro.
Place in the refrigerator until ready to serve.  Slaw can be made a day in advance (it actually gets better as it sits).
Enjoy!
Cottage Mama’s Note:  This salad is also great without the peanut butter for a lighter slaw.  Substitute sliced almonds for the peanuts if you have someone with a peanut allergy.  Or omit the nuts all together.

Busy, Busy

It has been busy, busy around The Cottage Home lately.   My etsy shop, The Cottage Mama, seems to really be taking off and I am just tickled pink with the new opportunities that are coming my way.

I wanted to share some of the things I have been working on with all of you…………

A new design for the shop – Floral Blue & Orange Bubble Romper

This is one of my favorite designs that I have come up with.  I love using rick-rack, piping and fabric covered buttons and this cute little outfit has all three!

I’ve also been busy with some custom order requests.  Most of the things in my shop are custom orders; however, I have been getting a few requests for some things that are not in my shop.

This is a set of “sister” vintage pillowcase dresses.  My good friend sent me these two pillowcases – they were from her late Grandmother and wanted them made into dresses for her two girls – 12 months and 3T.  I felt very honored that she asked me to make these into dresses for her.  I did a double fabric bow for the little sister and one large fabric bow for the big sister.

A friend from high school, down in Texas, contacted me and wanted a dress for her baby girl.  Her only request was that it be made from some type of fabric with birds on it.  I searched high and low for just the right fabric.  I wanted something that was in keeping with “The Cottage Mama” style, but was also right for my friend and her daughter.  I’m very happy with how it turned out and she is too!

I used baby blue piping in the collar, sewed a vintage inspired yo-yo and finished it with a fabric covered button.

If you have been wondering where I take a lot of the pictures of my dresses – this is the door into our coach house behind the cottage.

Yes, the term “coach house” sounds glamorous…….but don’t be fooled.  When we bought this house, this once studio apartment, was falling down and quite frankly, I’m still surprised it’s standing.  My dream is to some day turn it into a full-blown studio for “The Cottage Mama”, but until then, the door serves as a nice, rustic backdrop for pictures!

So that’s what I’ve been up to lately……..sewing my little heart out.  I feel truly blessed by all the love and support I have been receiving with my new little business venture.  I’ve got a really fun tutorial coming out next week and a few that I just need to get written up…….so please stay-tuned!

Happy (almost) weekend!  Have a good one!

A Day at the Market

I hope you all are enjoying this wonderful holiday weekend – we sure are!  I just wanted to share some pictures from our trip to our local farmer’s market.

Check out these hanging baskets – aren’t they GORGEOUS!  I would love to have one, but we don’t have anywhere to hang something like that.  So if you can’t take one home, you might as well stop and smell the pretty flowers.

During this time of year there is very little produce available at our market.  It’s mostly plants, herbs, cheese, honey, bread and wine.  Asparagus is in season right now, but that’s about it.  In a couple months the market will transform into more of a vegetable and fruit market.

Here’s Miss Savannah taking a stroll through the central square – she is quite the little independent 2-year old these days.

It was gorgeous weather outside and Savannah was loving it.  She is wearing a dress I made for her from the “Sienna” dress pattern by Lil Blue Boo.  The dress is made entirely from recycled knit shirts and only cost $1.00!

Matilda was having fun too – this is her “I’m so happy, I might explode face”.  I made her a coordinating dress also!

The girls have been getting along great – I feel very blessed that Savannah has yet to show any jealousy towards her baby sister.  I’m sure there will be ups and downs, but I really hope that they will grow up to be good friends!  It just melts my heart when Savannah puts her arm around Matilda and says “best friend” – so sweet!

On our way home from the farmer’s market we stopped at one of my favorite antique shops and here’s some of the treasure I found:

A couple of vintage embroidered pillowcases (which will be made into girls pillowcase dresses) and a bunch of really beautiful vintage handkerchiefs.  I’ve got some projects in mind for the hankies so there may be another tutorial using these in the near future.

Anyway, I just wanted to share what we’ve been up to this weekend.  
What have you all been up to?  
Anyone doing anything fun?

Summer Fabric Rag Wreath Tutorial

I have had my spring wreath on the door since, well, the beginning of spring.  I kind of felt like it was time for something new.  I wanted to create a summer wreath for our front door that would be fun and cute, but would break the budget.  So here’s what I came up with…….

Summer Fabric Rag Wreath Tutorial
Supplies:
1 wreath form (whatever size you like)
Scraps of fabric (10-12″ long)
1 piece ribbon or other material for hanging
Scissors
Directions:
This is a medium sized wreath that I bought from the dollar store, so it was only $1.00 (woohoo!!)
Pull out your scrap bin to find the fabric for your wreath.  This is my “Nicey Jane” scrap bin (I like my scraps to be arranged by fabric line).  I LOVE Heather Bailey’s “Nicey Jane”………it just exudes summer!
Cut your fabric scraps into 10″-12″ long strips for a medium wreath.  The length will depend on the size wreath you have chosen.  Use all different widths – I had some very skinny pieces and some pretty wide ones.  I like the variety of the different widths.
Now the fun part – just tie each strip on the wreath and tie it into a knot.  Push them very close to one another.  Do this until your entire wreath is covered in fabric strips.
This is what the front of the wreath will look like when it is complete.  Fluff all of the strips and make sure none of them got caught in the knots of the others.  Give the wreath, what I like to call a “haircut” if you feel the strips are too long.  Cut it down until the look is to your liking.
Here’s what the back of the wreath will look like – which I think looks pretty also.
Now you will need ribbon or twill tape (which is what I used) to make the hanger for the wreath.
Cut whatever length you need depending on your door……mine was only 10″ long.  Loop the ribbon around the wreath and tie a knot.  The knot will not be seen by all of the scraps on the wreath.  Place the knot down on the wreath.
Hang your new, fun summer fabric rag wreath on your front door.  Doesn’t it look happy?
This is not the best picture, but you get the idea.  So I hope you will use your leftover scraps of fabric to make a summer rag wreath.  This really is one of the easiest projects I’ve ever done – no sewing, no gluing – just a little time.  This is also a great project to have the kids take part in too!

Happy Memorial Day Weekend!

The Beginning of Summer at The Cottage Home

I love my home, I really do, but I’m not going to lie………..I can’t say I don’t long for a garage, an eat-in-kitchen or a laundry room that wasn’t in, what I call, the dungeon.  But would I trade The Cottage Home, with all its history and charm, for any of those things?  NO WAY!!

Today my husband, Brett, was home and we spent this late afternoon outside planting our vegetable garden and taking in the beauty that surrounds us.  And wow, I feel more blessed than ever to be the proud owners of this 1930’s cottage!

Here’s a little tour around The Cottage garden………

Strawberries
Getting ready to plant our vegetable garden.
We have had our apple trees for 3-4 years and this is the first year we have apples!!
My hubby brews beer (I’ve mentioned that, right?)……anyway, here is one of his many hop plants that he grows to use in his homebrew.  It’s growing on our coach house.
Pretty flowers in the window boxes on the porch.
The very beginning to our wine grapes – we make our own wine too!
Pink peony – I love this flower!
The chives have gone wild!
More pretty flowers.
And finally………The Cottage Home.

Get Rid of the Funk and Recharge Your Day!

Do you ever have those days where you are just feeling in a funk?  It’s like from the minute you get up, you just kind of feel blah?  I think we all have those days for sure!  The question is, do you let yourself get caught up in the blah or do you take charge and do something about it?  I say – do something about it!!

9 Ways to Recharge Your Day
1. Have a dance party.  Yes, this may sound silly, but turn on your favorite tunes and “shake your tail-feather”.  After about 2-3 songs, you will be feeling good, energized and ready to tackle the day.
2.  Smile.  I know, this is super-cheesy, but it really works.
3.  Look at pictures of your loved ones.  
4.  Either pick up a copy of “The Book of Awesome” or go to 1000awesomethings.com.  My Mom just sent me this book and it is a great reminder of the little things that happen in our day to day lives that bring us happiness.  Read a few of these reminders each day and it will start to put a smile on your face.
5. Laugh out loud.
6.  Go outside.  Sometimes just breathing in some fresh air and taking in a little nature can turn a day around.
7.  Make a cup of tea.  There’s something so soothing and calming to me about sipping a hot cup of tea.  It causes the world to slow down for a little while and gives you a warm, cozy feeling inside.
8.  Count your blessings.  Take a minute to think of all of the things you have to be thankful for – my guess is, there’s probably A LOT.
9.  Make a list.  There’s something so satisfying about crossing “to do” items off of a list.
So let’s take the “blah” out of our day and make it a great one!  Happy Tuesday!

The Power of Touch

 Me and My Girls

I don’t know if you have ever noticed the tag-line for my blog here, “Cooking. Sewing. Crafting. And All Things Domestic.”  Well, I’ve been noticing lately that I have done A LOT of cooking, sewing, and crafting, but the “domestic” part of this blog has gone to the way-side.

So in thinking about the focus of The Cottage Home, I have decided to incorporate some more posts addressing family, home and relationships, since that is the core of my life.  I hope you don’t mind.  This blog is an ever evolving creative outlet for me and I’m so happy that you have decided to join me for the ride!

 My in-laws (Gigi and Grumpy) with Savannah Rose and Matilda Jane

The Power of Touch
Integrating Touch Into Our Every Day Lives
I recently attended a new playgroup with my girls.  A good friend invited me to join her group that has been together for 3+ years.  I met a lovely group of women who all have two children and are going through the same ups and downs of life as I am with two little ones.  It was so refreshing talking to these women – they were laid back, warm and very inviting.
As we were getting ready to go and saying our goodbyes, every single one of these women (some of which, I’d only just met) gave me a big hug.  And not just a little, “one-arm, I’m hugging you because I feel like I should” hug.  A hug that felt like family.
I left this group with an amazing feeling, almost a high of sorts.  I mean I’ve been to other groups with my girls before, but never have I had this same feeling and it got me thinking about the power of touch in our every day lives and it’s ability to nourish our souls.
 Sister in-law, Abby and her boyfriend Bryan
Nine ways to integrate touch into our every day lives:
1.  A high-five.  Whether it’s with your children because they did a great job. Or with your spouse because you accomplished something together.  Or even with a co-worker for a job well-done.  If you feel like giving a high-five – go for it!
2.  A handshake.
3.  A big hug.  Whether it’s with your family or friends…….a hug always feels good.  Make every hug matter!
5.  An arm around the shoulder.  Placing your arm around someones shoulder can say so much without using words.  It can show support, a bond, compassion and friendship.
6.  Tickles.  Little ones loved to be tickled.  Our little Savannah will say “again” over and over until we tickle her some more.  It’s a great way to connect in a light-hearted, fun way.
7.  Kisses
8.  Snuggles.  I don’t think there is anything that feels better than snuggling up with the ones you love.
9.  Holding Hands.  Holding hands shows a commitment, whether it is a commitment to a spouse, child, family member or friend.  Hand holding has the power to give both people involved a strong sense of love and security in their relationship.
I encourage you to try to incorporate more touch into your every day lives.  Try it for a week and let me know how you feel.  I can almost guarantee you will have a warmer feeling inside your soul.
Have a wonderful weekend!

Foil Baked Tilapia

I finally have a healthy recipe for you!  I love fish.  I’m not sure why we don’t eat it more, well yes I am……..we live in the Midwest and fish is pricey here and not always the best quality.  My hubs and I grew up on the West coast in CA, so we were super-spoiled during our childhood when it comes to seafood.

I had some frozen tilapia in my freezer as well as several bell peppers we picked up at the farmer’s market, so I decided to try my hand at creating a new recipe. This recipe was SO easy and a great one for a beginning cook.  My husband commented on how good this was more than twice, so I know this recipe is a winner!!

Foil Baked Tilapia

Ingredients:
4 tilapia fillets, fresh or thawed from frozen
2 bell peppers, sliced (I used one green and one yellow – red would be great too)
2 green onions, sliced thin
1 garlic clove, finely chopped
Dried cajun seasoning
Butter or olive oil
Freshly ground pepper, to taste 
4 sheets of foil
  
Directions:
Preheat oven to 400 degrees.
Slice two bell peppers into thin strips.
 Slice green onions.  
Place four pieces of foil onto a large baking sheet.  Place 1/8th of the sliced bell peppers in the middle of each piece of foil.  Place tilapia on top of bell peppers.
Moderately season tilapia with dried cajun seasoning.  My seasoning is from The Spice House – they are amazing – check out their website
Place 1/4 of the garlic and green onions on top of fish as well as the remaining bell peppers.  Drizzle with olive oil or add a small pat of butter.  Add freshly ground pepper, to taste.
Fold up each piece of foil around the fish and pepper mixture.  Place in oven and bake for 20 minutes.
Fish is done when it flakes easily with a fork.
Serve fish on top of whole grain wild rice.  Make sure to pour all of the remaining juice from the foil packets over the fish.  Enjoy! 


Cottage Mama’s Note:  Uncle Ben’s Ready Rice would make this dish even quicker (only takes 90 seconds to cook).  If you don’t think you can cook, you can make this dish – I promise!  Give it a try and let me know what you think!