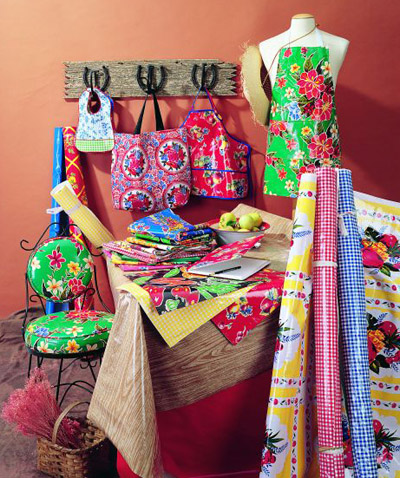
If you’ve never worked with oilcloth, you are going to love it! There are so many super-fun projects you can do with the versatile material. Here are some examples of some great projects made with oilcloth:
Oilcloth Giveaway
Just an update…….
Many of you have emailed and asked and, yes, I do plan to make this pattern available on the blog. I just need a little time to get my pattern pieces together, scan them into the computer and the tutorial written. I have been really tired lately and slightly under the weather, so please be patient with me……..I promise it’s coming. Oh, and I’ll be posting the pattern for the “Winter Snowflake Dress” too!
For this next weeks challenge we were instructed to take a woman’s fashion trend, brand, or look and make it into an outfit for a child. To say this was a challenge is an understatement!! But I’ve come up with a look that I hope you and the judges will like – I’m looking forward to sharing it with you on Saturday.
Secondly, thank you, thank you, thank you to everyone that commented on my “Adventures in Potty Training” post. You all have shared some invaluable information with me and I can’t wait to give some of this strategies, tips and tricks a try. Miss S. did ok on Monday. Probably the most humorous part of the day (though it was NOT funny at the time) was that in the time it took me to go upstairs to grab something, Savannah took off her Minnie Mouse underwear, went into the play room, peed on the floor, then put back on her underwear. When I came back downstairs she said, “see mama, I’m doing great – I’m all dry!”. Well yes SHE was all dry, but the carpet was not – ugggh!!
Yesterday she seemed to come down with a cold that had her laying on the couch, so I decided to back off a bit. I couldn’t bare to make the poor little lady get up off the couch when she was feeling under the weather. But today she seems to be feeling better and is, oddly enough, very excited about using the potty. So, this is good, I guess………we shall see!
Adventures in Potty Training
We interupt our regularly schedule program because today is a big day………we have officially begun potty training. I have been dragging my heels about this one for some time now, but it’s finally time to get the ball rolling.
Savannah will be three in March, so I figured now was probably a good time. I am SO nervous about this adventure. I don’t imagine Savannah is going to be one of those “I put big kid underpants on them and, poof, they were potty trained”. No way, not my strong-willed, opinionated little girl. This is going to take a master plan.
I have never potty trained a child in my life. There is so much advice out there that it makes my head spin. We certainly can’t do the “let them be naked” with the negative degree temperatures going on outside. So, right now, we are wearing underpants and the little miss gets a small treat for #1 and a lollipop for #2 and we will just have to go from there.
I kind of wish there was a camp she could go to and would be returned to me fully potty trained, but as of yet, none of those exist, so I’m left to my motherly duty of doing it on my own. And since I kind of feel like you guys are my friends (we’re friends, right?), I thought I turn to you and see if you had any advice, tips, tricks, or things that worked for you. Please, pretty please, help a girl out………
Week 2 Project Run and Play – Leila and Ben Challenge
Lemon Cupcakes with Cream Cheese Frosting
I love lemon. I love lemon bars, lemon pound cake, lemon poppy seed muffins, and I REALLY love lemon cupcakes. Here’s a great recipe for lemon cupcakes with the best (in my opinion) cream cheese frosting!
Lemon Cupcakes with Cream Cheese Frosting
Ingredients:
3 cups self-rising flour
1/2 teaspoon salt
1 cup unsalted butter, softened
2 cups white sugar
4 eggs
1 cup whole milk
2 tablespoons lemon zest
1 teaspoon vanilla extract
2 tablespoons lemon juice
Cream cheese frosting (recipe below)
Directions:
Preheat oven to 350 degrees. Beat sugar and softened butter together in a large mixing bowl. Add eggs, vanilla extract and lemon zest.
Add the salt to the flour and add flour/salt to the wet ingredients (butter, eggs, sugar, ect), slowly. Then add half the milk, then lemon juice and then the other half of the milk, beating the mixture in between. Do not over-mix.
Line your muffin pan with cupcake liners. Fill each muffin tin 3/4 full. Place in oven.
Bake cupcakes for 18-21 minutes until the tops are golden brown and a toothpick inserted comes out clean. Allow to cool before removing from muffin pan.
Once the cupcakes have cooled completely, the next step is adding the frosting……….
Week 1 Project Run and Play – Winter Wonderland
Our first weeks challenge for Project Run and Play (the blogger version of Project Runway for kids) was “Winter Wonderland”. I have to admit, when I saw this theme, I was 100% stumped. I just couldn’t wrap my head around it. I think part of it was the theme being so wide open and the other part was that I was insanely nervous about what my fellow bloggers would be bringing to the table. Have you checked out the competition? There are some seriously talented ladies!
But luckily, I am married to a very creative husband who suggested that I go into my studio, look around at what I have, and see what speaks to me. So, I thought, ok, it’s worth a shot. And it worked!
I started out with this vintage crocheted collar that my grandma Ethel had sent me. It just looked like a delicate snowflake that I thought was definitely “Winter Wonderland” like. Then I dug through my pile of felted sweaters and found this dreamy, blue/green cashmere sweater that was feminine, cozy, and warm. Finally, I had purchased a bunch of Sandi Henderson’s “Meadowsweet 2” and thought this light speckle damask fabric would be perfect for the skirt and the circles reminded me of snowflakes as well.
And here’s what I came up with for my final look……….
Our snow had mostly melted, but as we were shooting these pictures inside, it began to snow outside. Perfect weather for a “Winter Wonderland” shoot!
In the past, Savannah has not been a huge fan of modeling for me, but she seems to be warming up to the idea. She told me that this dress was “beautiful and SO cozy”……..well, that’s cashmere for you…….the girl’s got taste, that’s for sure!!
I’m so, so happy that I am participating in Project Run and Play – it is definitely going to be a great exercise to stretch my creativity and it’s always fun to change things up a bit.
Blackberry and Mustard Glazed Ham
This ham was SO good (if I do say so myself)! I served this for Christmas Eve dinner for my family, my in-laws and my two sister-in-laws. And even my husband, who would much prefer some type of red meat, absolutely loved it. This recipe was given to my mom by someone she works with (Miss Mary) and then was passed onto me.
The Party Dress – Printable Pattern and Tutorial
**The Party Dress instructions and pattern pieces have been removed. There is a brand new updated version of the pattern available for all The Cottage Mama Newsletter subscribers. Sign up for the newsletter at the top of the blog home page and you will receive the full, FREE The Party Dress PDF pattern sent to your inbox in size 6 month – size 10.**
Vintage Inspired Craft Room Organization
My mother-in-law has a great art studio in her home. It is large, gets lots of natural light and she has so many neat supplies such as buttons, vintage linens, lace, fabrics, glitter, glues, pens, paints and the list goes on and on.
For this past Christmas I wanted to make her a few things for her studio. Most of these items were for storing her large collection of different trinkets that she uses on her Art Dolls. I found these great vintage labels HERE and had fun turning these into pretty organizational supplies.
With the new year upon us, I bet a lot of us are in an organizational mood, so why not make it fun with vintage inspired craft room organization!?!
I made my mother-in-law a canvas sign for her craft room. My girls call her “GiGi” which stands for Grandma Glitter. My mother-in-law has a serious thing for all things glittery!
I painted the canvas a bone-white. Then I altered this (click here) graphic to customize it with her information using Picasa. I fit the image to page, printed it on my home computer, cut it out and mod podged it to the canvas.
These are store-bought heavy cardboard boxes that I found at Joann’s. I mod podged the circle graphics to the top and then mod podged a blank label on the side. I chose to leave the label blank so she can label them as she wishes. Click here to get the free graphics.
These are some fun apothecary jars that I simply mod podged labels onto as well. I thought she could use these to display some of her most treasured buttons. Click here to get the free graphics.
So here’s Gigi’s craft room organization set. I think she really liked it and I can’t wait to see that sign hanging in her studio. Happy organizing!
Project Runway for Kids: Blogger Edition
I’m excited to announce that I will be participating in the first ever Project Runway for Kids (the blogger edition) called Project Run and Play. Some of my favorite bloggers are participating and there is going to be some serious talent going on during this competition.
As far as I know, the competition is going to work pretty much like the Project Runway that you see on TV. Each week there will be a theme for children’s clothing and we will have to submit pictures of our completed garments by the end of the week. Over the weekend there will be a reader poll for the public to vote as well as some super-cool guest judges that will weigh in on the competition. After all the votes are in, one of the bloggers/designers will be “out”. And the winner will be sharing a tutorial for their children’s fashion design.
Yes, like I said, I am really excited, but I’m really nervous as well. I think it’s going to be a fun experience and even if I don’t make it past week one, I’m sure it will still be a great time! The competition starts the second week of January. If you have any interest in children’s fashion, you should definitely come check out Project Run and Play!!


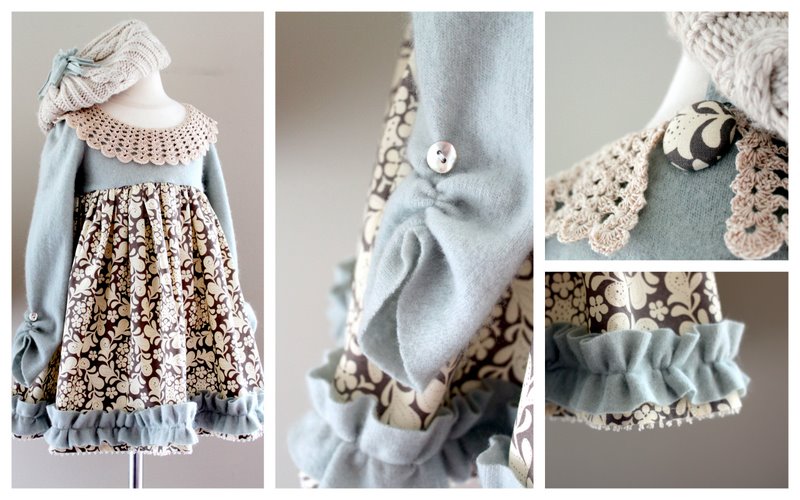
Lindsay Wilkes is the owner and designer behind The Cottage Mama. She creates timeless, vintage inspired sewing patterns for children’s clothes. She is also a fabric designer for Riley Black Designers / Penny Rose Fabrics, author of the book ‘Sew Classic Clothes for Girls’ and can be seen teaching nationwide and online in her video series ‘Lessons with Lindsay’ sponsored by Baby Lock Sewing and Embroidery machines.


