Holiday Tablecloth Tutorial

In case you missed my post last month over at Skip to My Lou………

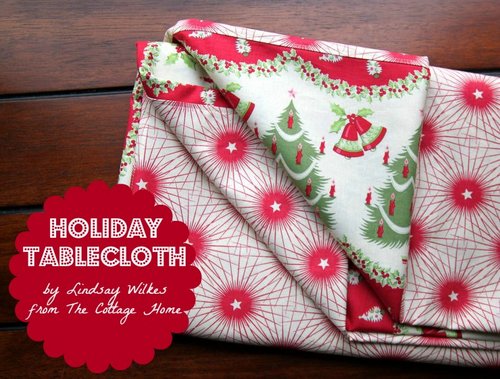
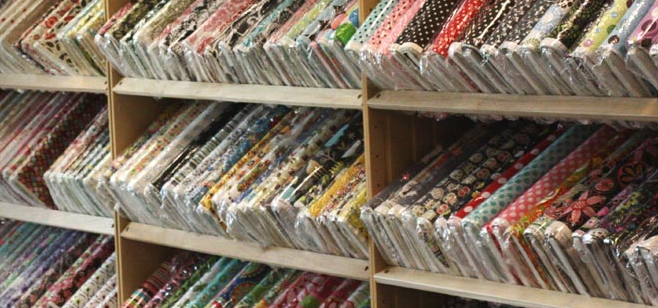
Over the holidays we tend to have a lot of visitors since a lot of our family lives out of state. For the last several years I have used a solid red tablecloth for our holiday entertaining, but this year I thought it would be fun to create a new tablecloth that we could pull out for holiday entertaining. I found this fabric over at the Martha Pullen Store when they were having a big sale and I fell in love with it. I adore prints with a vintage vibe and this one was just what I was hoping to find for this tablecloth.

I designed this tablecloth to almost look like it has a table runner going down the center, however it’s completely sewn into the tablecloth. This is a fun way to use to coordinating fabrics by combining them into one tablecloth. Let’s get started………

Holiday Tablecloth
Length approximately 106″ long

Supplies:
3 Yards center fabric (Cut 31″ wide x 108″ long)
3 Yards border fabric (Cut 2 pieces 18″ wide x 108″ long)
Basic sewing supplies
Iron

Instructions:

NOTE: You can definitely adjust the measurements and sizing to fit your own dining room table. Ours is rather large, so this was designed for a longer table. If you have a smaller table, just reduce the length measurements to fit.

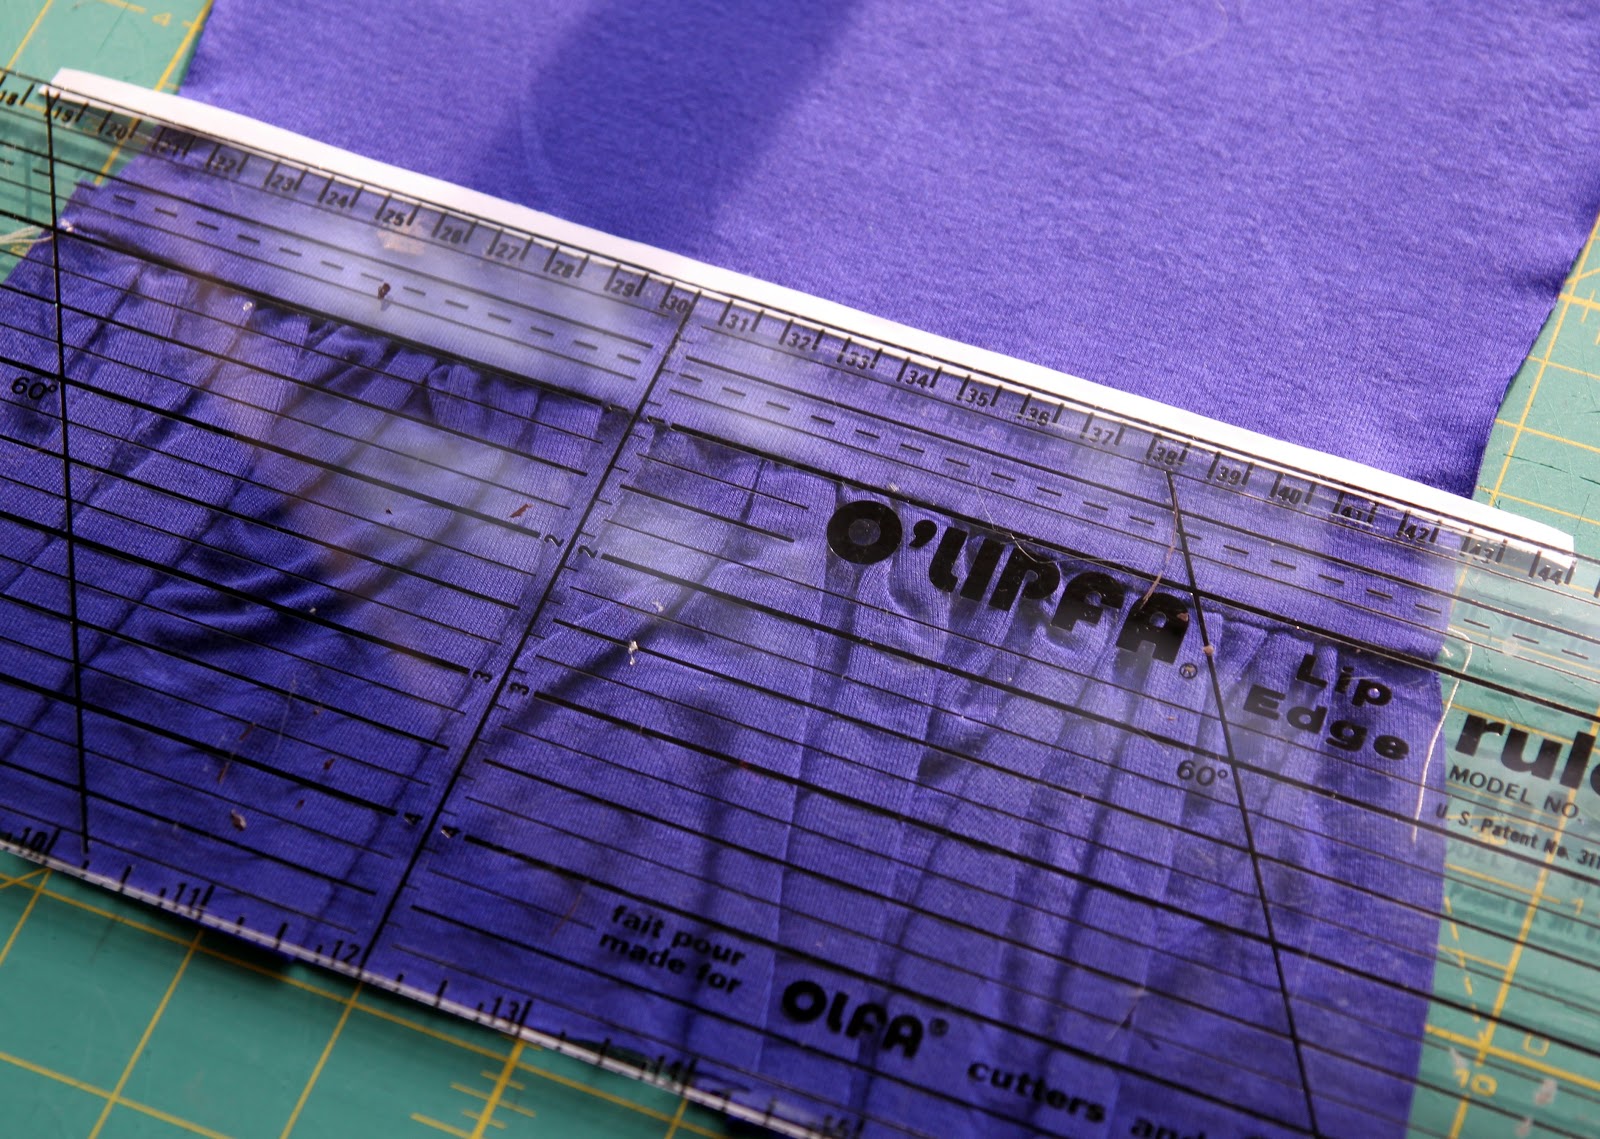
Cut your tablecloth pieces. You should have one center piece and two pieces on either side of the center piece. Sew the side pieces to the center piece by lining up one raw edge of the side piece with one raw edge of the center piece (right sides together) and sew using a 1/2″ seam allowance. Do the same thing for the other side. Press the seams open.

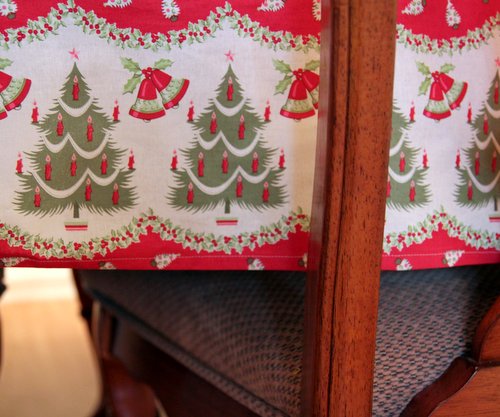
Make sure that if you are using a directional fabric that your print is facing the right direction. As you can see in my tablecloth, it would have looked a little silly if my Christmas trees ended up up side down.

Hem the tablecloth. The hem is very basic. Press up 1/2″ towards the wrong side of the fabric and up another 1/2″ towards the wrong side of the fabric all the way around. The only part that is a little tricky is the corners. A Dritz Ezy-Hem is a wonderful tool to have in your sewing basket. You can also use a regular hem gauge as well.

To sew your corners, fold in one corner piece by 1/2″, then fold it over another 1/2″. Fold in both sides by 1/2″ and then fold them again by 1/2″. Do this on all four corners.

Sew all the way around the hem using a 1/2″ seam allowance.

And that’s it! How easy was that? A pretty new tablecloth just in time for the holidays. Fabric used was from Anna Griffin’s ‘Isabelle‘ line. Merry Christmas and Happy Holidays!

A Little Early Christmas Gift & Ryobi One+ Power Tool Giveaway from The Home Depot

As most of you know, my family and I live in a 1934 cottage-style home. When we bought this house about 8 years ago, it was in bad shape. You should have seen the orange shag carpet that was on the stairs or the bedroom upstairs that had carpeting up over the baseboards (what were they thinking with that one…..I’ll never know). We have done a ton of improvements throughout the years (most before I ever started blogging). However, in the last three – four years home improvement has not been on the top of our list with having three kids under the age of five, my husband busy at work, my ‘The Cottage Mama’ business and all the other things in life.

I’m hoping that next year will leave us a little (maybe just a little) more time to tackle a few projects that have been on our list of to-do’s for quite some time. So when the folks from Home Depot contacted me asking if I would like to surprise my husband, Brett, with an early Christmas gift of RYOBI 18V One+ Lithium-Ion tools……..I thought, well that sounds like perfect timing!

I was able to pick out a set that I thought would be perfect for him. I decided on the RYOBI One+ 4 Piece Lithium-Ion Super Combo Set and guess what? I get to give one of these sets away to one of you as an early Christmas gift! So here is Brett receiving his early Christmas gift……

Brett’s early Christmas present waiting for him under the tree.
 Brett: “Hmmmm……I just had my birthday and it’s not Christmas yet. What is this?”


 Caspian: “Hey, Daddy…..what’s going on?”
Brett: “Check it out buddy, I got an EARLY Christmas gift. Isn’t it awesome?”

 Brett: “Wow, this set has four tools!”
Caspian: “That’s great, Dad, but let’s focus here and see if I this thing is strong enough for climbing.”

 Caspian: “Actually, let’s forget about the power tools…….I’m digging these twinkle lights”

 Brett: “Wow, buddy, it has it’s own carrying case.”
Caspian: “That’s great, Daddy. It looks just my size for climbing inside.”

 Caspian: “Again, Dad, forget about these tools…..let’s check out this super-cool box.”

 Brett: “No, Caspian power tools are super cool and this one has a lithium-ion battery.”

 Caspian: “Power tools, huh…..well, let’s see if I can chew on this thing. We’ll see what kind of power it’s got.”

 Brett: “Now listen, Caspian, a man should know how to use his power tools. If you want to know how to put together the biggest toys ever, you need to know how to use this thing.”

Caspian: “You’re right, Daddy, drills are super cool”

Isn’t a drill that runs out of battery so frustrating? You get all the supplies out for your project only to realize that your drill will not even last long enough to get through completion. I was excited to get Brett these RYOBI One+ tools because of the Lithium Ion batteries. Lithium Ion batteries produce a consistent charge throughout the life of the battery, can be charged many more times than other batteries and are not damaged by leaving the charger on too long.

The RYOBI 18V One+ Lithium Ion Compact Drill Kit features the latest in power tool technology and is a great gift idea for the DIY person in your life. This drill weighs less than three pounds, the RYOBI One+ Compact Drill Kit is easy for users of any strength or skill level to use. I love that the tools are more light-weight because sometimes I have to take DIY projects into my own hands and it’s nice to know that I will be able to use my husbands tools if need be. Lithium Ion batteries are lighter in weight, allowing for smaller, more powerful outdoor and power tools. I’m not a wimp or anything, but some of those drills are SO heavy!

Not sure exactly what tool set your loved one would like for the holiday…..then how about a gift card to the Home Depot? That way they can pick out whatever set or tool they would like. They have some really fun gift cards that are interactive. My favorite it the one with Santa’s apron that plays jingle bells. How cute is that? A little more fun than just a piece of plastic. Just something to think about if you are not sure what to get that DIY person in your life.

So what do you think? Does this sound like a set you would like for you or a loved one? If so, just leave a comment below letting us know why you would like to win the RYOBI 18V One+ Lithium-Ion Super Combo Set (Retail Value: $179.00).

Giveaway open until Wednesday, December 12, 2012 at midnight (CST). I will announce the winner soon after so you can make sure to get your gift in time for Christmas!

The Home Depot partnered with bloggers such as me to help promote their Lithium Ion power tool collection. As part of this promotion, I received compensation for my time. They did not tell me what to purchase or what to say about the products. The Home Depot believes that consumers and bloggers are free to form their own opinions and share them in their own words. The Home Depot’s policies align with WOMMA Ethics Code, FTC guidelines and social media engagement recommendations.


Winners ~ Cyber Monday Giveaway Day and Modern Designs for Classic Quilts

And the winners of our two most recent giveaways are……….

Cyber Monday Giveaway Day:

Modern Designs for Classic Quilts:

Congratulations to both of you lovely ladies! If you could please email me (Lindsay) with your contact information at thecottagemama[at]gmail[dot]com, we will work to get you your prizes as soon as possible. Thank you so much to everyone who entered!

Scrappy Ruffle Headband Tutorial

Today I’m sharing a tutorial for the Scrappy Ruffle Headband Tutorial that I created for Riley Blake Designs Project Design Team. This headband is made from Riley Blake Fabrics (The Sweetest Thing) and Sew Together Trims and Buttons. These headbands come together in no time with very little sewing involved. Use up the scraps from whatever quilt or outfit you have around and you’ve got a fun accessory any little girl would love to wear!

Scrappy Ruffle Headband Tutorial
by Lindsay Wilkes from The Cottage Mama
Supplies:
2 coordinating fabrics (scraps)
1 plastic headband
1 piece of ruffle elastic trim (or other trim)
1 button
Glue gun or strong craft glue
Scissors
Hand sewing supplies
Instructions:

Cut two coordinating fabrics into rectangles. Cut the larger one 5″ x 3″ and the smaller one 5″ x 2″. If you would prefer a larger ruffle on the headband just adjust your measurements accordingly.

For my headband, I used the ruffle elastic trim from Riley Blake’s line of Sew Together trims and buttons and cut the trim 3″ long. However, if you don’t have this, you can use regular elastic or you can use a gathering stitch and apply trim on top in one of the later steps.

Layer the two coordinating fabrics on top of one another, making sure to center the smaller piece on top of the larger piece.

Place the ruffle elastic on top of the two fabrics running straight down the center. Stretch the elastic so it is the same length as the fabric. Sew down the center of the elastic (while stretched). I used an elastic stitch that is on my machine, but you can just use a regular zig-zag or straight stitch. Whatever works for sewing elastic.

Like I said above, if you do not have this product, you can certainly run a gathering stitch down the center of the two fabrics and pull the thread to achieve your desired length. Then you could sew trim such as rickrack or ribbon on top of your stitching.

I purchased a five-pack of headbands from our local dollar store. They aren’t the most beautiful things, but for 20 cents a piece, you can’t beat it! If you can find plain plastic headbands you can skip the next step, but use whatever works.

Snip the end of the cloth cover on the headband and remove the cover to reveal the plain plastic headband.

Cut a strip of fabric 1/2″ long by about the full width of the fabric (42″). You may need more or less depending on how layered and tightly wound you want to cover the headband. Selvage fabric would be good for this step, since there always seems to be strips near the edge leftover after sewing different projects.

Take your glue gun or strong craft glue and wrap your fabric strip around the headband. Place glue every 2-3 wraps and continue wrapping until the entire headband is covered.
Sew or glue your button to the center of the ruffle and then glue the ruffle to the headband.


I also decided to make a coordinating look for my little miss and had the opportunity to try out Riley Blake Design’s new knit fabric. And let me tell you, it is dreamy. It washes perfectly and the stretch is amazing. My daughter commented over and over again how soft it was on her skin. She also asked if I could make her a blanket from the knit. I might need some more yardage for that one……..
Here is her outfit…….

I made a pair of leggings with a yoga waistband. It’s hard to see in the picture, but the leggings are banded at the bottom. I also wanted this to be a layered look, but the sleeves are actually attached to the dress, so it’s not a separate shirt. The sleeves have a banded cuff as well.

And here I leave you with a picture my silly little girlie. She has so much fun posing for her mama when I make her new outfits……it really warms my heart.
Have a great day!


Go To Leggings Pattern Review

I have been wanting to make my girls some leggings for months now. Leggings seem to be our go-to thing around here when it comes to wearing skirts and dresses. I was so excited when Andrea Pannell (The Train To Crazy) came out with her ‘Go To Leggings Pattern‘ because it was exactly what I had been thinking about for the girls. I decided to do a ruffle adaptation of the pattern because…..um…..I guess I just can’t leave well enough alone.

If you haven’t visited the Go To Pattern Shop, you should go take a look around. There are loads of patterns from different designers that are sure to inspire your creativity.

Let me tell you a little bit about this pattern. The ‘Go To Leggings Pattern‘ is a PDF pattern that comes in size 12 months through size 12. It has 5 styling options and 5 length options (including a skirt), so there are endless combinations of different styles of leggings you can create.

If you’ve never used a PDF pattern, they are very easy to use. You simply print the pattern out on your home computer (8.5” x 11” paper) and then tape the pieces together to create your full sized pattern. I know some of you are more traditional (like me) and prefer paper patterns, but the ‘Go To’ patterns have some of the best instructions I have ever seen regarding how to tape all of the pattern pieces together. Also, another advantage to a PDF pattern is that you do not have to trace the pattern to preserve the original, you can simply print it out again if you would like to make a different size and it is stored in your computer.

Also, if you have ever been interested in getting started working with knits, this is a great pattern for beginners. There are lots of tips and tricks regarding working with knits. The entire pattern is 26 pages and 10 full pages are just instructions with all kinds of wonderful information.

Go To Leggings Pattern
Double Ruffle Variation

My daughter, Savannah, has been a little picky about her clothing lately. She only wants to wear things that her mama makes for her, which is so sweet (and I know won’t last forever). I let her pick out this fabric from my stash and we decided ruffles would be really cute for her leggings.

The great thing about working with knits is that you don’t have to worry about the fabric fraying as you would with woven cotton. These double ruffle leggings were made with raw edged ruffles, but you could certainly hem each ruffle, just make sure to lengthen the ruffles to account for the hem.

Would you like to add some ruffles to you ‘Go To Leggings Pattern’? Here’s how…….

Cut out the full length legging pattern from the ‘Go To Leggings Patter’ and then cut off 4.5” from the bottom of both leggings pieces.

Cut four ruffles. Typically when you create a ruffle, you want it to be 2 times as long as the main piece to which you are attaching the ruffle. So the bottom of my pattern piece (size 6) was 9”, so the length of all of the ruffles was cut at 18”. Cut two ruffles 4.5” x 18” and cut two more ruffles 4” x 18”.

Make sure you change your needle when you are sewing with knits. There are special ball point needles that are designed for stretch knits. Trust me, you do not want to work with knits using your regular 80/12 needle.

Run a gathering stitch along the top edge of the 4.5” ruffle. Gather the ruffle until it is the same length as the bottom of one legging pattern piece. You should use coordinating thread, but I used white here so that you could actually see the stitching.

Pin the ruffle to the bottom of the leg of the leggings, lining up the top edge of the ruffle with the bottom of the legging, right sides together. Attach the ruffle to the leggings using a 1/2” seam allowance.

Press your ruffle down, away from the bottom of the leggings and press the seam allowance up towards the legging.

Run a gathering stitch along the top of the 4” ruffle, 1/4” from the top edge. Pull the threads to gather the fabric to equal the same width of the bottom of the leggings.

Measure up 1” from where you attached the 4.5” ruffle. You can mark this line with a fabric marking pen, pencil or chalk or you can use my favorite product, Wash Away Wonder Tape. If you use Wonder Tape, place a line of tape 1” up from the top of the other ruffle, peel off the paper backing and stick your gathering ruffle along the tape, lining up the top of the ruffle with the top edge of the tape. If you don’t use the tape, just pin the ruffle in position Stitch in place using a 1/4” seam allowance and sewing on top of the gathering stitches.

Continue sewing the pattern according to pattern instructions, making sure to catch all ends of the ruffles in the inner leg seam allowance.

My little lady LOVES these leggings. She says they are so soft and comfy and the fit is spot on. These were such a quick-sew and I will definitely be making more of these in lots of different colors!
One last thing……if you want, you can enter to win a shopping spree at GoToPatterns.com and Sew Fine Fabric!

Go To Patterns PDF sewing patterns 

THREE WINNERS!

Go To Patterns sewing pattern giveaway
a Rafflecopter giveaway

I did receive the Go To Leggings Pattern for free, but was not compensated in any other way for this pattern review. All opinions are 100% mine.

DIY Beaded Fabric Necklace ~ Easy, Snappy Holiday Project

I was so honored when Baby Lock Sewing and Embroidery Machines invited me to be part of their Snappy Holiday Snappy-Sew Round-Up. Each of the featured bloggers was supposed to come up with a quick and easy holiday gift that you could put together with just a moments notice. I came up with the Beaded Fabric Necklace.

The Beaded Fabric Necklace is a quick-sew gift that is perfect for any of the lovely ladies in your life. You can make these necklaces to suite all types of occasions depending on your fabric selection. Consider using pearl beads or even spray painted wooden beads to change up the look. Whatever you choose, these necklaces will take you no more than 20 minutes each and your gal pals will absolutely adore them!

Beaded Fabric Necklace
by Lindsay Wilkes from The Cottage Mama
Click HERE for printer-friendly pdf instructions.

Sewing Skill Needed: Basic / Beginner

SUPPLIES:
1 strip of fabric (cut 2” x 43”)
39 Wooden craft beads
Basic Sewing Supplies

INSTRUCTIONS:

1. Cut one long fabric strip 2” x 43” long.

2. Cut both ends to a point.

3. Fold fabric in half lenghwise with the right sides together. Sew using a ¼” seam allowance starting at one point and sewing all the way down to the other side. Leave the other end open.

4. Clip the corners of the one pointed end that you sewed closed.

5. Turn right side out. Use a chopstick or pencil to make this step a little easier.

6. Tie a knot approximately 10” down on one side. Once your knot is tied, you should have about 8.5” of fabric on top of the knot.

7. Place one bead through the opening into the tube and slide it all the way down to the knot. For the second bead, thread the fabric through the bead and slide it all the way down to the first bead. For the third bead, place it through the opening into the tube and slide it all the way down to the other bead. Continue this pattern until you have threaded or inserted all beads.

8. After all the beads have been used, tie a knot on this other end.

9. Since you have threaded the open end through many of the beads, it might have gotten a little shredded looking, but don’t worry, that is fine. Just trim of the frayed end.

10. Tuck in the raw edges of the open end and topstitch to close the opening. Topstitch on the other side as well so they both match. You could also choose to close the opening by hand sewing it closed using a slipstitch.

11. To wear the necklace, simply tie the fabric in a bow. The size bow that you tie will determine how long or short your necklace will be. You could definitely tied the fabric in a knot, if you are not the bow type of person.

You will be able to make approximately three necklaces from ¼ yard of fabric and one value-sized bag of beads. To view more sewing and craft ideas, please visit the official blog of The Cottage Mama over at The Cottage Home: www.thecottagehome.blogspot.com.

Visit Baby Lock’s Snappy Holiday Snappy-Sew Project Round-Up to print a PDF of this tutorial and as well as the tutorials from six other fabulous bloggers!
Baby Lock's Snappy Holiday Quick-Sew Project Round-Up
Here is a list of all the participating bloggers sites so you can visit them and check out their Snappy Holidays Projects:
Lindsay Wilkes (me):  http://thecottagehome.blogspot.com
Heather Valentine:  http://thesewingloftblog.com
Thanks again to Baby Lock for inviting me to be part of their fun holiday series!

Cyber Monday Giveaway Day!

Today is Cyber Monday Giveaway Day at The Cottage Home. Our lovely sponsors have come up with some fabulous prizes for the readers of The Cottage Home blog and I am so excited to share them with you today. I know all bloggers probably think that their sponsors are the best, but I don’t know…………this line up is pretty darn spectacular!

The Cyber Monday Giveaway Day is going to be a little different. Today is a winner take all giveaway. One winner will take home ALL of the prizes. Talk about a fabulous holiday gift, right? At the bottom of the giveaway post you will find a little widget where you can enter to win. For each item that you do, you will gain an extra entry and increase your odds of winning these incredible prizes.

So without further ado, here are The Cottage Home blog sponsors………


No matter why you love to sew, Baby Lock understands. Everything that we do is to make your time sewing at your machine as enjoyable as possible. Baby Lock’s main goal has been to enhance the love of sewing since our very beginning, over 40 years ago.


BABY LOCK GIVEAWAY: Zundt Embroidery Designs

(Retail Value: $300.00)

Swiss embroidery from the St. Gallen area is known around the world for exquisite designs and utmost quality. The artists at Zundt have carried on this tradition, and now Baby Lock is offering three of Zundt’s collections. With this pack you’ll receive Butterflies Cutwork, Lace in Vogue, and Yukata Art. These collections are ideal for creating elegant apparel, giving home décor a lacy touch, embellishing quilts, and more.


Quilt in a Day has everything you need to make a quilt – books, patterns, free block patterns, notions, fabric, rulers and videos. Quilt in a Day was founded in 1975 by “Hall of Fame” quilter, Eleanor Burns. Through out her career, Eleanor has published over 100 “How-to” quilt books, developed an Eleanor Burns Signature Pattern Collection and designed a variety of specialty rulers all produced to aid the quilter in successfully and easily completing their quilt. Her Quilt in a Day TV series began airing on PBS and is still broadcasting nationwide and abroad.


Quilt in a Day GiveawayWin a Free Eleanor Burns 2013 Block Party Membership: 


(Retail Value: $94.00)


Join Quilters Hall of Fame Inductee, Eleanor Burns, in the comfort of your own home with her 2013 Block Party. Receive a 16 page pattern every month. Follow along with Eleanor in classroom LIVE via Webinar. Each pattern and webinar is unique  – you never know what you are going to learn or see! One thing is for sure, every pattern is easy with step-by-step techniques pioneered by Quilt in a Day. If you are not able to attend the Webinar, you can still sew at your convenience with a video available for viewing on our website. 


Fabricworm brings you modern fabrics for the modern sewist! We feature a large collection of designer fabrics specializing in modern, retro, organic, and children’s fabrics. Please note our extensive Japanese Import section as well as Custom Coordinated Bundles available in Half Yards and Fat Quarters to suit all of your crafting and quilting needs.


FABRICWORM GIVEAWAY: A fat quarter bundle of Camp Sur by Jay-Cyn Designs for Birch Organic Fabrics.


Also, Fabricworm is offering their ongoing coupon code “linus5” which gives you $5 off any order of $50 or more.

Fat Quarter Shop works to bring you the latest fabric collections and sewing notions, all with a touch of great customer service.  Visit our shop to find out about our exclusive kits and clubs, BOMs and more!  To celebrate Cyber Monday, we are giving away a Fat Quarter Bundle of Seascapes by Deb Strain for Moda Fabrics!  The bundle includes 29 fat quarters, all of which will have you daydreaming of a day at the beach. 

FAT QUARTER SHOP GIVEAWAY: Fat Quarter Bundle ‘Seascapes’ by Deb Strain (29 Fat Quarters)

(Retail Value: $97.50)

Fat Quarter Shop is offering 25% off your entire order with code “jingle” until Thursday the 29th at midnight CST.  


Crafter’s Vision prides itself as having first class customer service with excellent prices, free shipping and top notch products. We would like to take this time to thank all our customers for trusting Crafter’s Vision with your shopping needs through the years and wish all of you a blessed holiday season. 

You will not want to miss shopping with us on Cyber Monday! Save an additional 50% off our list prices for all fabrics in ouSALE section! In addition to this, all orders shipping in the USA over $30 will qualify for FREE SHIPPING!


CRAFTER’S VISION GIVEAWAY: $50 Gift Certificate to Crafter’s Vision


Create Kids Couture is a PDF and paper pattern company. CKC is co-owned by Shannon and Tiffany and they specialize in boutique children’s clothing sewing patterns. They are giving away a 3 pattern pack of your choice; choose from over 90 PDF patterns on their website: www.CreateKidsCouture.com


CREATE KIDS COUTURE GIVEAWAY: 3 Pattern Bundle Pack

In celebration of Cyber Monday, Create Kids Couture is also offering 30% off your entire order. 

Use code CYBERMON at checkout on their website only.


a Rafflecopter giveaway

Holiday Cards

So have you started shopping for holiday cards yet? I know, I can’t believe it’s almost that time of year either. Time is flying by. Well, I have been browsing around online checking out some different designs for our family. I’m thinking I will be using our favorite family picture from this year…….

I have found some really beautiful designs over at Minted.com and I wanted to share a few of my favorites with you.

Aren’t these all so fun? I don’t even think I got through all the pages of the Minted holiday cards (there was something like 34 pages). Anyway, I just wanted to send some inspiration your way in case you haven’t ordered your cards yet. I always love getting photo cards from our family and friends.

Right now minted is offering 15% off a purchase of $150 or more with the code: FALL150 and 10% off a purchase of $100 or more with the code: FALL100. Plus, they will address the cards to your recipients for free with every card purchase ~ now that’s a time saver!

Have a great pre-Thanksgiving week!

Modern Designs for Classic Quilts ~Book Review & Giveaway

Today I am very excited to introduce a brand new quilting book that you are sure to want to add to your Christmas wishlist. Modern Designs for Classic Quilts is written by Kelly Biscopink and Andrea Johnson and is complete quilting eye candy. I met Kelly as an Editor through my publisher and was absolutely thrilled when I found out she had written a book of her own!

At quilt market in Houston, TX last month, my mom (aka Grandma Jane) and I went out dinner with Kelly and Andrea and we. had. a. ball. We laughed so hard we cried. I’m telling you, these are my kind of girls. So I’m going to try hard to write an un-biased review, but it always helps to know that the authors behind a book are truly wonderful people. And it helps when they’ve written a truly fabulous book!

I absolutely adore the concept of this book as I feel it is very similar to how I view sewing children’s clothing. The book has some of the most traditional, classic quilt styles, yet they are taken to a whole new level through the use of modern patterned fabrics and bold solids.

This Spider Web Quilt, called Effie’s Web, might be my favorite in the book. I love how much color and movement you can see throughout the quilt. Look at it one way and you see one thing, look at it another and you see something else. Also, it’s a great way to use up scraps of fabric and with all the clothing I sew, you know I have a lot of scraps.

Although, I love Effie’s Web, it’s a pretty close call between that one and the cover quilt called the Urban Cabin. First of all, how cute is that name? It is a traditional log cabin style quilt, but the way in which the fabrics are placed is so totally modern. Brilliant!

Check out some of these quilt patterns included in the book that use beautiful solids incorporated into their designs. As much as I love patterned quilting cotton, sometimes I think solids can bring the beauty out in a quilt design like nothing else.

The overall tone of Modern Designs for Classic Quilts is very friendly and welcoming, just like Kelly and Andrea. The techniques section is beautiful with very clear photographed instructions. They include everything from cutting, sewing and pressing to how to match seams, sewing curved seams and paper piecing. There are also non-quilting techniques included such as installing a zipper, ruffling and raw edge applique that are used for some of the smaller projects included in the book.

Kelly and Andrea have done such a wonderful job bringing together two worlds of quilting together in one book; modern and traditional. Who says you have to be defined as a modern quilter or a traditional quilter? No one. And these ladies show that you can have it all……a little modern, a little classic and a whole lot of beautiful.

So guess what? Not only did Kelly and Andrea send me my very own copy of this book for this review, they sent a copy for one of you! 

Would you like to win a copy of Modern Designs for Classic Quilts?
Well, this one is easy, just leave a comment on this post telling us why you would like this book. 
One entry per person. Giveaway will be open until Monday, November 19, 2012 at midnight (CST).
To check out more reviews of Modern Designs for Classic Quilts, please visit some of these other wonderful blogs on the book tour:
Tuesday, Nov. 6             (Lindsay, CraftBuds)
Wed., Nov. 7                 (Jill, Darling Jill Quilts)
Thursday, Nov. 8           (Faith, Fresh Lemons)
Friday, Nov. 9               (Generation Q)
Saturday, Nov. 10         (Angela, Quilting is my Therapy)
Sunday, Nov. 11            (Shannon, Stitch Craft Create)
Monday, Nov. 12           (Laurie, Scarlet Fig)
Tuesday, Nov. 13          (Kaysie, KZJo’s Studio)  
Wed., Nov. 14               (Jessica, A Little Gray)
Thursday, Nov. 15         (Mary, The Tulip Patch)
Friday, Nov. 16             (Deborah, Whipstitch)
Saturday, Nov. 17         (Lindsay, The Cottage Mama)
Sunday, Nov. 18           (Jenny, Sew Kind of Wonderful)
Monday, Nov. 19          (Carla, LollyQuiltz)
Tuesday, Nov. 20         (Thomas, Thomas Knauer Sews)
Wed., Nov. 21              (Brenda, Pink Castle Fabrics)
Thursday, Nov. 22        (Lindsay & Liz Rea, CraftBudsInspire Me Grey)
Friday, Nov. 23             (Sarah, The Last Piece)
Saturday, Nov. 24         (Cara: Cara QuiltsAndie: AndieJohnsonSews, Kelly: Stitchy Quilt Stuff)

Also, you can keep up to date with these lovely ladies over on their blogs: 
Kelly at Stitchy Quilt Stuff and Andrea at Andie Johnson Sews.

DIY Cabochon Jewelry

As much as I love sewing, sometimes I get the urge to do something a little different. I’ve been planning some of my DIY Christmas gifts this year and I thought it would be really fun to make some pretty jewelry for friends and family.

Flower cabochons have always had sort of a vintage feel to me and I find them to be really beautiful. You can buy them from many different sources online (here are a ton sold on Etsy) and they are really reasonably priced. Basically they are just molded resin and are really lightweight and easy to work with when crafting. You can attach them to just about anything, but this year I decided to make rings, earrings and hair pins.

If you get these going in assembly line style, you will have plenty of jewelry in no time!
DIY Cabochon Jewelry
by Lindsay Wilkes from The Cottage Mama
 
Supplies:
Flower cabochons (found here)
Blank bobby pins, rings or earrings
E6000 or other industrial strength glue
Instructions:

Gather up all of your supplies for this project.
Like I said above, you can purchase some really gorgeous cabochons via Etsy.com. I ordered all different shapes and sizes so I would have a wide variety of different styles and colors.
As far as the blanks go for bobby pins, rings or earrings, I purchased the earrings and bobby pins online and found the rings at our local Joann super-store. You will have more of a selection if you order online, but you should be able to find all of these at your local craft store. Our lovely blog sponsor, Crafter’s Vision carries some different blanks as well.
I bought adjustable rings because I’m not sure of everyone’s ring size. Just make sure the blank portion of the ring is smaller than your cabochon (or at least the same size). The square rings (that came in this variety pack) didn’t really work for this project since the blank was too big.
E6000 is a great glue to have in your stash of craft supplies. It’s super strong and dries clear. You can find this at your local craft supply store. If for some reason you can’t find this, then just look for another industrial strength glue. Jewelry gets a lot of wear and tear, so you don’t want it falling apart.
So this project is really simple. Take a dab of glue and place it onto the blank jewelry, then press your cabochon on top. Leave them upside down to dry for at least 24 hours.
For the smaller pieces, like the earrings, I just put a dab of glue on some paper and dipped the top of the blank part of the earrings and pressed them to the cabochons.
These make great gifts for girlfriends, teenage girls and teachers.
Package these pretties up and you are good to go!