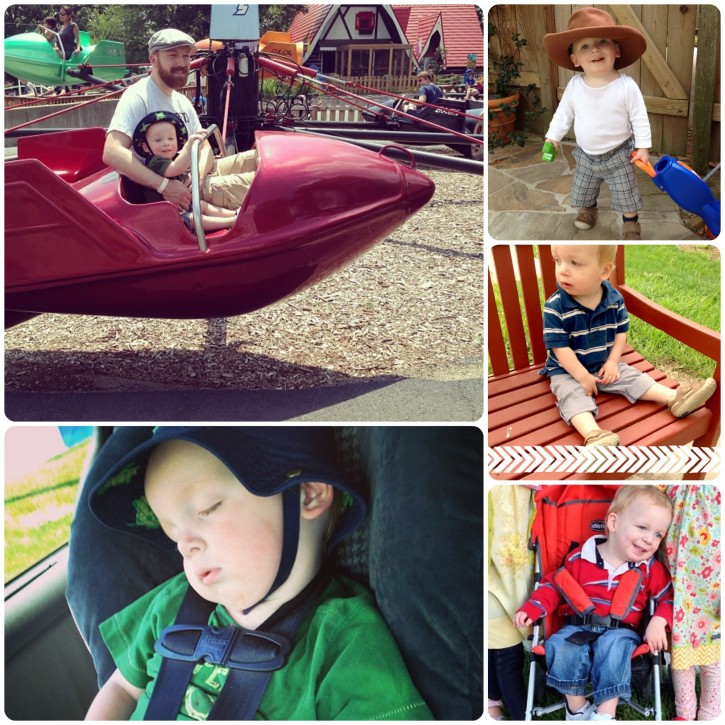
The New The Cottage Mama Website and Sale

Screen Shot 2013-08-20 at 12.30.06 PM

If you are reading this blog post in a reader or via email, you may not have even noticed that The Cottage Mama has a brand new website! This site has been a long time in the making. I wanted to keep everything all in one place……the blog, the shop, the book, etc. And I wanted it to be easier to navigate and find exactly what you are looking for every time you visit. So from this point forward the blog will no longer be called The Cottage Home, but will be just like everything else…..The Cottage Mama. Click here to come check out the new website!

[Read more…]

Back-to-School Bateaux Top Pattern: Sewing with Knits

BateauxTopPatternReview

This past week I had the opportunity to sew up the Bateaux Neck Top from ‘Wee Muses Patterns‘ by my blogging friend, Anneliese from Aesthetic Nest. I was excited to get my hands on this pattern as I’m trying to start sewing with more knits for my kids.

[Read more…]

DIY Rainbow Button Decor

This was a guest post I did over at Kojo Designs for their ‘Color Your Summer‘ Series and now I’m bringing it home.

Skinny Cow WoCave: Part 3 Treasure Hunting

TreasureHuntingQuilt

As you already know, I have a wonderful sponsorship going on with Skinny Cow brand and have been working with them on their WoCave campaign. For the second mission, Skinny Cow sent my good friend, Jen, and I out for lunch and for a day of antiquing searching for items to add to our WoCave’s (aka Woman Caves). So here’s a little bit about our fun adventure treasure hunting……..

[Read more…]

No-Sew Family Sign: Nancy Zieman’s Applique Tour


Today I’m part of Nancy Zieman’s Laser Cut Applique Tour. I’m really excited to share this new product with you all.

As you may know, fabric applique’s can be very tricky to cut out, especially extremely intricate designs. Well, leave it to Nancy Z. to come up with an easy solution with her new Laser Cut Applique Designs.

[Read more…]

Sydney Skirt: Free Pattern and Tutorial for Ruffles 2013


Today I’m over at my friend Kate’s blog, See Kate Sew, sharing the Sydney Skirt Free Pattern for her Ruffles 2013 series.


The Sydney Skirt Pattern is geared towards knit fabric and is a great beginner pattern if you’re new to sewing with knits. It’s super-simple and goes together in about an hour!


Head over to See Kate Sew to grab this free pattern in Size 12m – Size 12.
Click HERE.

Savannah’s 1st Day of Kindergarten

Well, it happened. My oldest child, Savannah Rose, started full-day Kindergarten yesterday. Wait, please press the pause button……..I was not ready for this one. But even though I wasn’t ready, she was MORE than ready to go!

[Read more…]

Garlic, Lemon and Chive Grilled Shrimp Recipe

One of the best parts of summer to me is definitely grilling. Now I’m not the grill master around my house (my hubby helps out in that department), but I absolutely adore the smell of food cooking out on the grill and like to eat it even more. If you like shrimp, you are going to absolutely love this recipe! It’s so super-simple and there is no worrying about your shrimp falling through your grill because the whole dish is cooked inside a foil pouch. SO easy!

 
Garlic, Lemon and Chive Grilled Shrimp
Author: 
Recipe type: Entree
Cuisine: Seafood
Serves: 2-3
 
Ingredients
  • 1 pound shrimp, (with shells, but deveined and cleaned)
  • ½ stick butter, softened
  • ¼ cup fresh chives, chopped
  • 3 cloves fresh garlic, chopped or a heaping teaspoon of chopped garlic in a jar
  • 1 lemon
  • 1 loaf crusty french bread, for dipping
Instructions
  1. Make the herb butter. Combine the softened butter, garlic and chives. Then add the zest of half of the lemon. Stir to combine.
  2. Cut two large pieces of foil and lay one on top of each other. We don't want any of the delicious butter sauce to run out so it's a good idea to use two sheets just in case one rips. Grab your shrimp. Each foil pouch will contain ½ pound shrimp. Arrange half your raw shrimp in the middle of two pieces of foil.
  3. Take half of the butter mixture and place it on top of the shrimp.
  4. Roll up the center of the foil pouch and then roll up both sides until you have a nice and secure foil pouch. Then repeat the above steps for the other half of the shrimp. You will have two pouches if you are using 1 pound of shrimp.
  5. Place the shrimp on a grill heated on high and cook for approximately 8 minutes. You do not want to over cook your shrimp, so be careful. If you don't have a grill or are trying this recipe during colder weather months, you could certainly give it a try in the oven.
 
Make the herb butter. Combine the softened butter, garlic and chives. Then add the zest of half of the lemon. Stir to combine.
Here is what the garlic, lemon and chive butter will look like once you have mixed it all together. This is delicious spread on french bread and baked in the oven for another side dish option.
Cut two large pieces of foil and lay one on top of each other. We don’t want any of the delicious butter sauce to run out so it’s a good idea to use two sheets just in case one rips. Grab your shrimp. Each foil pouch will contain 1/2 pound shrimp. Arrange half your raw shrimp in the middle of two pieces of foil.
Take half of the butter mixture and place it on top of the shrimp.
Roll up the center of the foil pouch and then roll up both sides until you have a nice and secure foil pouch. Then repeat the above steps for the other half of the shrimp. You will have two pouches if you are using 1 pound of shrimp.
Place the shrimp on a grill heated on high and cook for approximately 8 minutes. You do not want to over cook your shrimp, so be careful. If you don’t have a grill or are trying this recipe during colder weather months, you could certainly give it a try in the oven.
Serve with an extra sprinkling of chives, fresh lemon slices and crusty french bread.
You definitely want to make sure you have plenty of bread to soak up all that delicious herb butter!
I hope you enjoy this recipe……..it is simply delicious!


Skinny Cow WoCave: Mission 1

Several weeks back I shared with you that I have a wonderful new sponsorship from Skinny Cow brand (they seriously are the best) and I am participating in their Skinny Cow Brand Influencer for the WoCave Program.  If you missed the intro post, you can check out more information about it by clicking HERE.

So for my 1st WoCave mission, Skinny Cow sent me and three of my girlfriends to do something a little outside of our ordinary routine. My friends and I all love to craft, decorate, create, etc., but generally we get together at someones’ home for our creative night once a month. So for this mission, we were taken outside of our comfort zone and sent to paint pottery at a local shop in town.

I was really excited when we received our mission. I’ve painted pottery once before, but it was a long time ago and I knew my girlfriends would be up for the mission as well!

We were all give a large mug and saucer upon arriving at the shop. We walked around taking in all the inspiration and planning out what we wanted to paint on our pottery. The planning part was the hardest part for me since I agonize over my creations.

My friend, Jen, had a pretty good idea of what she wanted to paint on her pieces. She had an inspiration print that she had been thinking about so that really helped her create her design.

The colors at the pottery shop were very muted when you first put them on, but they had examples of what the different colors would look like once they had been fired and were ready to go a week later.

My friend Laura ended up doing polka dots with some sponges on her big giant mug and plate and stuck to really sweet palette of colors. It was so cute!

Ellie has a really beautiful home decorated in blues, greens and earth-tones, so she stuck to those colors in creating her two pieces.

So here I am with my mug. And here’s the thing……I had a little problem…….I needed about 8 more hours to actually paint the design I had planned. It was pretty funny. I had an intricate design drawn out in pencil (since the pencil marks burn off when the pottery is fired) and ended up just having to paint right over it because I only had 45 minutes left to finish. Same thing happened with my plate. Note to self for next time: ‘must arrive when shop opens in the morning’.

But with that being said, I think there will definitely be a next time. We all had such a great time trying something new. Isn’t that what life is all about? Getting outside of our regular routine and experiencing new things together. I think so. And what’s even better is when you can experience these things with your good friends and build memories to last a lifetime.

We just completed our second mission and I can’t wait to share more about it with you, if you follow me on Instagram (@thecottagemama), you may already have an idea where we went. Thank you to Skinny Cow brand for helping me experience such fun missions and activities with my girlfriends (and thanks for the Cookies ‘n Dough ice cream bars…….they were delish)!

Products and mission tasks were provided to me free of charge from Skinny Cow Brand, however, as always…….all opinions, ideas and experiences are 100% mine.


Oliver + S Summer Picnic Blouse and Shorts: Modern Yardage Fabric Giveaway

So now that I have finished my last four patterns, I am in back-to-school sewing mode for my girls. We start back in the middle of next week, can you believe it? I wanted to share this little outfit that I made for Matilda who will be in her second year of preschool this year. Make sure you read all the way to the bottom of the post because I have an incredible fabric giveaway for your as well!

I have so many patterns in my stash that I have been just dying to try. I have had this Oliver + S Summer Picnic Shorts and Blouse pattern in my collection for about three years now. And seeing as though the version of this pattern that I have only goes up to size 4T, I figured I better get this sewn (since Matilda is currently wearing size 4).

Matilda’s favorite color is blue. So when April (owner) from Modern Yardage asked me if I would like to sew some projects with their fabrics, I knew that ‘Poppy Hop’ by Cindy Lindgren for Modern Yardage in the Turquoise color-way would be perfect for this little outfit.

You might not have heard of Modern Yardage before, but they are a fantastic fabric manufacturer and to be honest, they are new to me as well. But I would like to tell you some things about them that set them apart from some other manufacturers in the quilting cotton fabric market.

All fabric designs available from Modern Yardage are available in three different scales. Seriously, this blew my mind. To me, one of the MOST important parts of designing a children’s outfit with patterned fabric is scale. Many times I’ll have pieces I want to put together, but if the scale isn’t right for the piece then I just can’t put those designs together. So you can choose just the right scale for each part of your garment.

All designs are printed on 100% pre-shrunk cotton (yes, I said PRE-SHRUNK) and for garment sewists, this is an amazing feature. No pre-washing….yay! The fabric is slightly heavier than traditional quilting cotton and has a wonderful feel (or hand). The fabrics are printed with environmentally-friendly, water-based textile pigments and they do not use any harsh acids or chemicals. Again, perfect for garments.

Finally, the fabrics are printed on demand. So when I got the three prints I selected for this garment, they were all printed out on one continuous piece of fabric. The fabric design is 44″ wide, but is printed on 58″ wide fabric, meaning the extra 14″ has maybe a new craft project idea, a message from a designer, a coupon for your next sale……..you never know…….it’s always a surprise.

Here is little miss thing wearing her new blue outfit. I really should show you all the faces she gave me during this photo shoot……..she was working it.

I didn’t alter the pattern at all, which is kind of strange for me. But it’s such a great design, I didn’t want to detract from the look with too many embellishments. And the fabric was pretty busy as well. The only thing I added was some white piping in the seam on the blouse in the front and the back and then the two little white buttons.

I always add a ‘The Cottage Mama’ label to everything I make for the kids. If you are looking for garment labels, you can read more about mine here.

I thought the fit was absolutely perfect. Matilda is spot on in a size 4 commercial clothing and I don’t think these pieces could have fit any better. The only thing I would do differently is that I don’t think I will finish the back elastic waistband the same as the pattern calls for next time. I wasn’t a big fan of being able to see some of the elastic on the inside of the shorts, but it was a great technique if you wanted to use adjustable waist elastic.

Oliver + S instructions are so easy to understand and follow. They come with black and white illustrations that are very clear. I’d say this pattern would be great for an intermediate or confident beginner.

And here is one more shot of Miss Matilda. Just so you know…….80% of my pictures of her end up with her in this position. Apparently she thinks this is her best pose. Silly girl.
So how about some fabric?
Would you like to win 5 YARDS of fabric of your choice from Modern Yardage?
If so, please enter in the rafflecopter below. Giveaway open until Sunday, August 11 at midnight (CST).

a Rafflecopter giveaway