So I know it’s after Christmas, but if you follow along over on The Cottage Mama Facebook Page, then you already know, but I was in charge of Savannah’s Kindergarten Holiday party this year. I was really excited about getting involved in the classroom and especially getting to spend some time with all these new little friends Savannah has made this year during school.
I was given 1 hour for the party and had to set up during the second half of the schools singing performance (luckily Kindergarten sang first, so I didn’t miss my Savannah’s song). There are 27 kids in Savannah’s full-day Kindergarten class, so I divided the class into four groups. I used holiday stickers so they knew which group they were in during the party. I had santa hats, wreaths, presents and peppermints.
I also divided the room up into four stations. I had a craft station, food station, game station and book station. For the food station, I did a hot chocolate bar. I kept the hot chocolate in a warmer and had a parent dispense it for each child. Then they were able to put all kinds of toppings on top such as whipped cream, marshmallows, mini-chocolate chips, sprinkles and more! We also had cookies at that station as well. For the game station, I made a giant sized Rudolph head and the kids played ‘Pin the Nose on Rudolph’. I found these giant round red stickers in a pin the nose on the clown set that I found at Hobby Lobby and just used the stickers from that. It was great fun and I had a prize for the winner in each of the four groups. For the book station, I had a parent read a book called ‘Gingerbread Friends‘ by Jan Brett and the kids also got to guess how many peppermints were in a jar. The winner got to take the jar home!
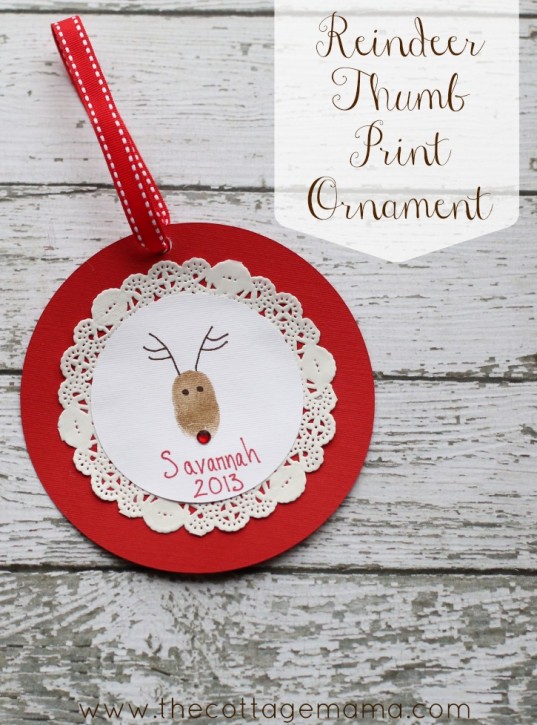
So for the craft station, I had the kids make these Reindeer Thumb Print Ornaments. I found all the supplies at my local Hobby Lobby and it was a really easy project to put together for the kids. I thought I would share this easy tutorial with you in case you wanted to try this craft at home or at school next year with your little ones.
Reindeer Thumb Print Ornament
Supplies:
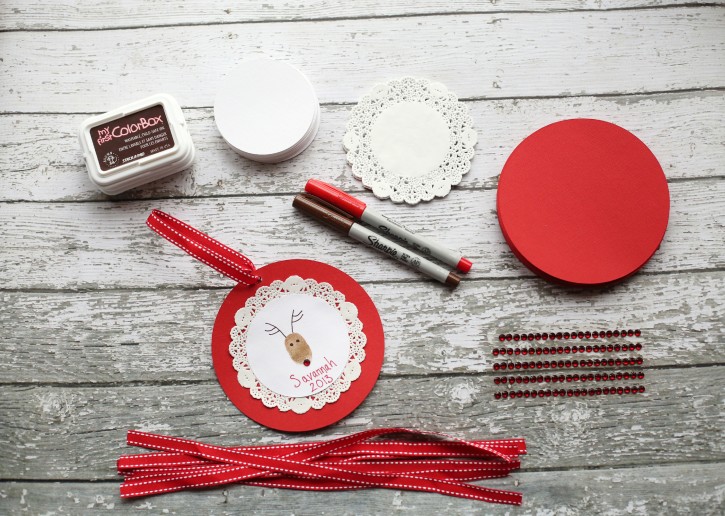
Red and white card stock
4″ Doilies
Brown Ink Pad
Brown and Red Pens
Red sticky rhinestones
Glue sticks
Hole punch
Ribbon
Instructions:
Gather all of your supplies. I cut the circles using my Silhouette cutting machine. I did a 3″ white circle, had 4″ doilies and then did a 5″ larger red circle. You definitely do not need that machine for your circles, you could certainly cut them by hand. I cut the ribbons ahead of time about 11″ long each and used Fray Check on the ends to make sure they wouldn’t fray in the future.
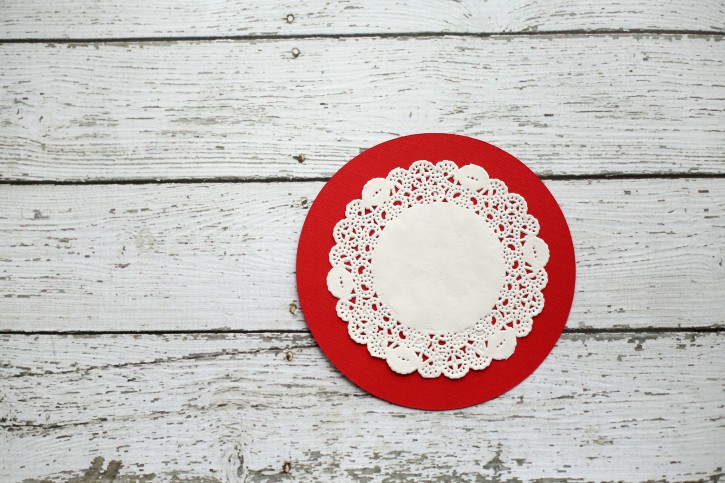
Making the ornament is very simple. First layer a 4″ doily on top of the larger 5″ red circle using a clear glue stick.
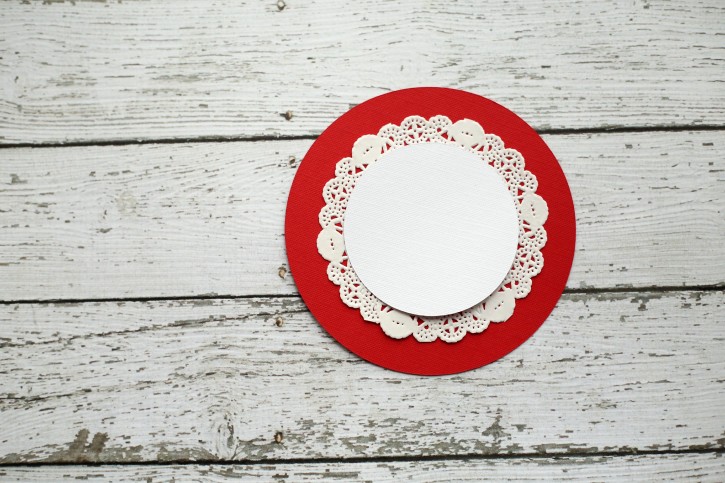
Next, add your 3″ smaller white circle on top of the doily. Glue it in place using your glue stick again.

Then grab your ink pad for the kids to do their thumb print on the ornament. I found this kid ink pad that worked really well. It dried fast and was very easy to wash off of the kids thumb. Since the party was right before the kids went home for Christmas break, I knew we wouldn’t have time for the ornaments to dry.
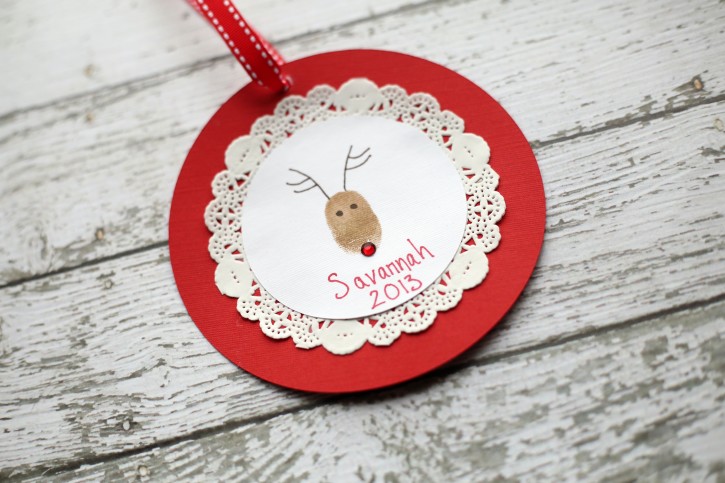
Once the kids put their thumb print on the ornament, they can use a brown pen to draw antlers and two eyes. Then I had them draw a red nose underneath the red rhinestone. The red rhinestones were found in the scrapbooking section of Hobby Lobby and while they were very sticky, I had a feeling they might fall off someday. So I thought drawing the red nose would ensure that our little reindeer always looked like Rudolph, rhinestone or not.

Then I had the kids write their name and year on the ornament. This was my example for the table, so that is my thumb print and hand writing……the kids turned out much cuter. Then the mom that was helping with the craft, punched the hole at the top and tied the ribbon.
Every 15 minutes during the party I rang a jingle bell to help the kids know that it was time to rotate to the next station. This ornament was completed for 7-8 students in under 15 minutes…….just to give you an idea of time.
I had such a ball planning Savannah’s holiday party and the kids all seemed to have such a great time. I still can’t believe I have a school aged child, but it’s turning out to be a lot of fun!


 Lindsay Wilkes is the owner and designer behind The Cottage Mama. She creates timeless, vintage inspired sewing patterns for children’s clothes. She is also a fabric designer for Riley Black Designers / Penny Rose Fabrics, author of the book ‘Sew Classic Clothes for Girls’ and can be seen teaching nationwide and online in her video series ‘Lessons with Lindsay’ sponsored by Baby Lock Sewing and Embroidery machines.


SUPER duper adorable- AND easy- can’t beat that!
Thank you for sharing this wonderful idea! That is a LOT of kids to coordinate, and it sounds like all your party ideas were creative and fun. I hope my memory can keep track of this idea until next year…..I would definitely like to put it to use with our homeschool group.
You are very organized. I bet the teacher and the students loved the party!