Archives for July 2012

LEGO DUPLO Read & Build Review: $100 Lego Sweepstakes

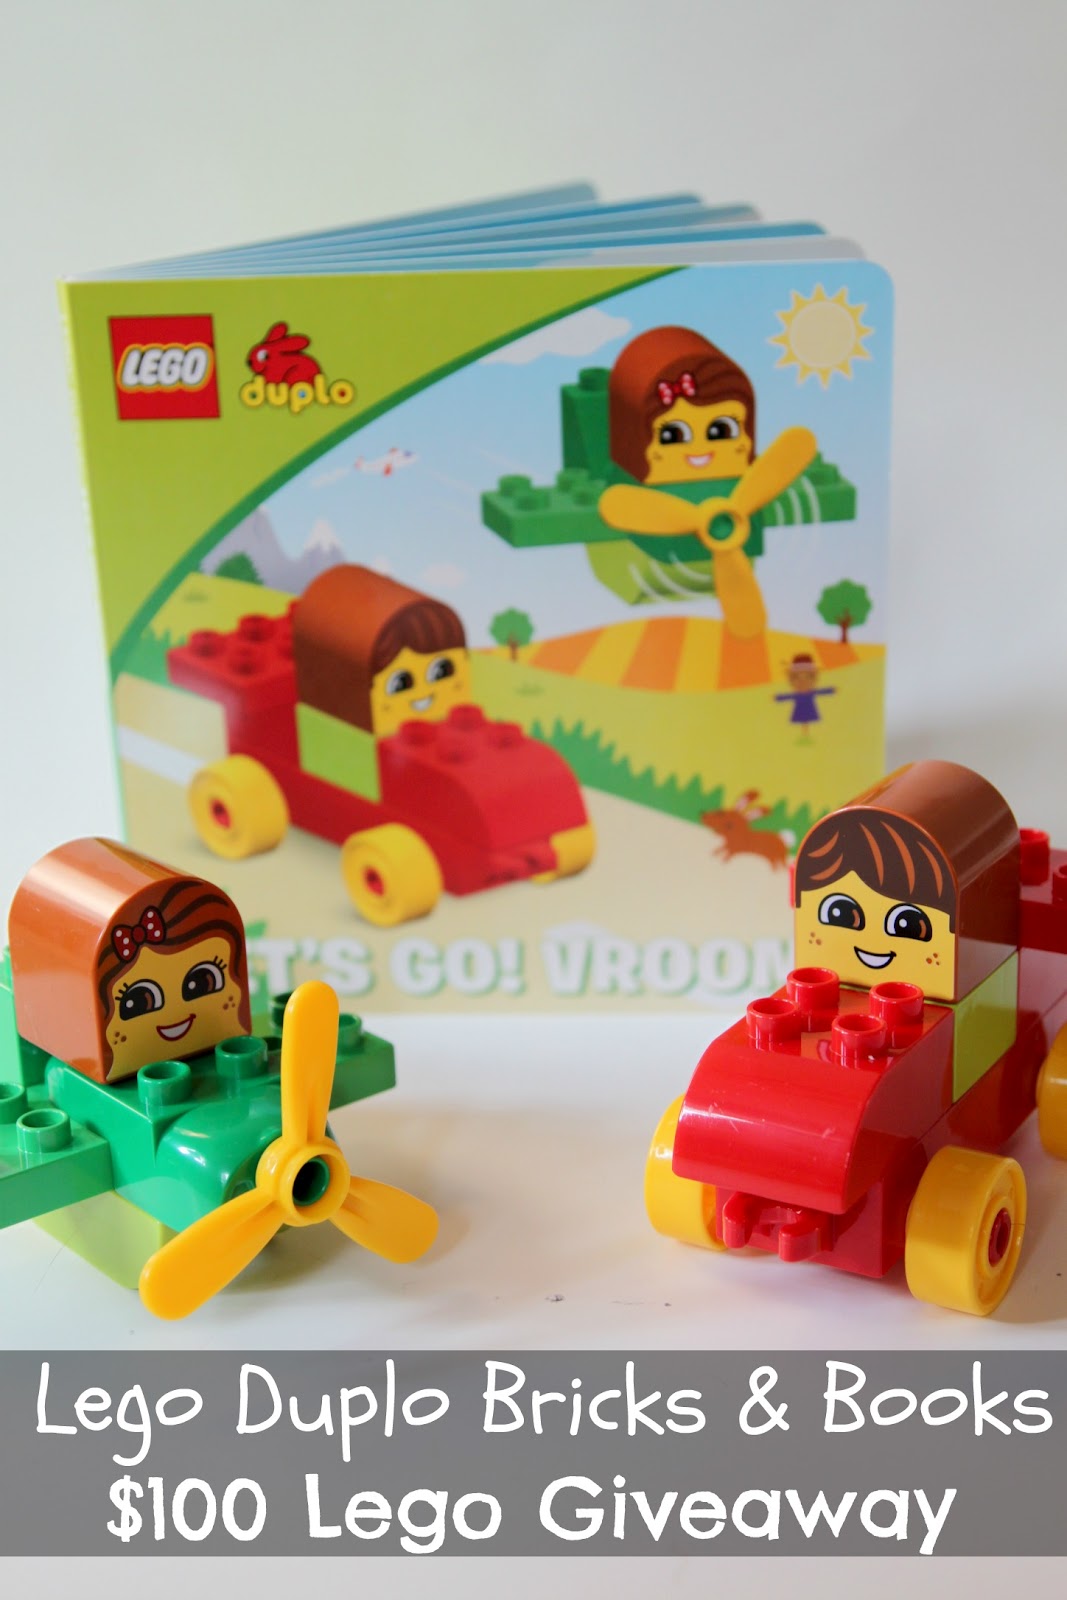
So there’s a new, fun LEGO DUPLO toy in town and the girls and I got a chance to try it out last week. We absolutely love blocks and we love books, so we were very happy to be given this opportunity to play with the LEGO DUPLO Read & Build set!

So here’s how this works. Basically it’s a storybook that instructs you to build certain things as you read through the story. Different block sets go with different stories and we were given the story “Let’s Go! Vroom!”.

“Let’s Go! Vroom!” is about Racer Joe who goes out driving and gets stuck somewhere. Pilot Penny decides she needs to go out and find him (I love the fact that Pilot Penny is a girl, but I digress). At this point in the story, your kids help build the airplane with visual diagrams given in the book. Then Pilot Penny goes soaring around the sky and finally finds Racer Joe. Racer Joe’s car is broken and at this point you have to help put his car together again. Then Pilot Penny and Racer Joe race off home!

Pilot Penny’s Plane

The girls actually asked me to read this story three times. They had so much fun putting together each vehicle and making them fly and race at the end of the story. Then they had just as much fun taking them apart to start the story over again.

Pilot Penny and Racer Joe
(built by Savannah and Matilda)

As a mom, I loved this toy because it was so interactive and focused on several skills in a fun manner. The girls needed some guidance to put together each vehicle, but they were able to handle it with just a little assistance from me. The book made them stop and focus to follow the directions (simple pictures) to complete each task. Also, they had to use team work on several occasions to complete one vehicle or another. Savannah (4 years old) was best at following the instructions and knowing where to put each piece and Matilda (3 years old) was great at finding the pieces and putting the characters into their vehicles. Together, they were able to figure everything out and had a great time racing off at the end of the story!
By the third time we read this story, the girls were already reciting the simple, preschool level text. I always know they are enjoying a story when they can recite parts of the book back to me. I would recommend LEGO DUPLO Read & Build for any toddler through preschool age child……especially one that loves to build and read. I feel that any chance we can get a kiddo to pick up a book, is a move in the right direction on the path to learning how to read. 
Want to win $100 LEGO Gift Card? 
 
To enter to win, please leave me a comment answering the following question:
How do you think LEGO DUPLO Read & Build could help your child learn to read?
Visit LEGO.com to see other Read & Build sets and order online. Check out BlogHer.com to find other reviews and more ways you can enter to win.
Sweepstakes Rules:
No duplicate comments.
You may receive (2) total entries by selecting from the following entry methods:
a) Leave a comment in response to the sweepstakes prompt on this post
b) Tweet about this promotion and leave the URL to that tweet in a comment on this post
c) Blog about this promotion and leave the URL to that post in a comment on this post
d) For those with no Twitter or blog, read the official rules to learn about an alternate form of entry.
This giveaway is open to US Residents age 18 or older. Winners will be selected via random draw, and will be notified by e-mail. You have 72 hours to get back to me, otherwise a new winner will be selected.
The Official Rules are available here.
This sweepstakes runs from 7/11 – 8/19/12.

Zealous Good: A Meaningful Way to Donate

I don’t promote a whole lot of different organizations on this blog, but when I was contact by Zealous Good in Chicago (about guest posting on the blog), I knew I wanted to share them with you all.  They are a wonderful organization, doing wonderful things for the community.  Please take a moment and read the following post from Zealous Good………

Zealous Good: A Meaningful Way to Donate 

Giving your old stuff away to a charity is a great thing. However, when you donate, do you really know whom it’s going to? How it’s helping? If it’s actually helping that much?

You donate a bag of old clothes to a charity. Great— but what if the charity could use your old children’s toys and games more? Would you know?

Now, all these questions are silenced by the Chicago-based organization Zealous Good. Zealous Good matches people with excess goods to donate to the needs of local charities, providing an efficient and effective way to donate your old, no longer needed items.

The average American household has $7,000 in unused items. $7,000! So give all those old children’s games, old sports equipment, or arts & crafts supplies you know you’re never going to use again new life, by placing them in the hands of a child who really needs them.

A local charity is waiting on the other side of your computer for help. And the best part– the donation process is easy.

To donate, go to zealousgood.com and submit what you want to donate. Then let Zealous Good start the matchmaking. You’ll be notified which local charities are interested, and you can pick which charity suits you best and schedule a time to pick up or drop off your item. Once your donation is in the hands of your selected charity, you get to see the difference you made and the lives you affected.

Or, if you’re a charity and need donations, it’s just as easy. Simply make a Zealous Good page and request what kind of donations you want to receive. After Zealous Good matches the donations with your needs, you receive the donation and your charity is fulfilled.

Simple. Powerful. Good.

So take a look around your house. See what extra stuff you don’t need. Maybe even ask your kids if they have old toys they would be willing to give to a child in need. If they do, you and your child can pick together which charity think would be best and which one you want your items going to, so you can both feel good about whom you are helping.

There’s never a bad time to do good. Why not make it today?

Click HERE to read more about Zealous Good.

Yes, Zealous Good is a Chicago-based organization, but even if you aren’t in the Chicagoland area, maybe you will think twice about where you take your donations.  I love the idea of knowing that what I no longer need will go to an organization can put it to great use!

Happy 3rd Birthday Miss Matilda Jane

Happy 3rd Birthday our sweet girl!
Today is your 3rd Birthday Miss Matilda Jane.  You are such a special part of our lives and there are a few things I would like to remember about you today……
1. Your favorite color is blue.
2. You are sweet and cuddly.
3. You sleep with your little stuffed puppy dog and you love him.
4. You can be found most days wearing a tutu.
5. Your favorite tv shows are Team Umizoomi and Dora the Explorer.
6. You love to take baths.
7. You love to play dress up.
8. Pretend play is a favorite and you like to pretend to be a puppy dog, a knight or a cowboy.
9. You like to help mommy cook in the kitchen.
10. You love to color and paint.
11. ‘You said it sister’ was a funny phrase you said recently.
12. You still take a good 2-3 hour afternoon nap (thank you!).
13. You love taking your gymnastics class.
14. You are usually up between 5:45am – 6:00am in the morning.
15. You always wear your sunglasses upside down.
16. You like to ask mommy for buttons when I am working in the studio.
17. Your most favorite foods are hot dogs, go-gurts, french fries, ketchup and pancakes.
18. You chose a Team Umizoomi theme for your 3rd birthday party.
19. You are very smart and really like patterns and counting.
20. As I’m closing your door after bedtime, you always say, ‘Wait, Mama, come back……..I love you’.
Matilda Jane, we love you from here to the moon and back again.  You bring a sweetness and spunk to our lives that is one of a kind.  I cannot believe you are three years old today…..such a big girl!  Your free spirit, loving nature, and sensitive soul are some of the many, many things that we love about you.
Happy Birthday, baby girl!
Love,
Mommy, Daddy, Savannah and Caspian

Recipe: Baked Apple Pancake

Looking for a delicious family breakfast or a new go-to brunch idea…..how about a Baked Apple Pancake? Easy and inexpensive, but packed with flavor. Not to mention the fact that it will make your house smell heavenly. Give it a try……you’re going to like it!

Baked Apple Pancake
SERVES 6
Ingredients:
2 apples, thinly sliced
1/2 stick of butter
1/2 cup brown sugar
1.5 teaspoons cinnamon
5 eggs
1/2 cup flour
1/2 cup milk
Directions:
Preheat oven to 450 degrees. 
Melt butter, brown sugar and cinnamon together in a bowl.  Toss the apples into the butter mixture and stir to combine.  Place coated apples into a large pie dish.  
In a blender, combine eggs, flour and milk.  Blend well.  Pour mixture over apples in pie dish.  Place pie dish on top of a baking sheet (to catch any drips).  Bake for 45 minutes or until top is golden brown and a knife inserted in the center comes out clean.  Dust with powdered sugar and serve with a drizzle of maple syrup.

YUM!

DIY Craft: No-Sew Fabric Covered Box Tutorial

This past weekend I was out and about running errands on my own.  And I’m sure most of you mom’s know…….I sort of felt like I was on a mini-vacation. Anyway, I stopped off at one of my favorite local thrift stores and, come to find out, the entire store was 50% off.  50% off at a thrift store?  Yes, I couldn’t believe it either.  I picked up a bunch of things that I just couldn’t go home without and this little metal box for 50 cents was one of them.

Here is what the box looked like when I brought it home:


Not very exciting, but it was just begging to be given new life.  So I decided to get out my craft supplies and turn it into something a little more eye-catching.  This is an easy, inexpensive craft project that can be done with mostly items you have around the house.  Granted, if you don’t craft a lot you may have to buy some essentials (like spray adhesive), but you’ll be able to use this things for projects in the future.


Fabric Covered Box Tutorial
by Lindsay Wilkes from The Cottage Mama
Supplies:
Box ~ any size (mine was able to fit large notecards inside)
Spray Paint
Spray Adhesive
Glue Gun
Fabric (a fat quarter should be more than enough)
Trim
Scissors
Instructions:


I grabbed a can of spray paint that I happened to have around for this project.  You want to make sure you spray the inside of the box really well since that will not be covered.  Let the inside dry and then flip the box over and spray the bottom.  The rest of the box will be covered by fabric and trim so no need to worry about it’s appearance.

Cut the piece of fabric for the top of the box about 1/2″ larger than the box top.  Then cut small slits on the diagonal in each of the corners which will enable you to wrap the fabric around the box (like you are wrapping a gift) after you use your spray adhesive.  You are just wrapping the fabric down over about a 1/2″ over the edge so that you don’t see any raw edges.  The raw edge will eventually be concealed by your ribbon trim.


Measure and cut out the strip of fabric to go around the box.  You want the fabric to go all the way around the box and overlap by about an inch.  Cut the fabric wider than necessary so you can press under the top and bottom with your iron.  Press the fabric so that it is just the right size to fit your box.  Also press under the one side that will overlap in the back of the box so it looks neat and tidy.
The next part is easy.  Take your box and fabric outside and spray liberally with spray adhesive.  Place fabric on the box and smooth out any bumps.  For the top, press the over-hang pieces down a tiny bit over the sides, but remember this will be covered by trim so it doesn’t have to be perfect. Spray adhesive around the main part of the box and wrap your fabric strip around the box, overlapping the strip in the back.
Next, get out your glue gun and glue any trims that you have onto your box.  You can use anything you would like to embellish this box.  I simply used trims that were already in my stash to make this an even more budget friendly project.  I used one piece of ribbon around the top and then I layered some rickrack and ribbon around the bottom.  This is your chance to get creative!


You can use this box for just about anything.  I think it would be fun to make some of these for different holidays too.  How about one for Christmas?  It could also be an adorable recipe card box, a place to store crafting or sewing supplies, or even a pretty container for flowers……..


I simply placed two of my really small ball jars (minus the lids) inside the box and filled them with water to hold the flowers.  These flowers were already growing in our yard and I love being able to use things that we already have.
So that’s it!  A super-simple craft project taking an ordinary thrift-store metal box and making it into something beautiful, special and one-of-a-kind!

Spring Sewing Swap Stuff

I recently participated in a ‘Spring Sewing Swap‘ over at Sewing In No Mans Land.  Did you hear about this?  Basically you just signed up and used three words to describe yourself / your style.  Then we were each paired up with someone and given only their name, shipping address and their three descriptive words.   We weren’t give a dollar value to send.  You were just supposed to send a package that you would like to receive in the mail yourself.  I thought this just sounded like such a neat idea.


I quickly sent my package out prior to heading to quilt market.  I should have taken a picture, but I didn’t have time.  I sent a bunch of different trims, a fat quarter bundle of fabrics, and several The Cottage Mama Sewing Patterns.

Then a week or so later, I received my package in the mail in return from the person I was paired up with for the swap.  I can’t tell you how excited I was ~ I was like a kid on Christmas!

My swap buddy sent me the most beautiful bag of trims, packaged up so beautifully.  To be honest, I can’t remember what three words I used to describe my style, but she hit the nail on the head.  And then she sent these beautiful summery fabrics.  I actually had no eyelet in my stash, so this was such a pleasant surprise.  She included two hand-knit hats for the girls that she made herself.  We absolutely love these hats to pieces.  I don’t have pictures of the hats because the girls love playing with them for dress up so they were off in one area of the house or another when I was taking these pictures.

I’m thinking I might challenge myself to make an outfit for one (or both of the girls) out of this grouping of sewing loveliness.  What do you think?  Do you think I can do it?  I don’t think it should be very hard since everything she sent is beautiful.  But it might be kind of fun to see what I come up with.

Anyway, I just wanted to share this beautiful package with you all.  And say a BIG GIANT thank you to my swap buddy!
Have you every participated in a swap before? 
If so, did you love the package that was sent your way?  
This really was so much fun.  I would definitely sign up for another one in a heartbeat!