I hope you’ve liked what you’ve seen so far in my Semi-Handmade Spring Wardrobe Series and today I am revealing two fun little dresses and a super-easy skirt.

All three of these looks were created from different store-bought shirts. They were transformed into something new with the addition of some new fabric, pretty trim, and large ruffles.

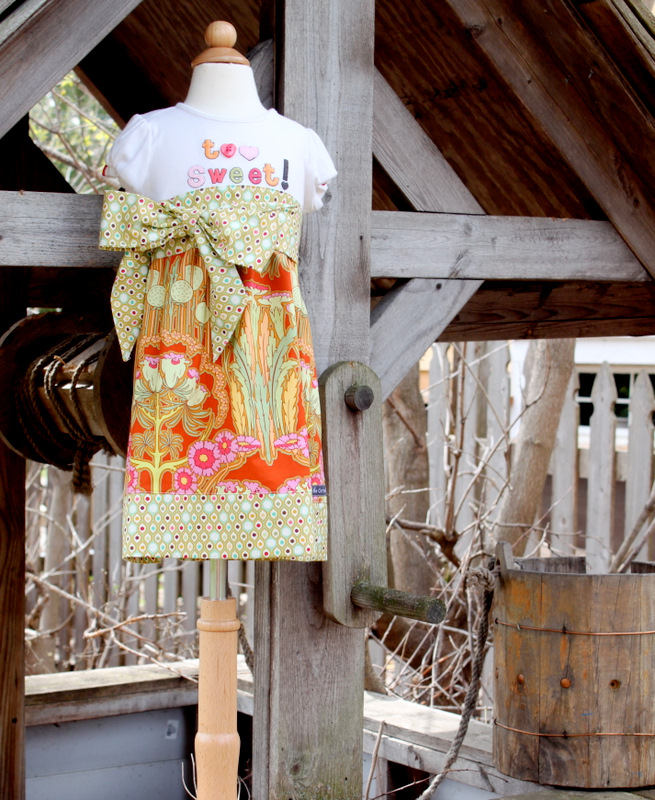
I think this dress looks like a high-waisted skirt, but it’s actually a dress. Again, I had another cute t-shirt that needed some new life and a few stains cut off. So I cut off the stained portion of the shirt (the bottom) and added this pretty skirt and bow.

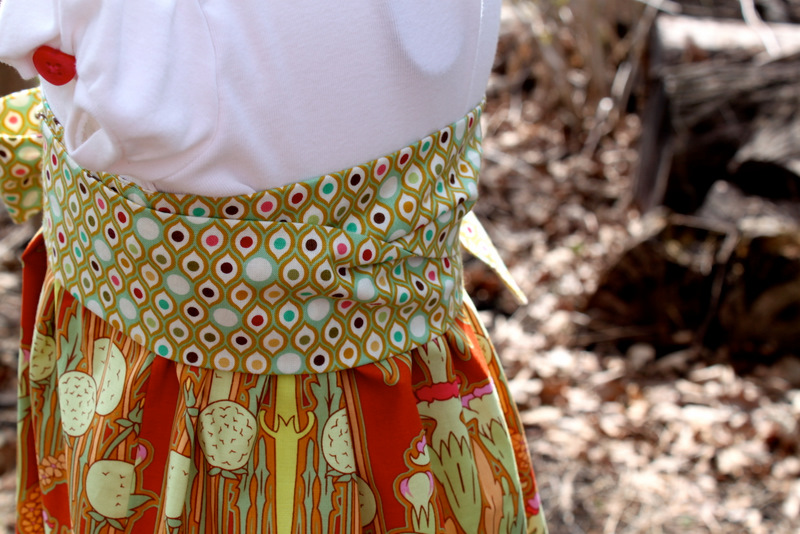
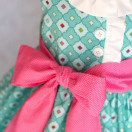
The wrap around bow is my favorite part of this dress. It’s really wide and is definitely a statement piece. I stitched the sash to the front of the dress all the way to the side seams. The sash is wrapped to the back, then to the front and finally tied in a large bow off to the side. You could make this look without the sash or just have it tie in the back if you would prefer something less dramatic.
In order to have the sash tie off to the side, you will need to make your sash a little bit longer on one side than the other. Just play around with it until it looks like you want, then pin it in place and sew.

The fabrics used in this dress are from two different designers. The main skirt fabric is from Amy Butler’s “Soul Blossom” line and the small accent fabric is from Tula Pink’s “Parisville” line. I think these fabrics are a little different for a little girl, but they really work with the colors in the shirt.
The yoga band skirt was created from the bottom of the shirt I used when creating my Empire Waist Maternity Dress (see post HERE). I think a little “Mommy and Me” is pretty cute, so you may find the two of us sporting matching looks this summer.

I purchased a matching blue tank top from Old Navy for her to wear with this skirt. Plus this tank will coordinate with some other play clothes she has for this summer.


The skirt is only made of two pieces – the bottom of the shirt used for the maternity dress and a super-stretchy jersey knit. This jersey was SO stretchy that I cut the waistband only 17″-18″ (Savannah’s waist is about a 21″-22″). The reduction in waist size made this skirt fit perfectly and there is no worrying about it falling down.


I ran a gathering stitch along the top of the skirt piece and added it to the folded waist-band that I created with the jersey spandex knit. The waistband is extra wide for this skirt, but you could follow the waistband instructions for my “Easy Bubble Skirt” tutorial as well (found HERE) but just make it much wider.

For my final look, I created a party dress made from another worn-out t-shirt. I simply cut off the t-shirt, added a skirt and made a giant ruffle to go down the top.
Savannah wore this dress to a recent birthday party. We paired it with a cardigan and tights because it was a little chilly that day, but I will put it with just a simple pair of sandals when the weather warms up.


The large ruffle down the front was created by cutting a large piece of fabric, folding it in half (wrong-sides together), stitching down both long sides and one short side. Then I turned it right-side out and pressed it. The open end is hidden in the seam between the shirt and the skirt. I ran a gathering stitch down the ruffle and then stitched over it again to secure it to the shirt.

I also wanted to do something a little more exciting with the skirt on this dress. I used three different prints that I thought went well together. Two of them are from Amy Butler “Love” and the other is from Amy Butler “Soul Blossoms”. I just cut wide strips of fabric and then sewed them all back together in a width that was about 46″ wide.

The trim is my favorite part on this dress – I think it ties it all together. It is a woven jacquard trim that has been stitched on the top and bottom to secure it to the dress.
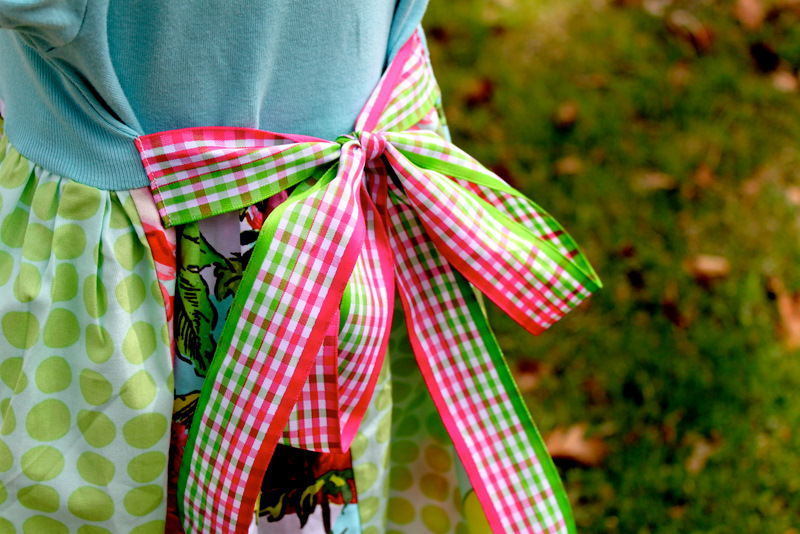
After I finished the dress, I felt it was a little wide (this shirt wasn’t super-fitted), so I added a coordinating ribbon to define the waist-line a little bit more. Plus it adds some interest from the back.
Whew, so those are my final three looks in my Semi-Handmade Spring Wardrobe Series. Tomorrow I will do a recap of Savannah’s Spring wardrobe. Thanks so much for following along with me – it’s been a lot of fun sharing with you all!

 Lindsay Wilkes is the owner and designer behind The Cottage Mama. She creates timeless, vintage inspired sewing patterns for children’s clothes. She is also a fabric designer for Riley Black Designers / Penny Rose Fabrics, author of the book ‘Sew Classic Clothes for Girls’ and can be seen teaching nationwide and online in her video series ‘Lessons with Lindsay’ sponsored by Baby Lock Sewing and Embroidery machines.


Your ideas are so great! I have huge pile of clothing down stairs just waiting to be refashioned!
Another darling round of ideas! This series is terrific!
awesome series. I just love your style. I can’t wait for you patterns. I think you really have great looks for little girls – simple and so appropriate for their age. and your fabric choices are always so great. LOVE the refashions.
Im really enjoying seeing all of these! Thanks!
Darling! She is going to be one styling girl this spring 🙂 Thanks for the great inspiriation!
Very cute! The ruffle down the middle of the top would perfectly cover stains on an otherwise nice shirt.
I love the material you choose. I think that is my hardest part. Love the ideas!!
Really adorable “remakes”!! Makes me want to get my granddaughters’ shirts and remake them!! 🙂
I have been sewing for years and know that sewing stretchy fabrics can be a real challenge and was wondering if you have done a tutorial on how you sew with this type of fabric? I am somewhat new to your blog and didn’t know if this was something you had done in the past or not. Might be good to show it again or create one?
Keep up the good work!
Such beautiful details on all these clothes in this series! Thanks for sharing!
The first sweet dress is so adorable, as the others too!
But specially the first one, I really would like to have something similar for my daughter.
Another adorable post! Thank you so much for sharing all of your beautiful items. I love reading your blog!
You always have the most lovely fabric combinations! Nice work.
I love these! My favorite is the birthday party dress~ all of them adorable!
For the final look did you use a specific pattern for the skirt you attached to the shirt? SO cute!!!
Thank you all SO much!! No, I didn’t use a pattern for the skirt, I just came up with it based on my daughters measurements.
Again, thank you guys for your sweet, sweet comments. I’m very happy you all enjoyed this series!!
Lindsay
Great ideas! I love it! I need to try some of these. Kristy from http://www.apronsandapples.blogspot.com