Archives for June 2010

Dollar Store Tiered Party Trays

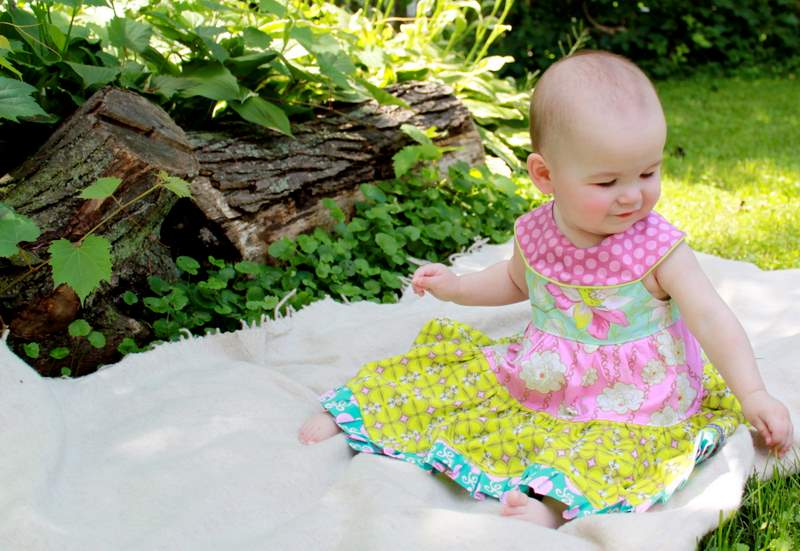
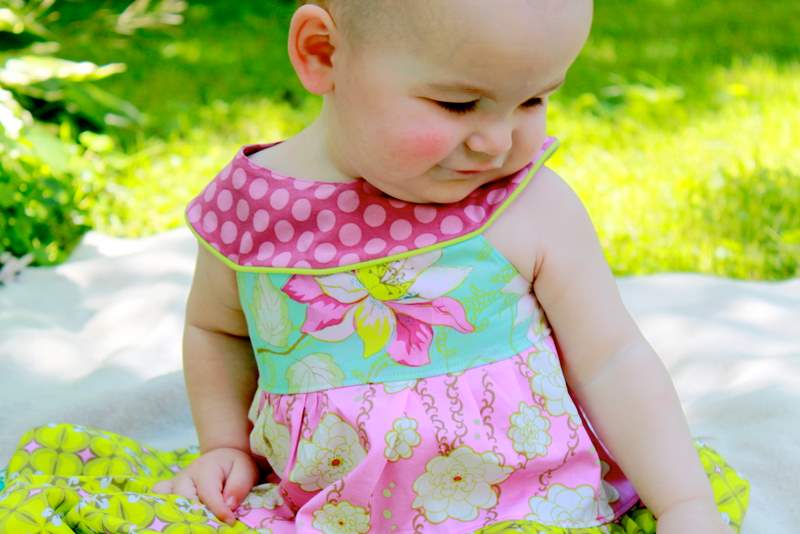
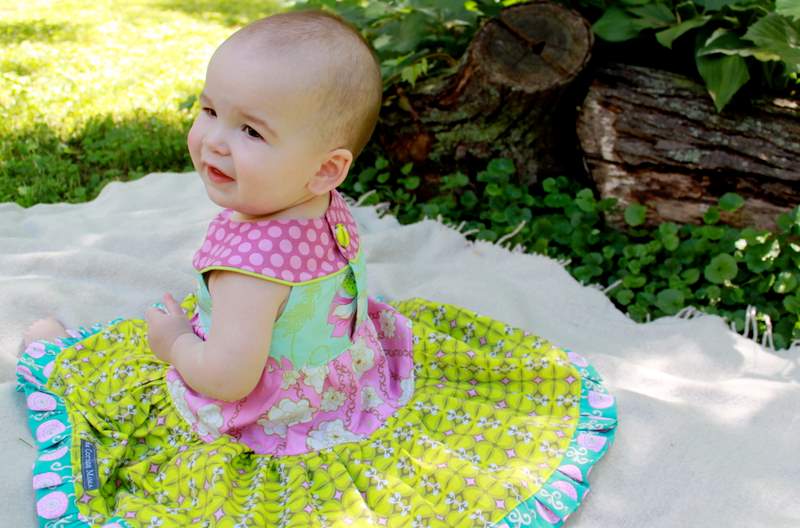
As I have mentioned, we are getting ready for Miss M’s Garden Party 1st birthday coming up this weekend.  I’m really hoping to be able to have the party outdoors (fingers crossed for good weather).

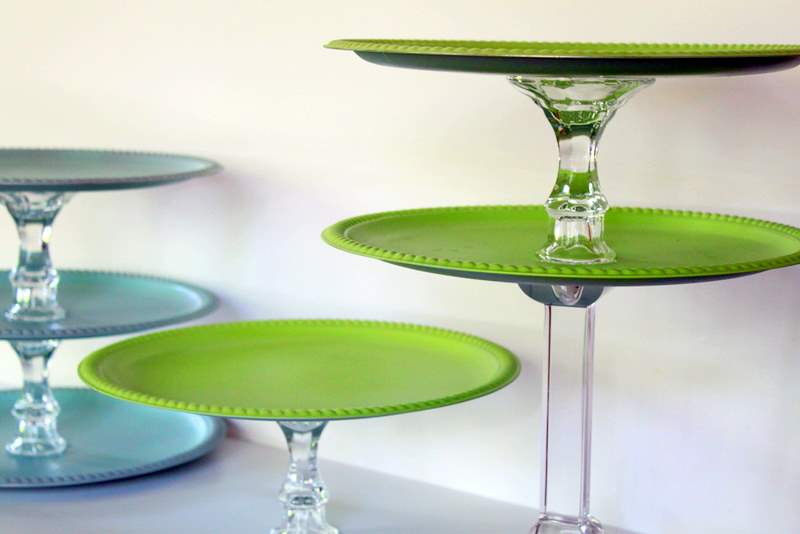
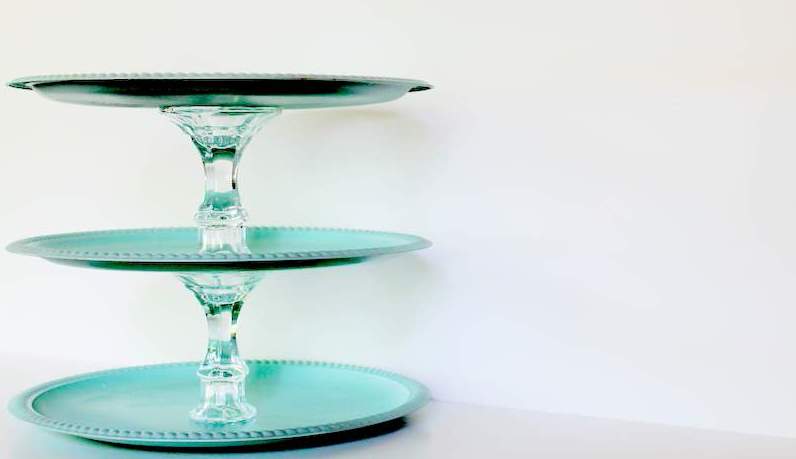
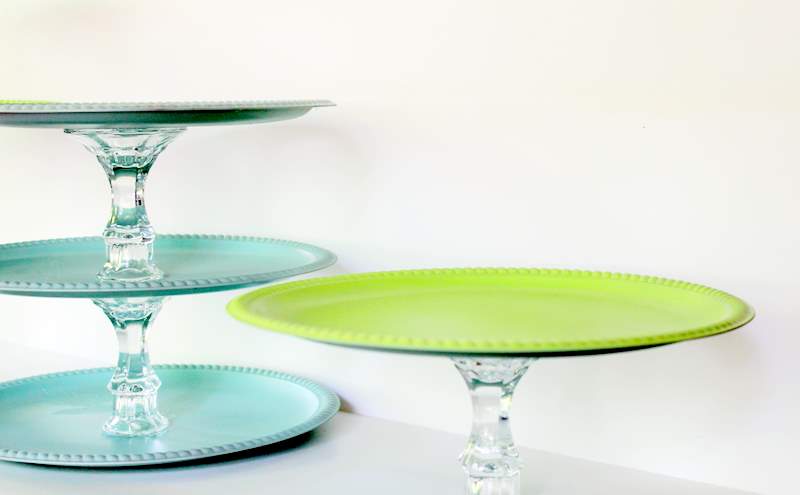
I have been working on some of the decor for her party and wanted to share these fun tiered party trays that I made from items from our local dollar store.

Now I cannot take credit for this idea.  I saw the tutorial for these trays by Julie on Joy’s Hope blog and knew I HAD to make these!

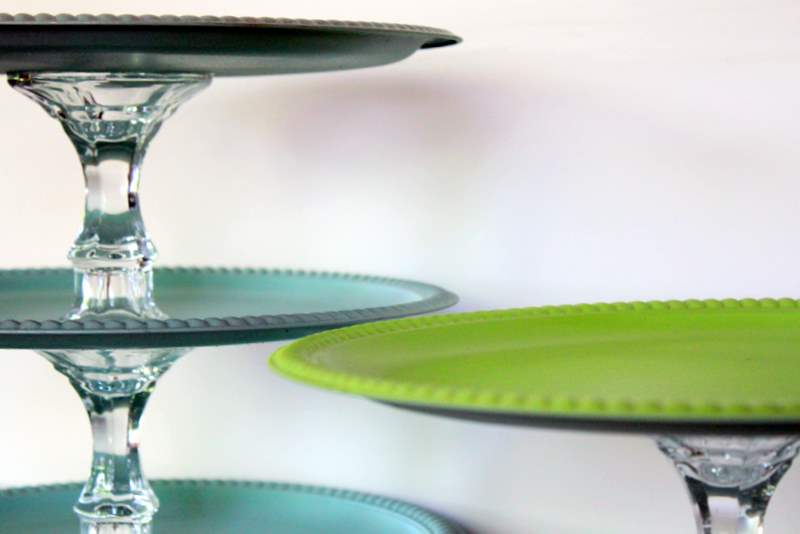
These are made from silver dollar store trays that have been spray painted to match the party decor.  They are attached to one another using dollar store super-glue and each tier is a dollar store crystal candle stick holder turned upside down.

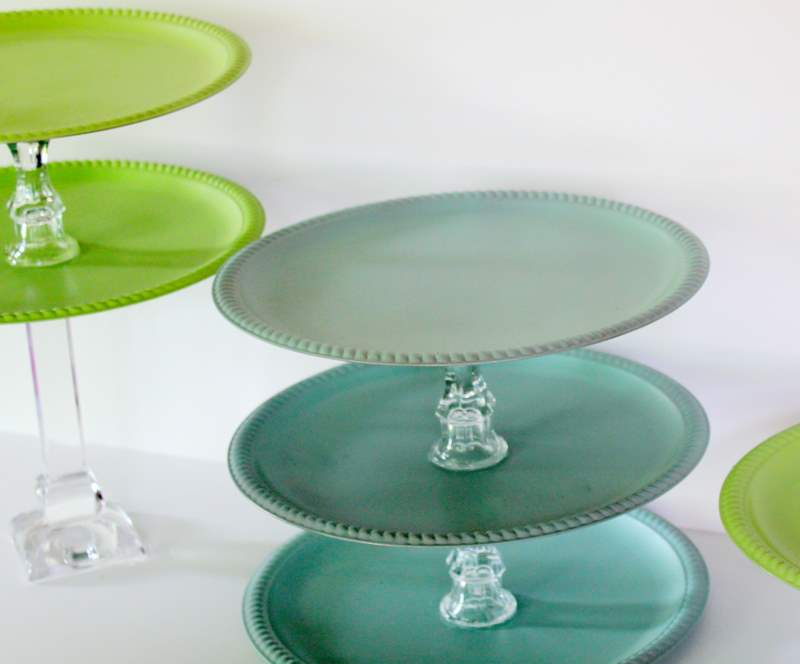
Julie at Joy’s Hope spray painted the candle stick holders which looked super-cute.  She also used a rainbow of colors that made them look so fun and happy.  I decided to leave my candle sticks clear to up the elegance factor – I like the way the crystal looks.

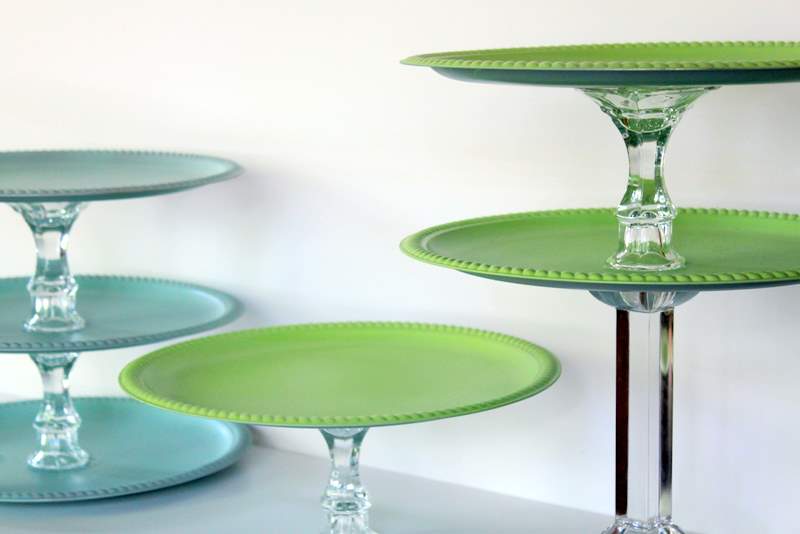
I made three different sizes.  All of the candle stick holders are from the dollar store, except for the tall one which I just happened to have on hand.

Joy’s Hope has a great tutorial and will show you everything you need to get started making these pretty tiered party trays.  I think these would be so fun for the holidays – can’t you picture black and orange for a Halloween party or red and gold for Christmas?  For $4-$6, why not make them for all the seasons!?!

Cottage Mama’s Note:  Now if you plan to serve food on these trays make sure to put down some decorative paper or a paper doily – these are not considered food safe due to the spray paint that was used.  These would also make a great place to store your jewelry or in a girls room for all her hair bows and accessories.

My Little Baby and My New Baby

I just feel like things have been go, go, go around here lately – I mean, seriously, where does all the time go?  I have all of these projects that I would love to get done, but there never seems to be enough hours in the day.  Maybe someday, I will get to everything……..

I’m trying to stay focused, which is very difficult for me – I tend to move in five different directions all at once but somehow get most of it done.  And honestly I LOVE to accomplish things.  Yes, I enjoy sewing and creating, but my favorite part is seeing the end result.  So this weekend my plan was to focus on sewing some custom orders (which I did) and working on my baby girls 1-year birthday party (coming up this next weekend).

But meanwhile, while trying to stay focused, I had a VERY exciting distraction come my way.  I have been wanting a new camera for a while and yesterday my hubby said that I could get my birthday present early (my b-day is July 15th) – eeeeeekkkkk!!  I couldn’t believe it………so check out my new baby:

image via canon.usa.com
Yes, that’s right – I got a new Canon Rebel T1i kit with an additional lens as well!  I hope you don’t mind me bragging, but I honestly can’t believe I own this camera!
So this afternoon, I wanted to shoot some pictures of my youngest daughter Matilda in one of my “The Cottage Mama” dresses and I got to try out my new beauty.  My intention was to shoot pictures of my dress for the shop, but my darling little lady just captured my eye and this little photo shoot ended up being more about her than anything else.
This dress has been my top-seller in the shop. It’s such a fun dress with all the different patterned fabrics and makes a wonderful twirly dress for older girls.
The dress is made from Art Gallery fabrics “Girly Girl” line.  I am in love with everything Art Gallery lately – you should see the new fabrics due out this Fall!
Sometimes you have to stop for a cheerio break mid-photo shoot!
My favorite part about this dress is the piping in the round-neck collar and the fabric covered button closure.  I’ve thought about doing a piping tutorial if people would be interested.  I think piping is a great way to add a traditional finished look to any garment.  Did you know you can make your own piping out of any fabric?
Well, that’s all!  Thanks for letting me share some pictures of my little Matilda Jane (and letting me brag about my b-day present) – would you believe she is sick in these pictures?  Such a happy girl!
Cottage Mama’s Note:  I did not adjust any of these photos with photoshop, though I am dying to learn all about it.  We have the program (CS4) on my hubs. work computer, but I have no idea how to use it – if you know of any online tutorials for the program, please let me know!  I’d love to learn how to use it!!

Individual Pecan Bread Pudding

We spent this past Sunday celebrating Father’s Day at my in-laws.  We had a fabulous dinner (shrimp, chicken and steak) and my mother-in-law made my father-in-law his favorite dessert (fruit soaked in Grand Marnier) and I made my husband a new recipe for Pecan Bread Pudding.

I’m usually not a huge fan of bread pudding, but this turned out great!  This is my version of a Paula Deen bread pudding (let’s just say mine has a whole lot less sugar…..if you can believe that).  The pecans and brown sugar on top added a lot of extra crunch – serve it with vanilla ice cream and you’ve got heaven on a plate!!
 

Pecan Bread Pudding
Serves 8-12
Ingredients:
3/4 loaf french bread, cut into 1″ cubes or 4-5 cups
5 eggs
1 cup white sugar
1 teaspoon cinnamon
1 cup light brown sugar
1 cup chopped pecans
1/2 stick butter, softened
Directions:
Preheat oven to 375 degrees.
In a large mixing bowl, combine eggs, sugar and cinnamon.  Add bread and toss to coat.  Allow the bread and egg mixture to sit for 10 – 15 minutes.
Meanwhile, combine brown sugar, chopped pecans and butter.  Mix together to make sort of a crumble.
Get out a muffin pan or pop-over tray.  Coat with cooking spray.  Stuff the egg soaked bread pieces into each muffin holder.  After you have filled all of the muffin holders, sprinkle the brown sugar/pecan mixture on top (divide evenly among all 12).
Place muffin tray on top of a baking sheet (just in case any of the brown sugar spills over).  Bake for 20-25 minutes, until top is golden brown and bubbling.
Serve with vanilla ice cream.  If you really like sweet stuff, take it over the top by drizzling caramel sauce on top and sprinkle with powdered sugar.  Enjoy!
Cottage Mama’s Note:  I didn’t have my camera at my in-laws so this is not the actual picture of my bread pudding that I made this past Sunday, but I promise it looked VERY similar!

Summer Garden Birthday Party – Fabric Invitations

So I’m in the planning phase of my daughter, Matilda Jane’s, 1st birthday party.  Rather than doing one gigantic blog post after the party, I thought I would just share things with you as I go.  Luckily I got her invitations in the mail last week, so I can check that “to do” off of my list! 

The theme for Matilda’s birthday is a Summer Garden Party and is inspired by the fabric I used to make her birthday outfit.  So I’ve already shared her birthday dress with you…….remember this………

I really feel like the invitations set the tone for the party before it even starts.  For my daughter, Savannah’s 2nd birthday the invitations were more casual and fun since it was a huge Elmo Dance Party.  But for Matilda’s birthday we are doing something more intimate outside in The Cottage Garden (our yard), so I wanted a little more class and elegance with the invitations.  I am a HUGE fan of sewing on paper – I think it is so different and unique and super-easy to do!

I took blank, cream colored, folded note cards and used the two fabrics from her birthday dress for the invites.  I used the floral fabric on the front and the polka dot on the interior.

I applied single-sided fusible interfacing to the back-sides of both fabrics.  I find this helps the fabric to lie very flat when stitching it to paper.  I placed a little piece of double-sided tape to the fabric to hold it in place while sewing.

I used a zig-zag stitch in coordinating blue thread to sew the two fabrics to the card.

For the inside portion of the card, I simply printed the party information onto paper and cut it to size.  I used a straight-stitch to attach the paper to the card (again, I used a little tape to hold it in place).

I used InDesign software to layer the digital images of the fabrics and place the text on top.  I’m sure you could use something like photoshop or maybe even Word to achieve the same effect.

Don’t you just love with something turns out how you envisioned it?  I love these little invitations – they are so sweet – just like my sweet Matilda Jane!

Cottage Mama’s Note:  The fabric I used is from designer Heather Bailey’s, “Nicey Jane” fabric line.

Dress Shirt Sleep Sack Tutorial

I’m not sure if you all were able to make it over to luvinthemommyhood to check out my Dress Shirt Sleep Sack tutorial, so I thought I would bring it right here to you!

I don’t know about you, but for the first year or so of my girls life they spend most of their time sleeping in a sleep sack.  I never have enough sleep sacks – they always seem to be in short supply, but they are pretty expensive at $20 a pop.  So that’s where today’s tutorial comes in……..Dress Shirt Sleep Sack Tutorial.

I have seen so many tutorials for men’s dress shirt refashioned into little girls dresses, which are SO adorable and I’ve been meaning to make one (or two) for my girls.  But here’s a new twist – make your little lady or little man a sleep sack out of their Daddy’s shirt.  Use a 100% cotton dress shirt for a light-weight, summer sleep sack and use a flannel, button-down for a cozier winter sleep sack.

The idea of my little baby Matilda all cozy in her crib, wrapped up in her Daddy’s shirt, just warms my heart………can you feel the love?

Supplies:
1 Large Men’s Dress Shirt
Bias Tape
Scissors
Thread
Sewing Machine
Iron
Baby Sleep Sack (to use as a pattern)
Rick-Rack, ribbon or other trim (optional)
Fabric for applique (optional)
Fusible Interfacing – I like Wonder Under (if doing applique)

Directions:

Grab a men’s button-down dress shirt – preferably from your little one’s Daddy or Grand-Daddy.  But if your hubby doesn’t have an extra one, just pick one up at your local thrift store.

Lay your regular sleep sack on top of the dress shirt.  Line the zipper of the sleep sack up with the buttons of the dress shirt.  A large men’s shirt is the perfect size for a 6-12 month sleep sack.

I am a big fan of using hardware-store washers as pattern weights.  Place your weights onto the sleep sack to ensure no slipping during cutting.

Cut around the sleep sack leaving 1/2″-3/4″ border.  I always use a rotary cutter because I am usually very short on time – makes for much quicker work!

You will leave this border to allow for your seam allowance, which is 1/2″ in this case.

Cut all the way around the entire sleep sack – through both layers of the dress shirt.

Here’s what the sleep sack will look like after you have cut it out.  I left the pocket, but feel free to remove it with a seam ripper.

Sew the top of each shoulder – right-sides together.

Stitch away.

Press your seams with an iron.

Now cut out the neck (only cut the top layer).  Use your sleep sack as a guide.  I just free-hand drew mine with a water-soluble fabric pen – approximately 3″ wide by 3″ deep.

Here is the sleep sack with the neck removed.

This part is TOTALLY optional.  I wanted my Matilda’s sleep sack to be a little more girly so I added some trim.  Get creative with this and use whatever trim you have on hand.

Stitch your trim to the sleep sack.

Pin your bias tape around each arm hole.  Open it and pin it to the RIGHT side of the garment.

Stitch the bias tape.

Now fold over your bias tape and stitch again on the RIGHT side of the garment.

Do the same thing around the neck opening, but make sure you fold over the edges as this will show and you do not want any raw edges against baby’s skin.

This part is entirely optional as well.  I cut out a flower from some fabric (Heather Bailey’s Nicey Jane) and used fusible interfacing to adhere it to the sleep sack.  Follow the manufacturers instructions for interfacing to do this step.

Then stitch around your flower.  I used a straight stitch, but if you do not like the frayed look, I would suggest using a tight zig-zag.

Now to finish.  Pin the sides and the bottom – right sides together.  Stitch the three sides closed.  Turn right-side out and press.

And there you have it – A Dress Shirt Sleep Sack

And here’s my sweet baby girl wearing her new cozy sleep sack.

Checking it out, making sure Mama did it right.
Yes! I LOVE my new sleep sack!!
Time for a nap!

Cottage Mama’s Note:  Please, please check all of the buttons on your shirt and make sure they are sewn on very securely.  I suggest reinforcing them, just to be extra cautious.

Vintage Hanky Tote Tutorial

I love vintage – whether it be linens, kitchen tools, fabric, graphic prints, clothing, ect.  There is something so comforting to me about things that have been around for awhile and things that have a history.

Several weeks back my family and I went to a local farmer’s market and stopped at a favorite antique store in the area on our way back.  I picked up quite a few vintage hankies as well as some vintage pillowcases.  I knew I wanted to turn the pillowcases into dresses, but wasn’t quite sure what I was going to do with the hankies.

My good friend, college roommate, and Savannah’s Godmother, Lara, just had her birthday this past week and I wanted to make a special gift for a VERY special friend.  You know the saying, “Make new friends but keep the old, one is silver and the other’s gold?”  Well Lara is one of my “old”, long-time friends and she is just that – pure gold.  She is one of the few people in life that I can be 100% myself and never feel like there is any judgement – I feel as comfortable around her as I do my immediate family.  She is very special to me and is without a doubt, what I like to call a “Forever Friend”.

So this is what I came up with for Lara’s birthday – the Vintage Hanky Tote.  Give it a try – make one for yourself or give this as a gift to that special forever friend in your life.

Vintage Hanky Tote Tutorial
Supplies:
1 medium size canvas tote
1 vintage hanky
Double-sided fusible interfacing (I used Steam-a-Seam Lite)
Fabric for tote lining (approx. 1/4 yard)
Trim (for bag straps)
1 large button
1 elastic hair-tie
Sewing Machine
Hand-sewing needle
Iron
Directions:
Start with a basic canvas tote.  I purchased mine at our local Joann’s, but I know you can get them many other places, such as Michael’s.
Measure the length of your straps and cut your trim accordingly.  You can use ribbon, rick-rack or whatever trim you like.
Stitch your trim to each one of the bag straps.
This is what your trim will look like after you have stitched it to both of the bag straps.
Now you will need to apply your double-sided fusible interfacing to the vintage hanky.
Press your hanky to remove any wrinkles or creases.
Apply your double-sided fusible according to your package directions.  Apply to the back-side of the hanky.
Now “fuse” (iron) your hanky to the front side of your canvas tote.
After you have ironed your hanky to the tote, stitch around the entire perimeter of the tote to permanently secure the hanky.  Do this leaving approximately a 1/2″ seam allowance.
This is what your tote will look like after you have stitched down your hanky.
Now if you have fun clothing labels, it is time to add this before we do the lining.  Place your label on the back-side of the tote between both of the straps.  Adding a personal label to handmade items is so much fun!  Even if you don’t have a business, I highly recommend ordering some personal labels – you will feel so proud seeing your name on something you have made.
Stitch your label in place with coordinating thread.
Now take your elastic hair-tie and tie a knot towards one-side.
Place your hair-tie on the inside of the back-side between both of the straps.  Place the knot a little bit lower than where you anticipate sewing in your lining (we don’t want the knot to show).  Stitch in place – sew back and forth several times to ensure a strong hold.
Now for the tote lining.  Place the bottom of your tote on the fold of the lining fabric (the fold will be the bottom of the lining).  Using your tote as your guide, cut around the tote, allowing for a 1/2″ seam allowance on the three sides (top and both sides).
Now stitch both sides together.  Place fabric, right-sides together and stitch (1/2″ seam allowance).  I used my serger, just because it is faster – it doesn’t make a difference which machine you use.  So now both sides are stitched together, the bottom is the fold from the fabric and the top is open.
Fold down the top 1″ all the way around and press.
It’s hard to tell from the picture, but the fold is with the wrong-sides together.
Now turn your lining, RIGHT-side out and your tote INSIDE-out.  Pin your lining to the top of the tote bag.
Stitch around the top of the lining.  Make sure to use a light-colored bobbin thread for this part because it will show on the outside of the tote.  If you want to be really fancy, you can hand-sew the lining into the tote.
Here is the lining sewn into the tote.  As you can see, you can no longer see the little knot from the hair-tie, it looks neat and tidy!
Now sew whatever large button you have chosen to the front of the tote bag.  I chose to do a fabric covered button with matching lining fabric.  I find fabric covered buttons lend a vintage flair, so I thought that was perfect (and I’m kind of obsessed……you should see the jars I have of these!).  But use any button you have or like.
And there you have it –  a lovely, timeless vintage tote, for a lovely, lovely forever friend!
Happy Birthday Lara!
Thanks for being such a great friend!

Ruffle Bonnet Tutorial

Yesterday I just had to show off the little birthday outfit that I made for my sweet Matilda Jane.  I just loved the way it came together.  But what I think really completes the look is the ruffle bonnet.

This project is actually more simple than it looks.  And the great thing about this bonnet is that it is one-size and adjustable.  Cinch the ribbon in the back really tight for a 6 month old and let it out as they grow.  The bonnet Matilda is wearing fit my daughter Savannah (2 years) as well once I let out the back a little and still has room to grow.

This tutorial is designed for a one size bonnet, size 6 months – 3 years.  It involves some very basic sewing techniques, so if you are new to sewing, give this a try.  Let’s get started……

Ruffle Bonnet Tutorial

Supplies:
Fabric – two coordinating prints
Thread
Single-fold bias tape
Fusible interfacing
Ribbon (I used grosgrain)
Iron
Directions:
Cut fabric pieces:
Main Bonnet-
2 rectangles (one for exterior, one for interior lining) – 17.5″ x 7″
2 rectangles interfacing – 17.5″ x 7″ (just very inexpensive light-weight interfacing)
Ruffle-
1 long strip 43″ x 3″ (this will be folded in half)
Ties/Straps-
2 strips 19″ x 2″ (this will be folded in half)
Ribbon-
1 long piece – cut to your desired length, approximately 21″
Apply your interfacing to the two main bonnet pieces according to package directions.  This is the most inexpensive interfacing around.  I think it was .77 for all of this.
*This is NOT anything like wonder-under (which you know I love).  This is just one-sided interfacing – wonder-under will fuse two pieces of fabric together, this will not and we don’t want it to.  We are using this just to add more body to the bonnet.

Fold your ruffle piece in half, length-wise and press – wrong sides together.  Run a gathering stitch along the top of this piece.  To do this, set your machine to the longest stitch length.  Stitch along the top of the fabric making sure NOT to back-stitch at the beginning or end.

Here’s your ruffle after you have run your gathering stitch.  As you can see, we still need gather it.

To do this, pull one of the threads on either end.  Continue to work the gather until you have reached 17.5″ long.

Pin the ruffle to the long-side of one of the main fabric pieces.  The ruffle should be pinned to the right-side of the fabric facing inward.

Stitch the ruffle in place – 1/4″ seam allowance.

Now place the other main bonnet piece on top of the piece with the ruffle – right-sides together.

Stitch the two main fabric pieces together – 1/2″ seam allowance.

Now to make the ties that go around the neck.  Fold each of the two fabric pieces in half – right-sides together.  Stitch down the long-side and then close one of the short sides.  I cut the ends at a diagonal for fun.  Then turn the tubes right-side out and press.

Open up the main bonnet pieces to reveal the ruffle inside.  Place one of the straps, pointing inward at the seam on top of the ruffle.  The raw side should be lined up with the raw side of the ruffle and main bonnet.

Close the main bonnet piece again and pin.  Do the same thing on the other short side with the other strap.

Stitch both short sides closed – 1/2″ seam allowance.

Clip both of your corners.  You need to do this so it will look nice when you turn it.

Turn right-side out and press.

Now three of your four sides should be closed.  The ruffle is complete as well as the tie straps.

At this point you need to decide what is the interior of your bonnet and what is the exterior.  Once you have decide that, you need to pin your single-fold bias tape to the exterior.  Cut your bias tape the same length as the long side of your bonnet.  Unfold one side and line it up with the raw, unfinished long-side of your bonnet and pin.  Stitch in place.

Now fold your bias tape over to the interior side, making sure that you leave a wide enough opening for whatever ribbon you have chosen to use.  Press, pin into place and stitch as close to the edge of the bias tape as possible.  This will make a tunnel for you to thread your ribbon through.

Now for the ribbon.  Like I said before, you can cut this ribbon to your desired length.  Maybe you want a big, huge long bow or maybe you want something more subtle.  I would thread the ribbon and then cut it to see how you like the look.

Now it’s time to thread the ribbon.  Do you have one of these?  It’s called a bodkin and I seriously don’t know what I would do without this thing.  It makes threading ribbon, elastic, ect…….SO easy.  If you don’t have one, head to your sewing shop and buy one – you can find it in the notions section and they are very inexpensive.  If you don’t have one, just attach a safety pin to one end of the ribbon and thread that way.

Thread the ribbon through the opening you just made with your bias tape.

Cinch the ribbon as much or as little as you like, depending on the child’s head size.  Tie in a bow.

And there you have it – your completed Ruffle Bonnet!  Isn’t it just so sweet?

I really think that the bonnet makes this little outfit.  Make one of these bonnets to coordinate with any of your little ones favorite dresses or outfits.  This would also make a wonderful gift for a new baby.

My sweet baby girl sure loves her new hat.  Her sister loves it too – I think I may be making another one of these so we don’t have any fights over this cutie little hat!

Ruffle Bonnet Tutorial - The Cottage Mama

Cottage Mama’s Note:  This project is great for a beginning sewer to practice some basic techniques.  If there is anything you have a question about, please feel free to email me or leave me a comment and I am always happy to help.

Summer Garden Party Birthday Outfit

So I have been busy, busy lately with custom orders.  And while I love the fact that I have had so much business lately, I needed to take a little break and work on something for one of my own little ladies.

My sweet Matilda Jane’s 1st birthday is in a month – she was born 7/8/09 (cool birthday, right?).  As it goes with the second child, Matilda doesn’t get very many things that are just for her, so I had to make sure I really turned it up a notch for her special birthday outfit.  And I really think this might be one of my most favorite little creations ever!

So here is her little birthday outfit.  It is a cross back dress with bloomers and a little bonnet.  This dress is made from Heather Bailey’s “Nicey Jane”.  Can I just tell you for the 100th time how much I love this fabric line?  I L.O.V.E. it – fits my style to a tee!

I added an inset panel to my original design and added three lined ruffles toward the bottom.  I lined the inset with some light-weight interfacing to give it a little more body.  I trimmed the edge with green rick-rack and finished it with a little bow towards the top in coordinating fabric.

The bloomers have encased elastic in the legs and at the waist.  Both legs are trimmed with blue rick-rack.

The rear has two lined ruffles that run the entire length of her little back-side.  I just love that little tushy!

I made a bonnet to go with the birthday set.  I will be posting a tutorial for making the bonnet later today or tomorrow.  

I’m just so happy with how this little outfit turned out and I think my Matilda Jane likes it too!  I can’t believe my baby girl is turning one next month, where did the time go?

Visit thecsiproject.com

Babyhood Bonanza – Guest Blogging at Luvinthemommyhood

Guess where I am today?  I’m over at Luvinthemommyhood guest blogging!  Shannon, just had her second baby girl, Harper (who is the cutest little thing EVER).  So while she’s on maternity leave she has lined up some crafty ladies to come over and blog about projects for Mama and baby.  You’ve got to check out what some of these ladies have come up with – there are some really great ideas!

Today I am sharing my tutorial for a Dress Shirt Baby Sleep Sack.  Come on over to luvinthemommyhood and check it out – it’s a super fun, inexpensive and easy beginning sewing project!

Asian Slaw

Several weeks ago, I shared my recipe for Jambalaya Egg Casserole that I served at my most recent playgroup.  With the casserole I served an Asian slaw and a pineapple salad – I shared the pictures, but not the recipes (I know, how rude of me!).  A couple people emailed asking for the recipe for the Asian slaw, so I thought I would share it with you all.

I love almost all Asian food (unless I can see the eyeballs) and I especially love things with peanuts.  This is a great dish to take to a potluck or for entertaining because you can make it ahead of time and it tastes great at room temperature.

Asian Slaw
Ingredients:
1 package Ramen noodles – Oriental Flavor
2 tablespoons peanut butter
6 tablespoons vegetable oil
1 teaspoon sesame oil
3 tablespoons rice wine vinegar or apple cider vinegar
4-6 cups shredded cabbage (regular green or napa) or 1 bag coleslaw mix
1/2 cup grated carrots
1 handful of roasted peanuts
2 green onions, sliced
Optional:  
Chopped cilantro
Sesame Seeds
Directions:
Crush Ramen noodles.  Use this time to take any aggression you may have in life out on your noodles. 
Mix oriental seasoning packet (from Ramen), peanut butter, vegetable oil, sesame oil and vinegar in a large mixing bowl – use a whisk or a fork.  I find everyone likes a little different consistency.  I like it to look like a salad dressing, so a little bit on the thin side.  If you need to thin it, add some hot tap water.  If you would like it thicker, add some more peanut butter.  
Add crushed Ramen noodles, shredded cabbage, carrots, green onions, peanuts, cilantro (optional) and a sprinkle sesame seeds (optional) to the dressing mixture.  Toss to combine.  Garnish with cilantro.
Place in the refrigerator until ready to serve.  Slaw can be made a day in advance (it actually gets better as it sits).
Enjoy!
Cottage Mama’s Note:  This salad is also great without the peanut butter for a lighter slaw.  Substitute sliced almonds for the peanuts if you have someone with a peanut allergy.  Or omit the nuts all together.