Archives for January 2010

Oh So Girly

Michelle over at Someday Crafts had a wonderful post about the shop “Oh So Girly” and I really think you must head over to her shop and check it out.  “Oh So Girly” sells adorable bows and hair-clips, watch faces with beautiful braclets, diaper keeps and crayon rolls for AMAZINGLY low prices – not to mention low shipping costs.

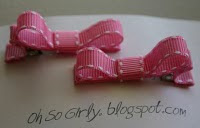
If you are looking to purchase something for an upcoming baby shower, a diaper keeper would be a wonderful gift and at only $5.00 – you can’t really beat it!  Here are some pictures of some other items for sale from “Oh So Girly”:

Brown & Pink Bow – $1.00
Pink Hair Clip Set – $1.00
Diaper Keeper – $5.00
  Crayon Roll – $8.00
Interchangeable Watch Face with Beaded Band – $12.00
Cottage Mama’s Note: Michelle at Someday Crafts is doing a giveaway for “Oh So Girly” so if you would like the chance to win some goodies, head over to Michelle’s blog and check it out!!

Big Girl Room – Freshcut by Heather Bailey

I realized that I never really posted much about the little girls room that I designed for my daughter, Savannah Rose.  When we found out we were having another girl (sweet Matilda Jane), we decided that Matilda would get the nursery and Savannah would get a new “big girl room” (though she wasn’t too much of a big girl only being 16-months at the time).  So I thought I would share some more pictures with you of the things that I made for her room.

All of the fabric used (besides the polka-dot quilt backing) is Heather Bailey’s Freshcut.  These are all my own original designs (though I did use some clip-art templates for my fabric artwork), so if there is anything you would like a tutorial on, I would be happy to share my “how-to” with you as well – just leave me a comment!

Art Work, Quilt, Applique “S” pillow, and Floor Pillow
Quilt – Twin Size

Applique “S” Pillow, Fun Small Pillow with Yo-Yo accent
Fabric Coved Lamp Shade with Fabric Yo-Yo Accent

Close-up of Lamp Shade

Elephant Fabric Art Work – Fabric Covered Photo Mat

Little Chick Art Work – Fabric Covered Photo Mat

Lion and Whale Fabric Art Work – Fabric Covered Photo Mat

Twin Size Quilt on Crib

Rocking Chair with “S” Applique Pillow

Floor Pillow

Window Valence

Cottage Mama’s Note: I used clip-art templates from Martha Stewart’s website.  I enlarged them to my desired sized and broke them down into separate pieces to create my fabric artwork.  Click here to find the templates.  Again, if you would like any instruction or tips on how to make these items, please don’t hesitate to leave me a comment!

Baptism Gift Tutorial

Yesterday we celebrated my good friend Lara’s son, Luca’s, baptism into the Catholic Church.  It was a beautiful celebration with good food and great friends and family.

I wanted to make little Luca something for his special day.  I thought about making some clothing or stuffed animal, but I really wanted it to be a baptism gift.  I decided to make him a little baptism plaque that could be displayed on a shelf in his room with a sweet bible verse.  I used Ephisians 4:5 – One Lord, one faith, one baptism.  I also tried my best to match his current room decor which is dark brown and green.

If you are looking for a baptism gift for a little one in your life, give this little plaque a try.  You can incorporate any bible verse or blessing you like and it will be a gift they can look back on for many years to come!

Baptism Gift Tutorial
Supplies:
1 wooden plaque (any size or shape)
1 bottle acrylic paint
1 paint brush
Scrapbooking paper
Mod Podge
1 sponge paint brush
Scissors
Start with a blank wooden plaque.  You can buy these at Joann’s, Hobby Lobby, Michael’s, ect.  They come in all shapes and sizes – pick one that you feel comfortable decorating.
Next you are going to paint your unfinished wooden plaque.  Pick a color of acrylic paint that will compliment the decorative papers you have chosen to use.  In this case, I chose a cream color.
Paint your wooden plaque.  I like to use a piece of wax paper underneath, so that it does not bleed through onto any other surfaces and is very easy to remove once dry.  Make sure you paint the entire front and sides and use even brush strokes.
Once you have finished painting your plaque, allow it to dry to about 30 minutes.
Meanwhile, while your paint is drying.  Cut out your decorative papers.  You can cut them out yourself or you can buy pre-made cut-outs at your local scrapbooking store.  I have a handy Cricut cutting machine that helped me cut these shapes out.  Click here for more information on the Cricut cutting machines. 
Once your papers are cut out and your plaque is dry, Mod Podge your papers onto the plaque.  Follow the instructions on your Mod Podge bottle to complete this step.  Mod Podge makes layering paper really fun so play with your layout prior to using your Mod Podge.  Then allow your plaque to dry for another 30 minutes – 1 hour.
Little Luca’s Baptism Plaque
Cottage Mama’s Note: You can use this idea for gifts other than baptism.  Perhaps you would like to show your Mom how much she means to you on Mother’s Day – print out a quote and use that on the plaque.  Or maybe you are just looking to add some decor to your child’s room – use this idea to Mod Podge words such as Princess or whatever matches your child’s decor.

Seams to Me – Mary Engelbreit Purse!

For my birthday this past summer I received the sewing book, Seams to Me by Anna Maria Horner.  I love this book – it is full of fresh, unique projects for the home sewer!  The book starts with some really nice basic instruction for everything from home decor, personal style and fashion, sewing for children and much, much more!

Anna’s instructions are very easy to follow, so if you are a new sewer you could easily sew from this book with no trouble at all.  The book also contains actual pattern pieces too (not just pictures) which is SO helpful.  Some sewing books these days have pictures of the patterns and ask you to blow them up by 200%-400%.  Personally, I don’t bother much with these books because then all the pattern pieces print on separate paper, you have to tape them together, and then cut them out.  I don’t know about you, but that takes WAY too much time for this busy Cottage Mama.

Here are some more pictures of a purse that I made for my mother-in-law from a pattern out of this book.  She loves Mary Engelbreit so I used her designer fabric “Recipe for Friendship”.  I was very pleased with how it turned out and I think my mother-in-law liked it too!

Completed Purse
Purse Interior with Pockets
Braided Fabric Handle
Cottage Mama’s Note:  Anna Maria Horner also has her own line of fabrics – click here to find out more about this wonderful designer!

Crock Pot Recipe: Jamaican Jerk Pork Chops

Yesterday afternoon I was digging through my freezer and pantry trying to figure out what to make for dinner.  My family is trying to be very budget conscious lately so I have been trying to make the most out of whatever ingredients we have on-hand rather than making another trip to the grocery store.

So, this is what I came up with – Jamaican Jerk Pork Chops.  The Cottage Mama’s Mama had made a version of this for me when she was here after I had my second daughter, Matilda.  She always makes the most delicious food when she stays here after I have a baby – reason enough to have another one (just kidding)!  Her recipe was done on the stove-top and used some pineapple, so her jerk pork chops were my inspiration for this recipe.

Crock Pot:  Jamaican Jerk Pork Chops
Ingredients:
5 pork loin chops (frozen or fresh..doesn’t matter)
1/2 cup frozen corn
1 can black beans, drained
1 cup tri-colored bell pepper strips (I used frozen, but fresh would work well too).
1/2 onion, sliced
Jamaican Jerk Seasoning
Directions:
It doesn’t get much easier than this – add all ingredients to your crock-pot, sprinkle liberally with Jamaican Jerk seasoning and cook on low for 6-8 hours.  Enjoy!
Cottage Mama’s Note:  I served this with Uncle Ben’s Ready Rice – Wholegrain Vegetable Medley (only takes 90 seconds to cook!) or it would be great with regular brown rice.  I buy tri-colored bell pepper strips in the frozen foods section of Trader Joe’s – I always have one or two bags on-hand.

Pantry Cooking: Asian Peanut Noodles

I’m a huge fan of pantry cooking.  I keep many things in my cabinets that can be used with or without fresh ingredients.  I think having a well-stocked pantry is essential for any home.  If you happen to have a night where you haven’t really thought about dinner or it’s the end of the week and you’ve run out of fresh ingredients, you can head to your pantry and get creative if you have the right things on hand.

One of my favorite pantry dishes is Asian Peanut Noodles.  This dish is created from ingredients you would normally have on hand and can be “dolled-up” if you happen to have some additional fresh ingredients.  This is one of my favorite dishes to make when my husband is at his brew club meetings and it’s just me alone with my huge bowl of peanut noodles – SO good!!

Asian Peanut Noodles
Ingredients:
1 lb. spaghetti
1 cup peanut butter
1/2 cup soy sauce
1 tablespoon toasted sesame oil
1/4 cup rice vinegar
1 glove garlic, chopped

1 teaspoon asian chili sauce (more or less depending on how spicy you like things)
Pasta cooking water

Ingredients

Directions:
Cook pasta according to package directions.
In a mixing bowl add all of the rest of the ingredients.
As you pasta begins to boil, spoon in some of the pasta cooking water into the bowl with all of your other ingredients.  You will probably use about 1/2 cup total, but keep adding the water until you reach your desired consistency (see picture above).
 Asian Peanut Noodles
Drain pasta, mix with sauce and enjoy!!

Cottage Mama’s Note: If I were really going to plan on making this dish (rather than just throwing it together last minute), I would make sure to add two green onions (sliced), 1 carrot (grated), 1 cup snap peas, a handful of cilantro (chopped), and a sprinkling of sesame seeds.  

Homemade Organic Baby Food

Matilda Jane – 6 Months

I can’t believe my little baby has started eating solids!  Where has the time gone?  I feel like I just blinked my eyes and there she is taking her spot in the “big girl chair” aka the high-chair.  I’m sure those of you with older children, can attest that time flies.  I’m trying my best to enjoy these precious early moments with my girls, but my goodness, before you know it they are going to be all grown up (sob, sob).
Since my sweet Matilda Jane is starting to eat solid food (well cereal, so far), I thought I would share one of my favorite homemade baby food recipes.  I had so much fun making baby food for my little Savannah Rose (not so little anymore…..again, sob, sob) and I definitely plan to cook some things for Matilda Jane.
Making your own baby food is very easy and affordable.  It’s really nice because you can control exactly what goes into your baby food.  I like to use all organic ingredients and add seasoning as well.  Just make a large batch, pour it into ice cube trays and freeze it.  Once frozen, pop it out of the trays and into a freezer safe bag.  When your little sweetheart is hungry, just pop a few cubes in the microwave and you have fresh, organic baby food in seconds!
Delicious Butternut Squash Puree
Ingredients:
1/2 tablespoon butter
1 medium butternut squash
1/4 yellow onion, chopped
3/4 cup chicken stock
Salt and Pepper, to taste
Directions:
Peel your butternut squash.  Cut it in half and remove seeds and cut into 1-inch cubes.  Steam butternut squash in saucepan for 15 minutes and remove from pan (you know it’s done when it can easily be pierced with a knife).  Add butter to pan and saute onion on medium-low heat until translucent.  Add a sprinkle of salt and pepper.  Add chicken stock and cook for 2 minutes.  Return butternut squash to pan.  Use an immersion blender to puree or if you don’t have an immersion blender, puree in a food processor or regular blender.
Cottage Mama’s Note:  This puree should be introduced as a 2nd food (after introducing each food separately, in case of allergies).  Taste your puree to see if it needs more seasoning – it should taste good to you.  I like to start using seasoning early on in my kids food because I think it helps them become accustomed to the way our family eats, which is with lots of flavor.  No bland cooking going on around here at The Cottage Home!!
Here are a few more pictures of Matilda Jane starting solids
(just because I think she is so cute!)
My sweet little lady checking out her food (love those cheeks!)
Mama, I don’t know if this is a good idea…..

Bacon, Onion, and Sweet Pea Risotto

I love making risotto.  I’m not sure why I don’t make it more often, I guess I just forget about how delicious it is.  People seem to think that risotto is a fancy, complicated dish, but it is quite the opposite.  Risotto is a wonderful dish because you can combine it with many different things such as; mushrooms, butternut squash, shrimp, and in this case, bacon, onion or peas.  If you’ve never made risotto at home, give this recipe a try – here I’ll take you through step-by-step!

Bacon, Onion, and Sweet Pea Risotto
Serves 3-4
Ingredients:
1 cup Arborio Rice
4 cups chicken stock
1/2 onion, chopped (red or yellow)
4 slices bacon, cut into 1-inch pieces
1/2 cup white wine
1/2 cup frozen peas
1/2 cup parmesan + more for garnish
Directions:
 Ingredients
Get out two saucepans – one to heat your chicken stock and one for everything else.  Add stock to one saucepan and heat on medium-high.  Heat the “everything else” saucepan on medium and add bacon and saute.  Cook bacon to desired consistency and just when it is about ready add your onion.  Saute onion until translucent.  About 4 minutes. 
 Bacon and Onion cooking
Add white wine and scrape all the brown, delicious bits off the bottom of the pan.  Then add rice and mix with bacon, onion and wine mixture.
 Rice, Bacon, Onion and Wine
Cook for 2-3 minutes.  Add one ladle of stock to the rice mixture.  Once that liquid has cooked down, add another ladle, and do this until you have used all of your stock and your rice is cooked through.  Turn off the heat and add frozen peas and parmesan (stir together) – the heat from the risotto will cook the peas so they are perfectly green.  Sprinkle with more parmesan and enjoy!!
Completed Risotto
Cottage Mama’s Note:  If you run out of liquid, but your rice is not finished, add additional stock or water.  Also, make sure the wine you use is a wine you enjoy drinking……”cooking wine” will not do for this recipe.

Homemade Soft Pretzels with Honey Mustard Sauce

My husband, Brett, is a homebrewer – I don’t know if I have mentioned that on the blog yet.  Brett makes his own beer and wine in the cottage basement, which is not much of a basement, more like the cottage dungeon.  And though I know I am probably bias, his beer is some of the best I have ever tasted.  Since yeast is a major component in the brewing process my hubby is very familiar with its workings.  So recently he has taken an interest in other things involving yeast such as baking bread.

Do you know what goes really well with beer?  Soft pretzels!!  This is my husband’s recipe for Soft Pretzels with Honey Mustard Sauce that comes to you via Draft Magazine.  These pretzels are SO awesome!!  He made them on New Year’s Eve and we gobbled them up so fast that they disappeared before our eyes.

Soft Pretzels with Honey Mustard Sauce
Makes 15-20 small-sized pretzels
Soft Pretzels:
1 package of active dry yeast
5 cups flour
1 1/3 cups warm water
1/8 cup warm water
1/3 cup brown sugar
Water, baking soda
Sea Salt
Honey Mustard Dip:
5 ounces creme fraiche (or sour cream)
3 tablespoons honey
2 tablespoons dijon or german mustard
Salt and sugar to taste
Directions:
  • Dissolve yeast in 1/8 cup warm water.
  • Stir in 1 1/3 cups warm water, brown sugar and flour.  Beat until smooth.
  • Knead dough until smooth and elastic.
  • Heat oven to 475 degrees.
  • In a saucepan, add 2 tablespoons baking soda to each cup of water.  Use enough to fill the saucepan; bring to a boil.
  • Tear off some dough and roll a pencil shape with your hands.  Pick up both ends, cross to form rabbit ears and then twist the ends and pull the back to the rest of the loop (making a pretzel shape).
  • Place twisted pretzels in water/baking soda mixture for 15 seconds until pretzel dough is golden or yellow in color.  Remove pretzels from boiling water and place onto cookie sheet.  Sprinkle tops with sea salt.  
  • Bake 8 to 10 minutes or until pretzels are golden brown (see picture above).

Honey Mustard Dip

  • Stir creme fraiche (or sour cream), honey and mustard until creamy.
  • Add sugar and salt to taste.
Pretzels Ready to Eat

Cottage Mama’s Note:  Make sure to enjoy your soft pretzels with your favorite craft beer!

The Best Soap & Cleaning Product EVER!

Have you heard of Dr. Bronner’s Castile Soap?  Well I had heard of it and seen it in our local Trader Joe’s, but I hadn’t really paid much attention to it.  Lately, I have been trying to get my family “back to basics” by trying to eat more organic food as well as incorporating more earth friendly products into our daily lives.

So yesterday I was at Trader Joe’s and thought “I’m going to give this Castile Soap at try.”  And boy am I glad I did – it is AWESOME!!  This one bottle of soap can tackle 18 different tasks and has the most amazing peppermint scent ever.  The soaps are biodegradable and vegetable-based and are made with certified fair trade and organic oils. 

Today I used it to clean my entire house.  I used 16oz of water with about 1 teaspoon of the soap and went to town.  I cleaned my furniture, my floors, my countertops, my sink, and the list goes on.  And what’s even better –  I didn’t even barely use 1/30th of the bottle!!  My house has never felt cleaner and I feel really good knowing that the soap I used is 100% safe for my two little girls (both under age 2).

According to the Dr. Bronner’s website you can use this soap as a body wash, shampoo, facial cleanser, toothpaste, mouth wash, laundry detergent, dish-washing detergent, on babies to cure cradle cap, and again, the list goes on and on.

So if you are interested in switching cleaning products to something that is safer for you and our environment, I highly recommend Dr. Bronner’s Castile Soap.  Try it – you won’t be sorry!!  Click here to find out more information.