It’s been awhile since I shared a boy project, right? Well, this is a project that I shared a little while back over on Cheri’s blog, I am Momma Hear Me Roar. My husband had a pile of clothes sitting in our bedroom that had just shrunk or gotten kind of wonky after being washed tons of times. Being the good husband that he is, he knew to save those clothes for me and I could probably use them to make something for our little man, Caspian Finn.

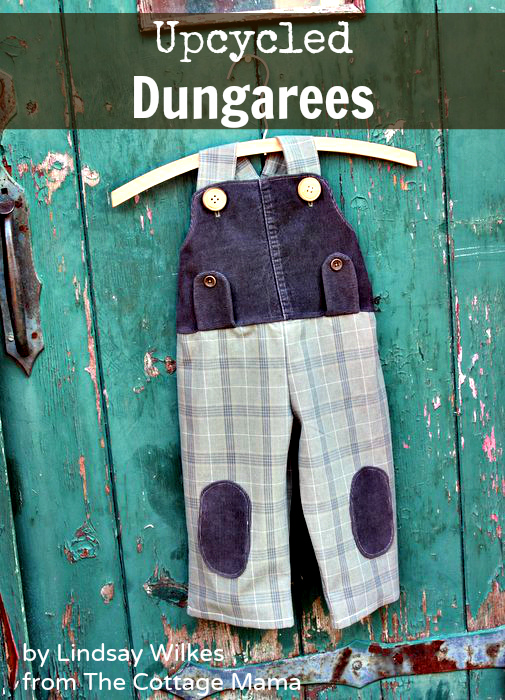
Caspian is on the move these days. After having two girls, I had no idea how active boys could be. When I put pants on Caspian, I often find that they have slipped off his waist are are left behind in the dust. So overalls and one-piece outfits are great for him. I love vintage style fashion, so these are my modern take on traditional boys dungarees.

I used two pairs of my husbands pants as well as a small piece of one of his old flannel shirts. I lined the front of the bib with the flannel as I thought that would feel good as a lining.

Today I thought I would show you how I used an existing pattern to come up with these dungarees. I actually used my own printed sewing pattern called the Run Around Romper:

I knew I wanted a similar fit to the romper, but I wanted more of an overall feel. Using an existing pattern is a great place to start, especially if you know that the fit works really well on your child.


I folded down the top of the Run Around Romper pattern to use for the bottom half of the dungarees. The romper is typically lined, but for this version, I did the pants un-lined with a traditional hem. So I just cut 2 of the front and 2 of the back.

I cut two of the pants pieces out of each leg. If you were making these for a larger child then you might have to check to see if the pant legs of the adult pants are wide enough to accomodate your pattern pieces.


I noticed that the back of the pants already had an encased waistband which is perfect for the elastic back for the dungarees.

I simply cut the waistband off of the adult pants and cut it the same width as the back of the two romper pieces. The ends were left open for threading the elastic. I cut a 8″ piece of elastic, threaded it through the back waistband and sewed some reinforcement stitches on both ends to hold it in place.

For the top of the dungarees, I used one pant leg and cut the piece on the fold. I used the top of the romper pattern.

I wanted to change the shape of the front of the romper pattern piece, so I just changed the curve on the top a bit. I also cut this piece out of the flannel shirt for the lining.

For the knee patches, I just cut two ovals out of some of the corduroy pants.

The straps were cut 11″ long x 4″ wide. I didn’t have any pieces of the pants that were long enough, so I had to include a side seam, but I kind of like the look. To sew the straps, just place them right sides together and sew down one short side and one long side, leaving the other short end open. Clip the corners, turn right side out and press.

So here are all the pieces prior to constructing the dungarees. I also used the tab pattern piece from the Run Around Romper pattern. It’s really fun to change up an existing pattern that you all ready own. And you want to know what’s even better? These dungarees were essentially free since I used clothing that we already own!


I used two wooden buttons that I already had and the two smaller buttons on the tabs were cut off from my husbands’ pants.


Caspian has been wearing these a ton and I really wish I had a picture of him modeling them. They are way cuter on than on the hanger, but the way that guy moves these days, I can hardly keep up!


 Lindsay Wilkes is the owner and designer behind The Cottage Mama. She creates timeless, vintage inspired sewing patterns for children’s clothes. She is also a fabric designer for Riley Black Designers / Penny Rose Fabrics, author of the book ‘Sew Classic Clothes for Girls’ and can be seen teaching nationwide and online in her video series ‘Lessons with Lindsay’ sponsored by Baby Lock Sewing and Embroidery machines.


So cute Lindsay! I love overalls on the little man 🙂
So cute! Overalls are perfect for little boys on the move.
Bravissimo!
Love this project. Can’t wait for updates on the Martha Pullen sewing class when you have time.
Perfect overalls. Thanks for thinking of the guys….
I love this!
Claudia
Thanks for the tutorial you make it too easy for us… I love this too!
children lunch boxes
kids plates
lunch boxes for children
personalised bibs
baby bowls
funny baby bibs