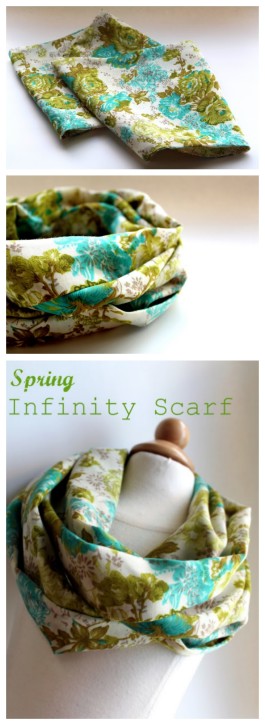
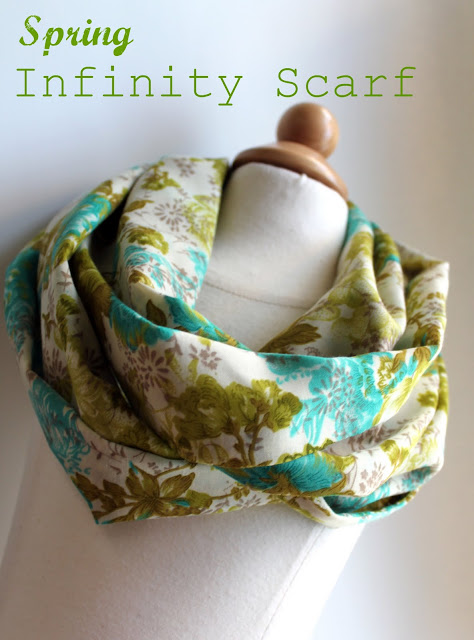
Have you seen the “infinity scarves” popping up in all the stores? Basically is just a round tube of fabric that you can loop around several times to add an instant pop of color to any outfit. I think these are great for the woman on the go because it stays in place really well so that’s why I’m excited to share this Lightweight Spring Infinity Scarf Tutorial with you. Whenever I try to wear a regular scarf, it never ends up looking as nice as it did in the morning, but this one will look great all day long. This project was very easy and only took about 20 minutes. If you are a beginner sewer, this would be a great first project as it only involves straight lines.
I recently walked into my local Joann’s and was instantly drawn vintage-inspired floral fabric. Then I went up and touched it and…….(swoon)…..did you know that Joann’s carries cotton voile? Who would of known (maybe you did, but I didn’t)! I was SO excited when I came across this super-soft voile. If you’ve never felt voile before, it is so, so soft and is usually made from 100% cotton, although you may occasionally find a blend. It is a bit more expensive than your regular quilting cotton, but I had a 50% off coupon, so mine was really reasonable.


 Lindsay Wilkes is the owner and designer behind The Cottage Mama. She creates timeless, vintage inspired sewing patterns for children’s clothes. She is also a fabric designer for Riley Black Designers / Penny Rose Fabrics, author of the book ‘Sew Classic Clothes for Girls’ and can be seen teaching nationwide and online in her video series ‘Lessons with Lindsay’ sponsored by Baby Lock Sewing and Embroidery machines.


That fabric you used is gorgeous! Thanks for posting directions. I am working on getting up the courage to make myself a skirt. Would love to use this tutorial to make a matching scarf.
~Kimberlee
http://www.TheSpunkyDiva.com
Love that! I’ll see if I can whip one up to go with an outfit I just got. Thanks for posting!
This comment has been removed by the author.
That’s so cute! I wish I looked better in scarves than I do!
Love it! Such a simple project and a great addition to a wardrobe:)
so cute lindsay! the fabric is so perfect for spring.
I didn’t know Joann’s had voile! I just made my daughter a dress using voile for the very first time and I loved working with it! You can press it with a pretty hot iron and not worry about ruining the fabric. I couldn’t believe how silky the fabric is! It’s amazing that it is 100% cotton!
This is so adorable, Lindsay. You have the most beautiful creations. So excited to meet you this week!
Lovely, thanks so much for the instructions.
I have been wanting to make one of these, so the timing is perfect. I also love the fabric you chose, I am going to see if I can find some voile.
I’ve noticed lately that Joann’s has started carrying a lot more higher end fabrics. I made these scarves as Christmas gifts using sweater knits. I was able to get 3 scarves from each piece. I put one twist in the tube before sewing the ends together. The project was in Sew Stylish magazine. They were a hit. Thanks for the voile idea.
My Joann’s said they didn’t carry voile and told me to look in the home decor fabric which all looked like heavy canvas – sigh – what department did you find yours in at the store?
Sometimes the folks at the fabric store don’t even know they are carrying certain fabrics. Just find a fabric that has a nice soft feel and looks like it would drape well. I found mine in the apparel section of Joann’s. Thanks!
This is so lovely and would make the perfect gift to a special friend. Thank you for sharing.
Very pretty! Love that fabric print.
Oh, that fabric is so pretty and this looks like the perfect project for a beginning sewer (like me). I’m definitely going to give this a try. How do you get your photos to look so gorgeous?
Love this fabric. Crossing my fingers that my JoAnn’s has some good voile. I would love to have this fabric to make a dress for me! This scarf would also be nice in a light jersey knit.
I’m in love with this scarf… I mean, seriously in love. I would take it out for a date tonight if I could! I adore the colours, the pattern, the fabric. EVERY BIT OF IT!
Lindsay! This is so rad! I’ve been looking for something easy and personable to make for my boyfriend’s sister and this is it! Thanks for sharing the great idea.
I am so excited to find an awesome print like this.
Lizzie from WA
thanks for the lovely tutorial! Just made one and I’m sure I’ll be making many more!
This comment has been removed by the author.
Did you remove this because an “Infinity Scarf” is turned 90 degrees at the seam? This is so you get both sides of the scarf showing, – – – – -forever.
Deborah
What a great project. I can’t quite visualize the part when you connect the 2 ends. Do you have more pictures of that part? And where exactly do you leave an opening? Is this for turning?
I had the same problem visualizing that part too….I sew a lot and I am not sure I follow your directions completely, and was wondering if maybe you forget to add to turn the fabric right side out and than hand sew seam together?
yes i agree!!! ive been sewing for a long time and i do digital and print patterns…this was hard to follow bc there is something missing
I think if you give it a try, once you get to that step, you will understand the instructions more clearly. If not, just send me an email and I can try to walk you through it. Thanks!
Love this.I even have time to make this!
Such a pretty fabric! I just got a loop scarf the other day and I love em now!
Hi Lindsay, I love this scarf! The fabric you chose makes it very timeless. I will have to try this one!
Tori
Hi,
I just made one of these using Thai silk, and it worked out great. Thanks for the tutorial. Will make a few more now as gifts.
Hi…..
It took me a couple minutes to figure out how long it would turn out…and how I could use less fabric….the the lightbulb finally clicked on…..I got it!
Now the list of scarves I want to make is miles long! So much to choose from….it’s hard to decide which I want to do first!
thanks for sharing….I luv your tutorials and really appriate it all…hugs
Absolutely love this! Just posted pictures of mine here:
http://sweet-verbena.blogspot.com/2011/08/summer-scarf.html
I even found the same fabric as you! Thanks so much for the great tutorial!
So Cute. Anyone think if you make it slightly wider could you double it as a nursing cover (like, enough to cover just your breast while feeding)?
I’m a pretty beginner sewer so I’m wondering how this would work.
LOVE the scarf! I did a tutorial for this on my blog today and linked back to your tutorial. Thank you so much for the great idea!
Thanks so much for this! It’s exactly what I’ve been looking for! Yours seems to come out the perfect length for double looping! 🙂
Really simple and gorgeous! I think a few of my friends will be receiving these as gifts! 🙂
I love this scarf and can’t wait to make it!
I have a question: if you’re only using one fabric, why cut two 12″ x 60″ pieces instead of folding a 24″ piece in half? Is there some reason it won’t come out as well if you do that? Maybe it won’t drape as well or something?
Thanks for this – it’s gorgeous. I see Christmas presents in my family’s future!
i was just wondering the same thing… any thoughts?
It’s been awhile since I made this, but I do remember that there was a reason why it couldn’t be done the other way. I think it would involve an additional seam, but again, I can’t quite remember. Give it a try and see if it works!! Thanks for commenting!
I really love this and pinned it to my pinterest board so I will remember to give it a try 🙂
I would love to share a photo of this with a link back in a weekly post I do called fab five. Email me and let me know if it would be ok.
[email protected]
Thank you for the tutorial, I just made a few and love them:)))
That looks like something even I can make…so will be trying….thank you!
This is a great tutorial! I just made 3 of these in less than an hour for Christmas Grab gifts- I know my girlfriends are going to love them!
So true – I did make this during a naptime! Superb tutorial, thankyou so much! Made one for my sister for Christmas, now I need to make one for me! 🙂
I LOVE this scarf! It is so quick and so easy, and I have made it for several friends as birthday and Christmas presents. Thank you for the wonderful tutorial.
Thanks for this great tutorial! Just finished two of these for my mom and sister-in-law for Christmas. They will be thrilled!
Lovely tutorial, thank you so much! Just made one for my BFF and she loves it!
Found this tutorial on pinterest and made already two scarves. I’ll think there will follow more. Thanks so much for this easy tutorial!
Love this pattern and can’t wait to try it. What size seam allowances do you use? I’m new to sewing and not sure if there is a standard.
I’m new to sewing and noticed this didn’t have a seam allowance called out? Did you use a half or quarter inch seam? Also, could you cut one 24″ piece and fold in half to make or does it require the two 12″ pieces? Thinking it might be the way it lies?
Thank you,
Linda
[email protected]
Lovely…
Thanks for the tutorial!!! I just made this (with two different fabrics)…I love how it turned out!
Blessings!
What a wonderful easy tutorial, thanks for the great instructions … I just made one out of a linen rayon blend and it is fantastic!
Thanks for the easy and very helpful instructions…The fabric is very beautiful.Happy sewing to you and yours.
Thanks Tommy
http://www.lightweightquilt.com
I used your tutorial to make a scarf for myself out of jersey and it was easier than I thought. I blogged about it here: http://handmadebyclairebear.com/2012/03/10/random-acts-of-sewing/
Thanks for posting
ClaireBear
Thank you for posting this tutorial! I really like the fabric you chose. I just made a few scarves that I was quite happy with, including one for my friend’s birthday present.
http://sarahdudik.wordpress.com/2012/03/29/infinity-scarf-from-a-thrifted-sheet/
Thank you for posting this tutorial!!!! I have some vintage fabric just waiting for me to get started!
Is there a certain fabric choice that you recommend for this? I see you used a cotton blend, but can you use a poly blend or a rayon also?
You can use any fabric you would like, but one with a nice drape is best!
How many of these scarves can I make with the 2 yards of fabric? I am making 6 or 7 for christmas presents!
When sewing the short ends together – and since they have to be sewn with right sides together, I was wondering why your instructions say to turn it right sides out???
If you use a 24″ piece folded in half, it is much more difficult to sew the short ends together. Far easier to have seams on both long sides and leave 3″ unstitched at the ends as in the tutorial. I like this pattern too and look forward to making one…or more! Thanks for sharing.
I think that these scarves are great. Having leftovers works toward Christmas presents.I have a bunch of vintage material.that was handed down from my mother,and I know just the piece to start with. Thank you for posting the pattern. I thought that’s how it would be done but I wasn’t quite sure. I just have to go rooting through all my fabric. It’s a chore I’ll enjoy! Thanks again!
I have used the scarf pattern. now I want to make a longer scarf so I guess I need to buy 65 inches versus 60 inches and if I want it wider I have to cut 14 inches wide versus 12 inch or 28 if I fold over the length and 24 if I fold in half. What was the reason for cutting the long strips in half versus folding in half?
This looks so easy for gifts! But I have read through several times and must be missing something. It seems like you only used 2/3 yard, so why did you need 2 yards? With fabric the same on both sides, would I use just one layer with rolled or folded edges, or still two layers? Thanks!
I forgot to say I’m using cotton batik, not so delightfully soft as this!
Love it. Where is that dress for from? It’s super cute. I’d love to have one to put all my scarves on!
How did it magically turn rightside out? When did you turn it? I’m so confused. I’m going out to my machine to try this now… Love the pattern, love the idea, hope to love the instructions 😉 Thanks so much
Will the extra fabric be exactly enough to make a second scarf?