Hi, everyone! I’m Veronica, and you can find me most days at sewVery where I blog about the outfits I make my daughter, patterns I’ve tested or reviewed, and an occasional purse or bag I’ve sewn for myself! I rediscovered sewing just two and a half years ago, and since then, I can’t go a day without planning my next project!
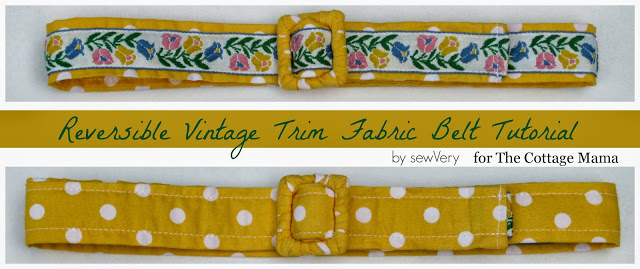
Here’s a list of things you will need to make the belt.
Supplies:
- Measuring Tape
- Scissors
- Approximately 1/8 yard fabric
- Vintage or new trim
- A metal or plastic belt buckle with no prong (I found a 1″ metal fashion buckle by Dritz at Joann’s) or a 1 1/8″ to 1 1/2″ inside diameter metal or plastic ring
- Fabric glue
- Hot glue gun (optional)
- Pins or clips
- Thread
- Sewing machine
Step 3: Raid that trim drawer and look for pieces long enough to use on your belt–at least the length measured in Step 1 + 1″.
Step 5:
Step 7: Unfold the fabric so that the raw edges are still turned in and on the right side of the fabric. Position the trim parallel to the center fold of the fabric as shown. The trim should extend beyond each end of the fabric by at least ½” if not more. If desired, use fabric glue, glue stick, pins, or clips to position the trim temporarily.
Step 8: Stitch the trim to the fabric along both long edges of the trim.
Step 9: Fold under the edge of the trim and temporarily secure in place using glue or a clip. Stitch across the short edge of the fabric to permanently secure the end of the trim.
Step 10: Fold the fabric in half again along the center and press from the backside. Clip or pin the open edges together and then stitch again along the same lines you used to stitch the trim onto the fabric.
If you are feeling particularly confident, you can combine Steps 7-10 and stitch the trim on all at once!
Step 11: If desired, wrap a metal or plastic buckle that has only the center bar (no prong piece) in matching fabric or just use it as is. On the yellow belt, I used a Dritz 1” square fashion buckle I purchased at Joann’s like the one shown below:
And on the denim belt, I made a buckle using a plastic purse ring that has a roughly 1 1/8″ inside diameter. To make your own buckle, follow Parts 1-6 of Step 12.
Step 12: To make your own buckle using a ring, first create a narrow piece of double fold tape using the same steps used to make the fabric belt. Wrap the tape over the ring and using your zipper foot, sew together. Wrap the other end around the ring snugly and sew together. Trim any excess fabric. For either the manufactured or fabricated buckle, begin wrapping a single-fold piece of fabric tape around buckle until no edges are exposed. On the back of the buckle, either use fabric glue or a hot glue gun to secure the raw ends of the fabric.
Step 13: Loop the belt over the center bar of the buckle at least 1 to 1 ½” with WST. Again, using your zipper foot, sew the end of the belt to secure the buckle. Hand tack close to the buckle if desired.
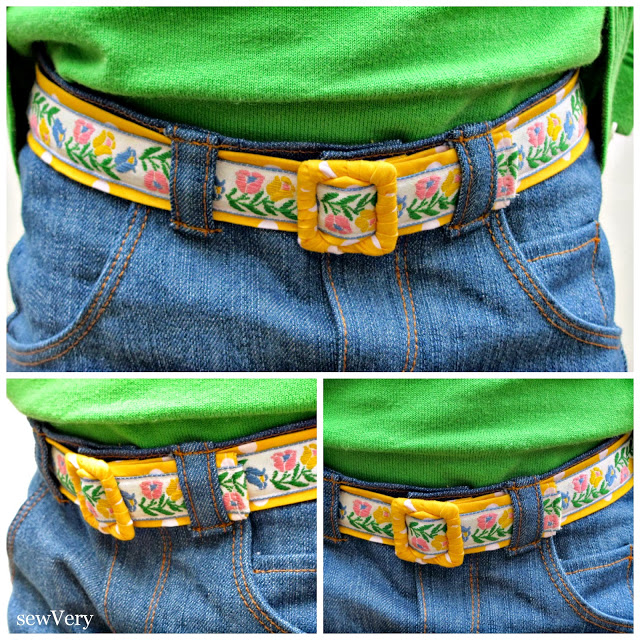
Now your Reversible Vintage Trim Belt is complete! Use it to spruce up an otherwise plain sweater set and pair of jeans to create an amazing, preppy ensemble!
Thanks, Lindsay, for the opportunity to share my Reversible Vintage Trim Fabric Belt Tutorial with your readers today! I’ve had so much fun visiting, and I hope that everyone will stop by sewVery for more fun sewing and crafting tutorials I’ve written. See you there real soon!





 Lindsay Wilkes is the owner and designer behind The Cottage Mama. She creates timeless, vintage inspired sewing patterns for children’s clothes. She is also a fabric designer for Riley Black Designers / Penny Rose Fabrics, author of the book ‘Sew Classic Clothes for Girls’ and can be seen teaching nationwide and online in her video series ‘Lessons with Lindsay’ sponsored by Baby Lock Sewing and Embroidery machines.


Cute!!! I’ve linked to your tutorial over at Craft Gossip:
http://sewing.craftgossip.com/tutorial-reversible-vintage-trim-belt/2013/10/29/
–Anne
great tutorial, veronica! i love how the belts turned out!
Thanks, Jess! I’m pretty pleased with them too, and Ella really likes them since she can use them all by herself!
Very cute Veronica!
Thank you, Jess!
Love the tutorial and creative belt idea.. So cute and easy!
Thank you! Glad you like it!
Love this, Veronica!! I want 20!
Thanks, Michelle! I’ve probably got enough trim to make at least a half dozen more! These would also work well as a tote bag strap/handle.
I received my book Sew Classic Clothes for girls today, this is really going to be a fun book. I also received the dvd I’m sorry to say it has to wait until next week. I hate it when work gets in the way of fun Thank you for sharing. Terry
beautiful belt. i am making it for myself, alittle larger. my problem i did not miss a pae of directions but every other page had a page mumber and not anything else. also only one bit of instruction. what a waste of our beautiful trees. i don’t like this. my husband refuses to let me type on the bak side so such a waste. the belt is great.
‘ After graduating from college, Einstein didn’t look for a
job linked to his field, physics. This implies that a website cannot come with
an article on Wikipedia mainly because oahu is the
largest of the kind. Keep up your eyes and ears open
for almost any new site polices regarding this
issue.