
I wanted to share this fun, easy Mason Jar Pin Cushion Tutorial with all of you. I have been trying to get my craft space organized over the last few days (trying being the operative word). I have a big stash of these mason jars that I got super cheap at the thrift store (.39 cents each). I am going to be using them to store all of my extra trims, buttons, ect. I decided to add a pin-cushion to the top to make them dual purpose (and I think it makes the jars so fun and decorative)!
So if you need some extra storage, grab a mason jar and give this tutorial a try!
Mason Jar Pin Cushion Tutorial

Supplies:
1 Mason Jar (any size) – with lid
Scrap piece of fabric
Scrap piece of cardstock/scrapbook paper
Glue gun (or strong craft glue)
Pencil
Scissors
Fiberfill
Directions:

Trace a circle around the interior lid of the mason jar onto your cardstock.

Cut out the circle with your scissors.

On the wrong side of your fabric, freehand draw another circle (about 2 inches wider than your lid center.)

Using your scissors, cut out the circle.

Here is your completed fabric circle.

Place your fabric (wrong-side up) over the exterior lid of the mason jar.

Center the circle over the lid exterior.

Place your fiberfill in the middle of the fabric circle.

Push the fiberfill into the fabric, pushing it through the lid exterior.

Take the lid interior and push it into the lid exterior.

This is what it will look like when you lock the lid center into the lid exterior.

Now hot glue your fabric down over the lid center to set it in place.

This is what it will look like when all of your fabric is glued down. Don’t worry – this doesn’t need to be neat, as you won’t be able to see this when the pin cushion is complete.

Now to cover up the fabric edges, take the cardstock circle that you cut earlier and glue it into the center of the lid.

And there you have it – the completed Mason Jar Pin Cushion!
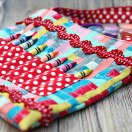
Cottage Mama’s Note: I tied a pretty pink ribbon around the top of the jar. I plan to make several of these to store all of my colored trims. I used pink & cream Amy Butler fabric because this jar will hold all of my pink trims. I also used Amy Butler scrapbook paper for the inside of the lid.


 Lindsay Wilkes is the owner and designer behind The Cottage Mama. She creates timeless, vintage inspired sewing patterns for children’s clothes. She is also a fabric designer for Riley Black Designers / Penny Rose Fabrics, author of the book ‘Sew Classic Clothes for Girls’ and can be seen teaching nationwide and online in her video series ‘Lessons with Lindsay’ sponsored by Baby Lock Sewing and Embroidery machines.


Super cute idea! I need some jars for clips & buttons! Thx for sharing!
This is a great idea! I just had my husband put a bag full of empty mason jars in the garage last night. I will have to get a few back out and try this.
Love it! You come up the cutest ideas!!
What a great & cute idea! thanks for sharing! 🙂
I really love mason jars and you have taken their lovliness to a whole new level! thanks for sharing 🙂
~ Emily N. from “too Blessed 2 Stress”
So cute and clever. I’ve got a few of these jars lying around. Thanks for the tip!
Very cute!
I LOVE this! 🙂 I am getting ready to move my craft stuff into the spare bedroom and create a craft room. I have tons of mason jars that I planned to store all my embellishments in on a shelf. This pincushion top is such a great decorative touch– thanks for sharing!
My WFMW tip today is about the simple, cheap way I found to organize my purse.
Very cute!
Great idea! Thanks for sharing it with us.
I use mason jars for craft storage too, but mine aren’t nearly as pretty as yours!
This is so cute! I’m going to stumble and add to Craftig:-)
How fun! I love that it’s so practical and a cute way to store your ribbon.
i love this idea!! so cute!
Our church craft group was looking for ideas for their Christmas Sale..this will be perfect. I’m sure everyone in the group has scraps of fabric, canning jars and paper. Thanks so much, I’m going to present it at the planning meeting. Thanks for helping out or little church!
I’m teaching a sewing class to young children & we’re going to do this craft as our 1st project together. Thank you so much for posting the details. You work is detailed & lovely!
Colleen from Monterey, California
I love this!!
I bought some mini jars for exactly this purpose, and your instructions are great! Thank you!
I made a few of these yesterday from your instructions and they seem to have a hard time screwing onto the jars when everything is glued together. Do you have a tip of getting them to screw on tighter? One of them keeps popping right off! Its kind-of comical actually. It makes a popping noise and flies right off the jar.
Thanks!
Very smart and creative idea, I really need something like this … thanks for sharing…
Wish you a very Happy New Year
I would love if you come to visit me at
http://craftaworld.blogspot.com/
Love
Farah
Thanks for the tute! I made one & posted it on my blog:
http://simplyjenna.blogspot.com/2011/08/mason-jar-pin-cushion.html
🙂 Jenna
Very cute! I can’t wait to make this! Stopping by from whatever goes Wednesday party!
Great idea and so simple! Thanks for sharing.
i love the idea so much, im making it into christmas presants for all the women in my family! thanks so much!
Definitely need some pin cushions in the craft room since the little is starting to be mobile. I also saw steel wool as a way to sharpen needles. Might try that inside instead of the batting.
Hi Lindsay,
I shared this great idea on my mason jar crafts blog post…feel free to share it!
http://www.favecraftsblog.com/mason-jar-crafts-mason-jar-ideas
Best,
Jaclyn
Editor, AllFreeKidsCrafts.com