Please give a warm welcome to a new guest contributor here on The Cottage Mama, Courtney from Sweeter Than Cupcakes. Take it away, Courtney…….
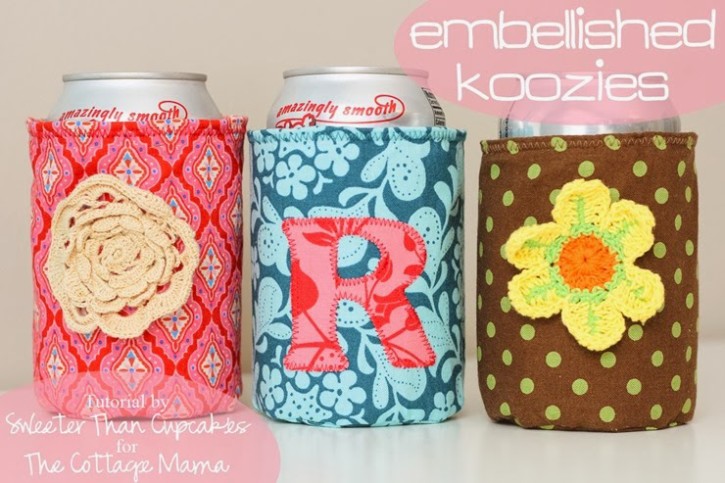
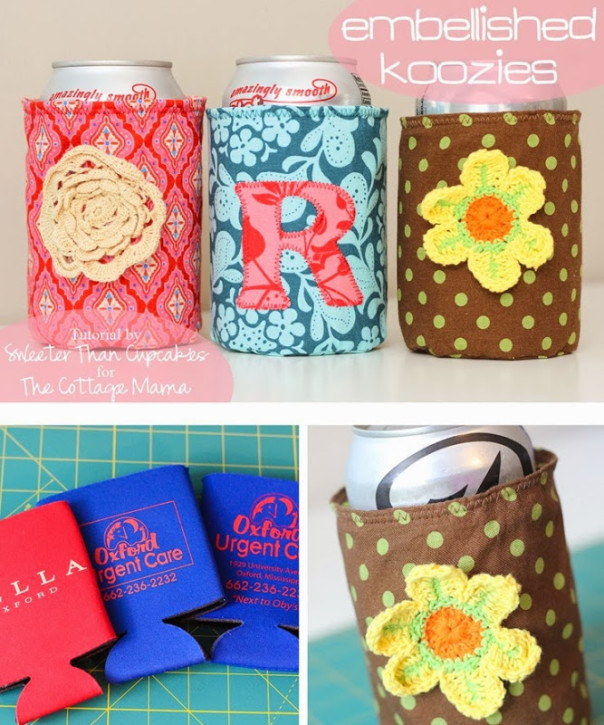
“GIMME” koozies, like “GIMME” caps, seem to multiply in my house. When they start falling out every time I open the closet door, I sort and toss. After all, most of them are not very chic! However, they are perfectly good and useful koozies. Why not re-purpose those ugly, prolific koozies into something attractive? Hence this tutorial which fills that gift closet with something unique yet affordable! These would make great teacher gifts for the holidays!
Materials Needed:
- Fabric Scraps or a fat quarter
- Koozie
- Embellishments
- Soda can
This is a great way dress up those free koozies companies use for marketing!

Just in case your koozie dimensions differ from mine, I’ll give you the method I used to arrive at my fabric cut dimensions. First, place a soda can in the koozie to get it to stretch to its usual rounded shape. Trace around the bottom.

Add 1/4” seam allowance and cut out your pattern. Measure the outer diameter of this pattern piece. Mine was 3.25”.

For the rectangle, measure the height of the koozie and add 1”. For mine, 4.125” + 1” = 5.125”. The width will be 3.14159 times the diameter you measured above. For mine, 3.14159 x 3.25”. So, the rectangle I cut is 5.125” x 10.25”. Cut one circle with your pattern piece and one rectangle.

Note: If you plan to applique the fabric cover, now is the time to do it.

Press the top of the rectangle to the wrong side 1/4”.

Open up the fold you just made. Sew the short ends of the rectangle right sides together with a 1/4” seam allowance. Press the seam open.

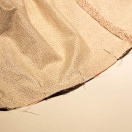
You now have a fabric tube. Clip tiny cuts along the bottom (unfolded) edge of the tube. Only cut into the fabric about 1/8”. This will help when you sew around the curve. Pin the bottom of the tube to the circle with right sides together. Sew the tube to the circle with 1/4” seam allowance. Clip the seam allowance again making sure to clip the circle piece this time. Be careful not to clip into your stitches.

Turn the cover to the right side. Press the bottom seam out with your fingers to get it smooth. Re-press the top fold as needed. Remove the soda can from the koozie, and slide the cover over the koozie.

Pull the folded edge of the cover over and around the top of the koozie and pin in place.

Sew around the top of the koozie with a zig zag stitch. Be sure to catch the folded edge underneath. You may need to stretch the koozie slightly as you go.

Hand stitch embellishments as desired through the side of the koozie. Enjoy!
Thanks Lindsay for letting me hang out on your blog today! Y’all come visit me at Sweeter Than Cupcakes where I have plenty more tutorials and am always sharing new clothing creations for my daughters.


 Lindsay Wilkes is the owner and designer behind The Cottage Mama. She creates timeless, vintage inspired sewing patterns for children’s clothes. She is also a fabric designer for Riley Black Designers / Penny Rose Fabrics, author of the book ‘Sew Classic Clothes for Girls’ and can be seen teaching nationwide and online in her video series ‘Lessons with Lindsay’ sponsored by Baby Lock Sewing and Embroidery machines.


Cute! Will try some of these for stocking stuffers. Thanks for the tutorial.
beutiful. thanks for the tutorial
I love this idea! Thanks for sharing :). I tried it and the only thing I will do next time is hem the top edge before sewing it down. I used a quilt scrap which is pieced, and hemming would have helped it. Also, I was excited to actually use Pi for something. I can’t actually think of another time it’s been useful. Thanks again!