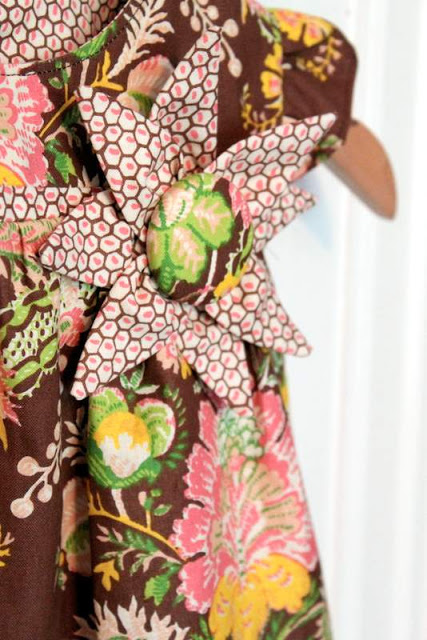
So now that we’ve got our top or dress completed, it’s time to add the fun, accent flower. This part of the pattern is completely optional, but I think it adds a nice little bit of whimsy to the outfit. You can get as creative as you would like with this accessory, but I opted to follow the pattern and just add an extra-large fabric covered button to the center.
You’ve got to start by cutting 8 petals. I used the accent fabric for the petals, but you could use whatever fabric you like……maybe even something less matchy and more bold…..it’s up to you.
Fold your petals in half, wrong sides together, and stitch down one side. I clipped some of the bulk off the very tip, so that they would be easier to turn right side out.
After you’ve sewn all eight petals, turn them right side out. Try using a sharper point (like a point-turner) to really get the corners nicely turned. Press with seams down the middle according to pattern instructions.
For the next step, I ran a gathering stitch across four petals at a time. I then pulled the bobbin thread to gather the petals. Once I had them gathered tight enough, I tied the ends of the threads together to hold them in place. I also opted not to top-stitch each petal just because I prefer this look.
Place four of your petals on top of the other four petals in an alternating position. Then run a stitch around in a circle to hold them in place.
Here is my flower before the addition of the button. Choose your button and add it to the center of the flower. I stitched the button onto the flower at the same time I sewed it to my top.
And there you have it – a fun, flower accessory. I love the idea of adding this flower to a headband or even adding a pin on the back. I think it would be really fun to make one of these for myself to pin to my purse or cardigan when Savannah’s wearing this outfit. A little bit of “mommy and me” never hurt anyone, right?
Tomorrow is day 5 of our sew along where we will be working on the capris/shorts. If you’ve reached your final destination of the sew along and were just doing the dress, don’t forget to add pictures of your completed sew along look to The Cottage Home Flickr Pool if you want to be considered for the contest and $50.00 gift certificate. And for the rest of you, see you tomorrow!



 Lindsay Wilkes is the owner and designer behind The Cottage Mama. She creates timeless, vintage inspired sewing patterns for children’s clothes. She is also a fabric designer for Riley Black Designers / Penny Rose Fabrics, author of the book ‘Sew Classic Clothes for Girls’ and can be seen teaching nationwide and online in her video series ‘Lessons with Lindsay’ sponsored by Baby Lock Sewing and Embroidery machines.


This was simple and fun – although I was kind of annoyed that the pattern included 4 patter pieces for this… one was totally adequate!
so far so good, im right here with you today. i had some time with my seam ripper yesterday. i too think 1 petal would have been ok, but i’ve noticed the pieces just arent labeled right or could use ‘cut 2’ ‘cut 4’ on them
This is coming out really nicely. My top looks so professional.
My question is whether it is possible to use only two buttons for the top–I know she specifically states you can only sew up the seam on the dress, but if the top is somewhat pull on then my “miss independents” will use it to dress themselves–if it buttons all of the way down, then they will wear it only when their moms help them pick it out. (I am sewing for granddaughters, so they are not here to check this out on). How does this appear on your daughter? Can she get her arms in if the bottom two buttons are closed? Thank-you. Am enjoying this very much.
I decided not to join you for the sew along but It is just so cute!!! If only my daughter needed more clothes. Maybe next time:) I love making childrens clothes but I am not very experienced at it so it is fun to read how someone else does it.
I love your flower! Thank you so much for sharing it. I will definitely have to try it on one of the dresses I make my daughter. I’m just starting to sew again. Thank you!
I finished my dress and flower today. I love this dress. It looks so good. Now I want to do the top and shorts or pants. Thank you! I’ll be posting to flicker in a bit.
The flower was more challenging than I expected. I chose to top stitch each petal as the instructions suggested. That was a pain, because the tip of the petal wouldn’t feed through my machine because the fabric was too thick even though I trimmed the corners. I made it work, but it wasn’t fun! 🙂