
Welcome to the Carina Gardner “Playdate Outfit” Sew Along! I’m so glad so many of you have decided to join in the sewing fun. And even if you’re not sewing the pattern along with the rest of us, you still might find some helpful hints and tricks when sewing with commercial printed patterns. So, let’s get started……….
The Tools:
Here are a few of the tools that I like to use when I’m sewing. I find they make life a little easier and they can help achieve that truly professional look to your sewn garment. I have quite a few tools in my sewing box, so I’m just going to share a few that I think will pertain to this particular pattern and garment so as to not overwhelm you.
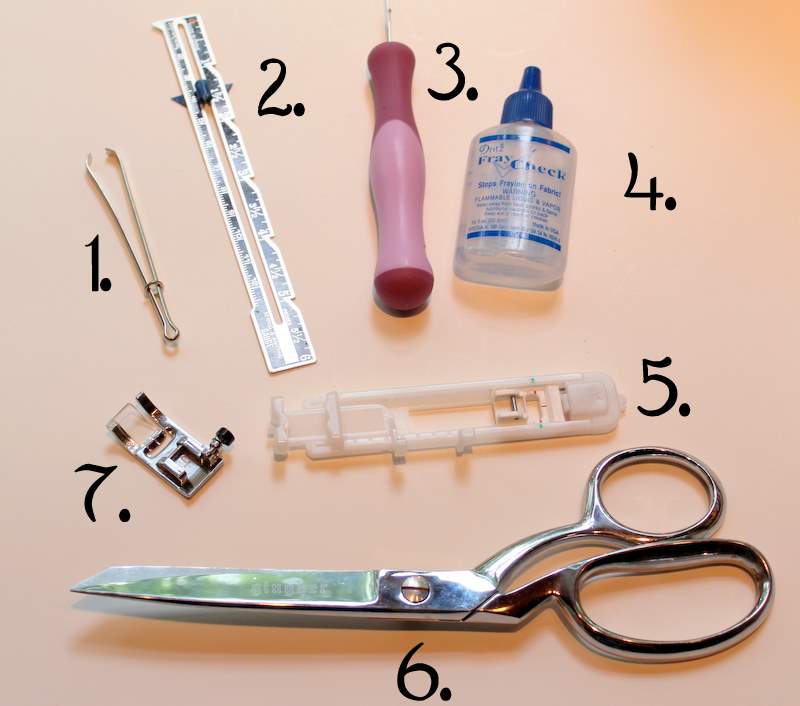
1. Bodkin – This tool is great for threading elastic. You can certainly use a safety pin, but this makes it even easier and it’s very inexpensive. It is found in the notions section of your sewing store.
2. Hem Gauge – The hem gauge is probably one of my favorite sewing tools. If you don’t have one, you MUST get one. This little guy helps you achieve perfect hemming lengths as well as helping with button placement and the centering of appliques.
3. Seam Ripper – I have a love/hate relationship with this tool. It’s definitely a must when you are sewing, but you don’t like to have to put it to much use. This is also what I use for cutting into my button-holes.
4. Fray Check – I use this a ton. This prevents fraying and washes really well. I use this on all of my button holes after they have been cut open as well as on the ends of ribbon and on the ends of all serged seams (which will not apply to you if you don’t have a serger).
5. Button-Hole Foot – If you have an older sewing machine, you may not have one of these. But if you have a newer model, your machine probably came with this foot. If you’ve never used it, get out that manual and give it a whirl. Basically, once you know how to use it, it does all the work in creating perfect button-holes. If your machine didn’t come with one, check online and see if there is one available – it’s well worth it!
6. Sewing Scissors – These are not your every day use scissors. These are your super-sharp, sewing-only scissors. Keep these scissors reserved for your sewing projects, that way they will continue to stay sharp.
7. J-Foot – This is my go-to sewing foot, the one I pretty much always have on my machine. I like being able to see through the bottom of the foot and it just works for me. Use whatever foot you are most comfortable with.
I also use a rotary cutter and mat for cutting my patterns, but that is something totally optional. If you are new to sewing, you may not want to invest in something like this yet so using pins and scissors to cut your patterns will work out just fine.

Iron, iron, iron. I can’t tell you how much time I spend ironing when I’m sewing a pattern. I probably spend just as much, if not more time ironing than I do actual sewing. You must have a good iron and a steam iron can be found at most stores (I got mine at Target). It doesn’t have to be expensive, but you must make sure it’s a good one. Check Consumer Reports or Good Housekeeping for some of their reviews – that’s how I found mine.

Another one of my favorite tools – spray starch. This gives your garment incredibly smooth lines and works great when sewing with cotton fabrics. I love pressing seams with starch and it truly gives a professional look.


Hand Sewing Kit: I got this plastic box at Office Depot during one of their back to school sales and I want to say it was only a penny (hard to believe anything is a penny these days). I keep my hand-sewing supplies in this box and it is so easy to grab when I need to sew on a button or something. All it has inside is neutral thread, a small pair of scissors and several different size hand-sewing needles, but the convenience of it is just great.

For the next several steps, I wanted to share with you the paper I use for tracing patterns. I use your basic Freezer Paper that can be found in most local grocery stores. This stuff is great. It’s thin enough to see through to trace your pattern, yet thick enough for your traced patterns to stand up to heavy duty use. I know many people use pattern tracing paper, but I just find this to be more durable.
Preserving and Tracing Commercial Patterns:
When I purchase a nice, commercial paper pattern, I very rarely will ever cut into the original copy. For $12-$16 per pattern, I want to make sure that I can use it multiple times and if I cut into one specific size then I am limiting the useful life of the pattern.
So how do I preserve my sewing patterns? By tracing each pattern piece in the desired size that I am sewing. I do this by using my large roll of freezer paper, pattern weights, a pencil and several rulers.

First, determine what size pattern works best for your child. Every pattern designer uses different grading standards. So a size 2 from one designer may be slightly different than a size 2 from another. It’s best to look at the grade rules (aka measurements) on each pattern when determining what size will be the perfect fit. If you are sewing for a friend or grand-child then you just may have to go with standard sizing.

Once you have determined what size pattern you are using, you will want to unfold your pattern and lay it out on a large flat surface. I layed my pattern out onto my rotary cutting mat because that was just the right size.

Next, roll out your freezer paper on top of the pattern piece you wish to trace.

I like to use my pattern weights to make sure my freezer paper doesn’t move when I’m tracing my pattern. These are just your basic washers that I had my husband pick up for me at Home Depot. Someday I’ll decorate them and make them look pretty, but for now they work just great!

When tracing the pattern, I like to use a ruler for my straight edges to achieve the perfect line. But if you have a steady hand, then you can certainly just trace everything by hand. Just make sure you trace very carefully because if your tracing is off, your cutting will be off and thus, your garment will not be quite right – it can definitely cause a huge domino effect.

Here is one piece of the pants pattern that I’ve traced onto my freezer paper. I’ve removed the original pattern from underneath so I can easily cut out the pattern piece with my rotary cutter.


After you have cut out your pattern piece, you’ll want to make sure you transfer all the markings and text from the original pattern. You especially want to note the grain line and any notch marks where you may need to line things up. I also like to include the size I’ve got on the traced piece so I can reference it if I decide to sew the same size again.
Determining Fabric Yardage:

Most commercial, printed patterns will provide the yardage calculations for you in the printed instructions. Use this to determine how much fabric is needed. Pay careful attention to whether or not a garment is lined or un-lined or whether or not there is contrast fabric used. This will all alter the total amount of yardage needed to complete the garment.
Pattern Cutting:

Before cutting any pattern pieces, pull out the instructions and look at the cutting layout. This will help you determine how your pattern pieces should be laid out on the fabric. It will also help you by making the most out of your fabric so you end up with the least amount of waste.
Make sure you pay attention to what pieces might be cut “on the fold” or “not on the fold”. When you cut “on the fold” this will make your finished fabric pattern piece double the size. The pieces needing to be cut on the fold are usually marked, but it’s always good to double check your cutting layout.
**I did notice what I think might be a slight mis-print in the pattern or it could have just been unique to my copy. There were two pattern pieces labeled “Waistband Front”, but if you compare them to the cutting layout, you will realize that pattern piece “H” is actually “Waistband Back”. Again, this is another place where the cutting layout comes in handy.**

Once you have traced all your pattern pieces, it’s time to cut out your pattern. Use pattern weights or pins to hold your pattern in place.

Remember how I said it was important to pay attention to the grain-line? Well, this is where you need to know what direction that is going in or you could end up cutting your pattern in the wrong direction. Generally, the grain-line you are going to want to follow runs parallel to the selvage of the fabric. The selvage is the outermost edge of the fabric. In the picture above, it is the cream colored line running along the printed edge of the fabric.

For the playdate outfit, I traced the pants pattern pieces at the full length, but because I wanted to use the cuff piece, I folded the bottom up to the dotted line in order to achieve the shorter length.

I always cut my patterns out with my rotary cutter because that’s what works for me. But like I said before, if you prefer to pin your pattern pieces and cut them out with scissors, go for it!

I like to mark my back pattern pieces with a safety pin. This is just what works for me. You could also use a water-soluble fabric marking pen and make an little “X”. I just find the safety pins easy to see so I know what piece is what – the front and back of pants can be a little confusing.

Once you have traced and cut all of your pattern pieces, you will need to store them. I like to store a lot of my patterns in large zip-lock bags. I place the pieces folded 2-3 times with the pattern cover and instructions all together.

Then I punch a hole in the top of the bag and slide them onto hangers. I find I can get 3-4 patterns per hanger (depending on how many sizes I’ve traced). Then these can be hung on a garment rack or in a closet for later use.

When I am designing my own patterns and need to be very careful about folds in the patterns, these pattern hooks come in handy. You can punch a hole in each pattern piece, slide them onto the hook and hand them up without ever having to put a single fold in the pattern. These can be purchased online from various design supply companies.
Ok, so now we’ve finally gotten started – woohoo!
The goals for today are the following:
1. Gather your tools.
2. Trace your pattern in the size you will be making.
3. Determine the amount of fabric you need for your garment.
4. Cut out your pattern.
5. Press all the fabric pattern pieces after cutting to get ready for sewing tomorrow!
I can’t emphasize enough how important cutting is when it comes to using patterns. If you don’t cut properly, I can almost guarantee your garment is not going to turn out just the way you wanted. The fit will be off, seams won’t line up. So it’s important to go slowly and take the time to really do each step correctly. Trust me, if you are going to spend a week sewing a garment, you are going to want it to turn out just right!!
Generally I like to respond to your comments via email, but since we are all sewing along together, I will be responding to everyone in the comments section so we can all see the responses. Feel free to ask any questions, give any tips and tricks you might have, or simply just talk about what you’ve learned. Anything goes……….


 Lindsay Wilkes is the owner and designer behind The Cottage Mama. She creates timeless, vintage inspired sewing patterns for children’s clothes. She is also a fabric designer for Riley Black Designers / Penny Rose Fabrics, author of the book ‘Sew Classic Clothes for Girls’ and can be seen teaching nationwide and online in her video series ‘Lessons with Lindsay’ sponsored by Baby Lock Sewing and Embroidery machines.


Glad you noted the error in the pattern. I need to check mine and see if it’s the same. I got the cutting done over the weekend so I’m all ready for tomorrow. Thanks for the pattern hanger suggestion. Great way to store. When you get a chance can you show a picture of a pressed pattern hanging from the other metal and rope hanger. Thanks and can’t wait for tomorrow!
Have a SEW easy day,
Emilee
WOW! I am not currently participating, but that is because I have no idea how to sew from a pattern. I didn’t realize you would be going into such depth, I hope our local shop carries this pattern (otherwise I will just be way late on the sewalong). Those better versed in sewing may not appreciate this as much, but THANK YOU soooo much for putting so much detail into this post (I hope the rest are just as detailed).
I’ve never thought to use my fray check for served seams! Good idea!
I LOVE how in depth you are going with the sew-along!!! I am so sad that I read this sooooooo late to join in… I will have to join Katie in being one of the ones to sew the outfit “after the fact”, lol! Hopefully you will have another sew along soon!!!!! Natalie
Do I need to wash my fabric before cutting it?
Cathy, if you are using high quality quilting cotton then, no, you do not need to wash it. If you are using a more inexpensive product, I would wash it for two reasons – you will probably have more shrinkage and you might have some dye bleeding. Throw in a “color catcher” with your was and that should catch any bleeding.
I’m also going to be joining after the fact as I have several other projects to wrap up, but I think this will be my daughter’s 2nd birthday dress/outfit! It’s so cute! I’m looking forward to seeing how you use the hem gauge as I do not have one/haven’t ever used one but think it looks promising!
ON Day 1, I managed to buy the freezer paper and wash & dry my fabric. Guess I better pick up the pace!!
Thanks for all the great tips about your tools. Also, I’m looking forward to seeing the serger in action, because I don’t have one and I’d like to see the difference it makes.
I’m running a little behind, too. It took a lot longer than usual to get the kids to bed last night. All that I managed to get done yesterday was to wash and iron my fabric and trace and cut out the pattern.
Thanks for running this sew-along. I’ve been wanting to get my sewing mojo back, and this is the perfect motivation.
I’m not making this outfit but am glad that you are doing such in-depth step by step instructions for the newbies out there!
I love the hand sewing kit idea…and the neutral thread keeps you from having to search for the “just right” thread color!
Thanks for your tips…there’s always something new that can be taught to even us “oldies” 😉
I am new to sewing and I want to thank you for your clear and very very helpful tips on the basic tools for sewing and pattern tracing!! I will be back to learn more.
I love your ideas. I am going to get some large ziplocks and try that pattern organization method.
Thanks for sharing!
Hello,
I am new to the blog! I am wondering if you have some good fabric storage ideas? I am setting up a small business in my home and need any advice I can get for storage of my fabric so it is easily viewed.
j’aime votre travail et vos explications mon anglais est approximatif je prend le temps
de lire pour comprendre surtout certains details mais suis trés heureuse de participer
avec ce groupe et votre livre que j’ai acheté
cordialement